This guide explains how to use the RFPs & Bookings module, which brings together the previous Enquiries, Event Bookings, Accommodation Bookings, and Supplier Bookings workflows into one place. The RFP stage is used to create and send the initial brief to venues, while the booking stage is used to manage options, proposals, confirmations, amendments, and cancellations.
TABLE OF CONTENTS
- 1. Find an existing RFP or booking
- 3. Add rooms and bedroom requirements
- 4. Add venues or suppliers
- GRATIS Search V3: how it works, what changed, and what to expect
- 5. Complete option details and room or delegate questions
- 6. Build the charges table
- 7. Contact venues
- 8. Review venue responses
- 9. Using the Actions button
- 10. Work with booking options
- 11. Confirm, amend, cancel, or lose the record
1. Find an existing RFP or booking
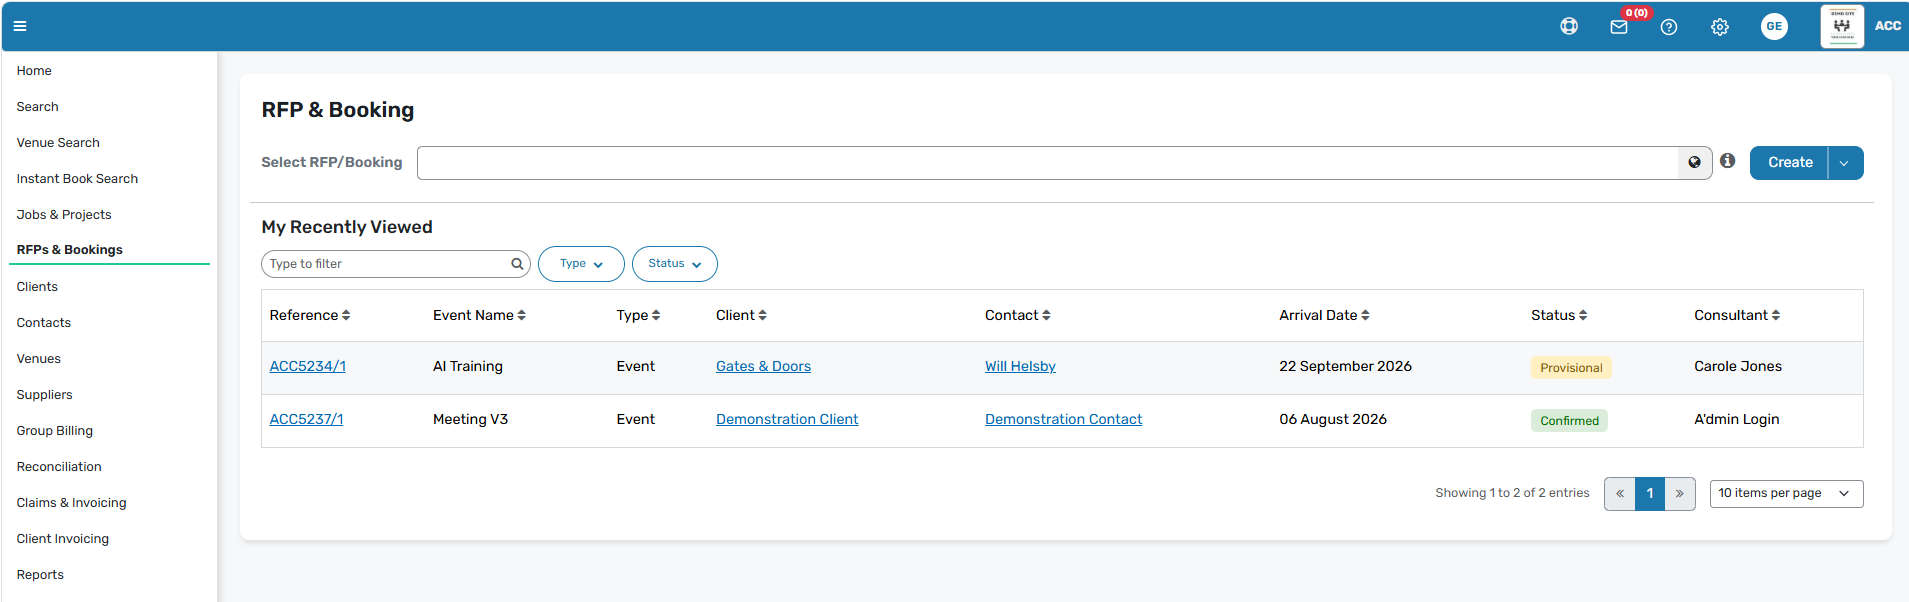
When you open the RFPs & Bookings module, use the "Select RFP/Booking" bar at the top of the screen to find existing RFPs and bookings.
The My Recently Viewed section shows the records you accessed most recently, making it easier to return to current work.
You can refine the list by entering search criteria and selecting the relevant record type and status. You can also sort the results by clicking the arrows in the column headings.
2. Create a new RFP or booking
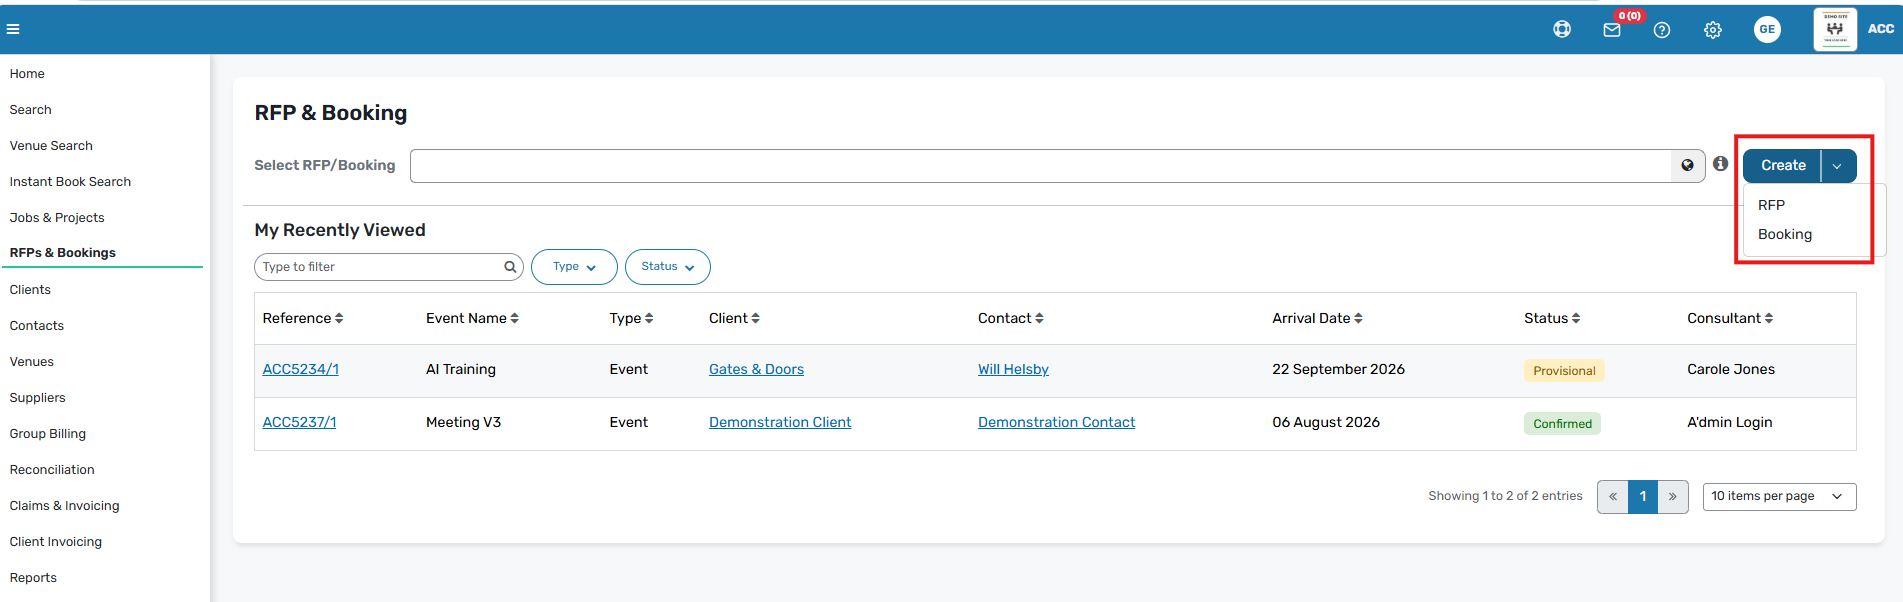
To create a new record, click Create on the right-hand side of the screen and select either RFP or Booking.
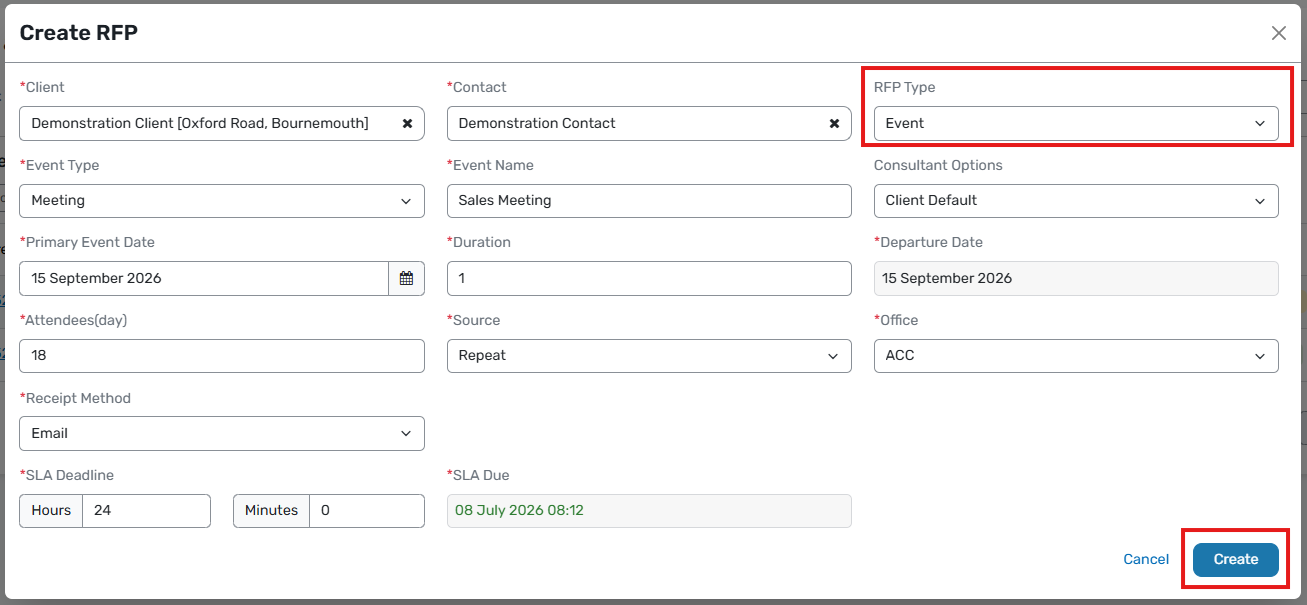
In the pop-up window, complete the relevant fields, including the type of RFP/Booking you are creating. The system defaults the type to Conference, so make sure you change it if you are creating an accommodation or supplier record.
After you complete all mandatory fields, click Create. The details you entered will then appear in the collapsed General section at the top of the page.
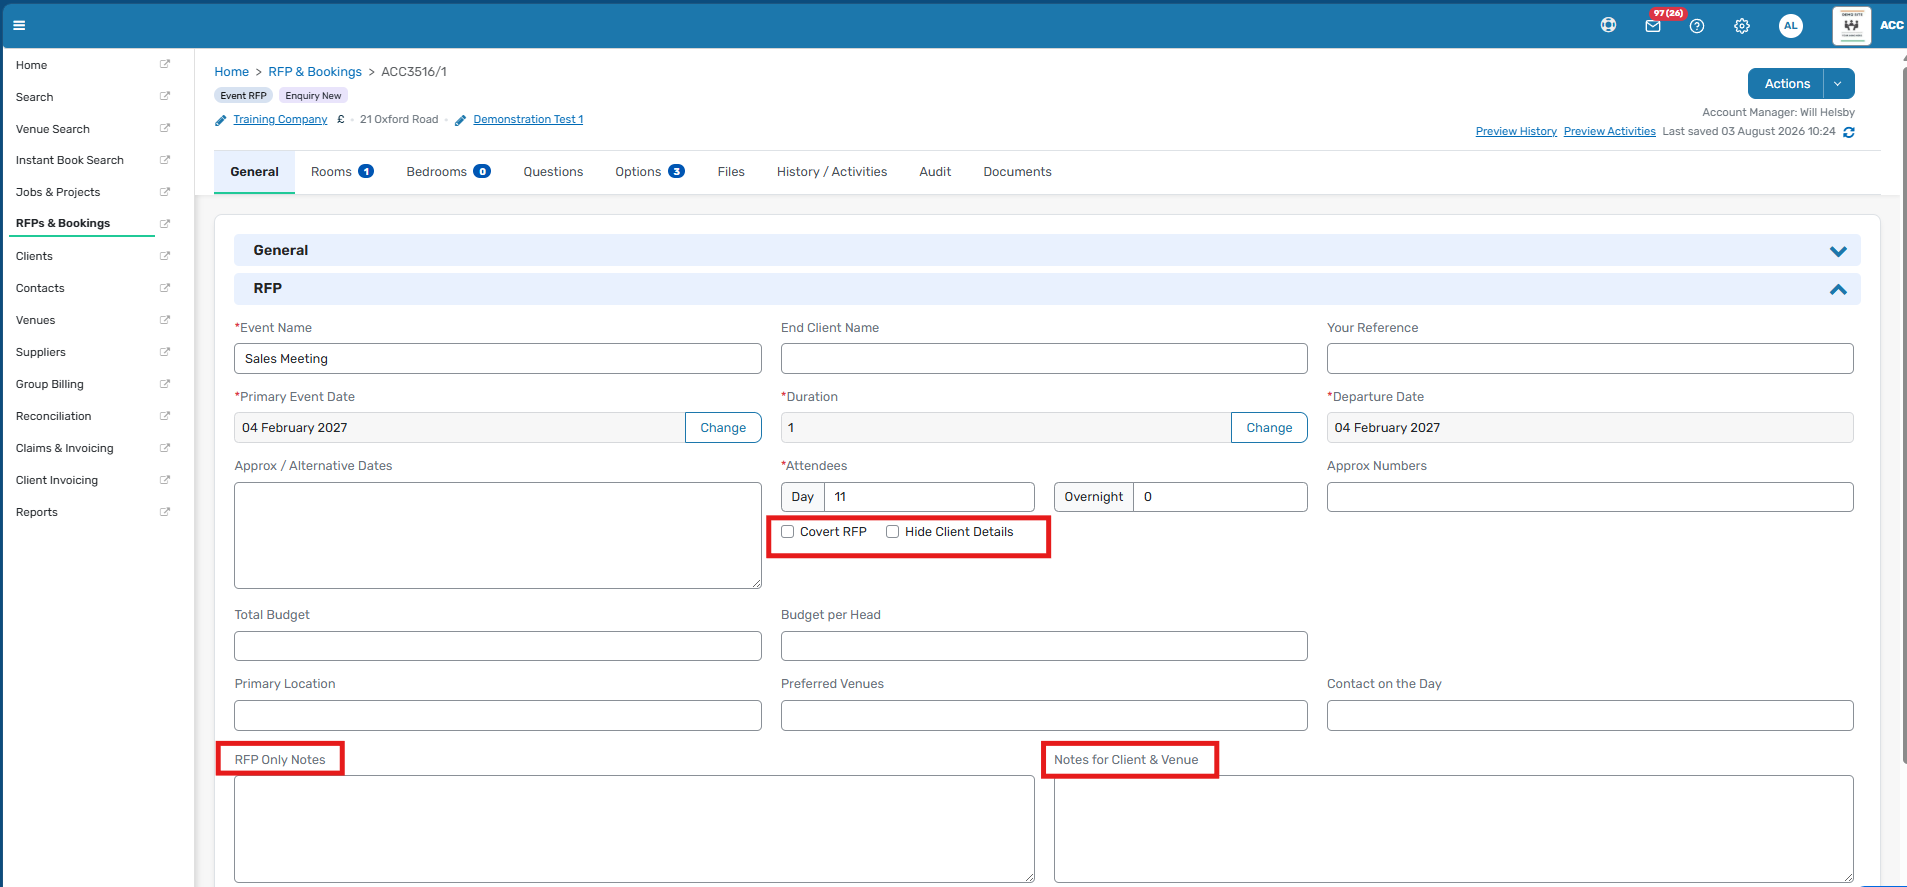
Enter the core event details, including source, event name, dates, attendee numbers, and any notes needed for the client and the venue or supplier into the RFP section.
Notes can auto-populate from the Agent tab in the client profile, which is useful for recurring requirements.
If needed, use the privacy settings, 'hide client details' or 'covert RFP', to hide or suppress client details on venue-facing or supplier-facing documents.
The system will save your inputs as you progress.
3. Add rooms and bedroom requirements
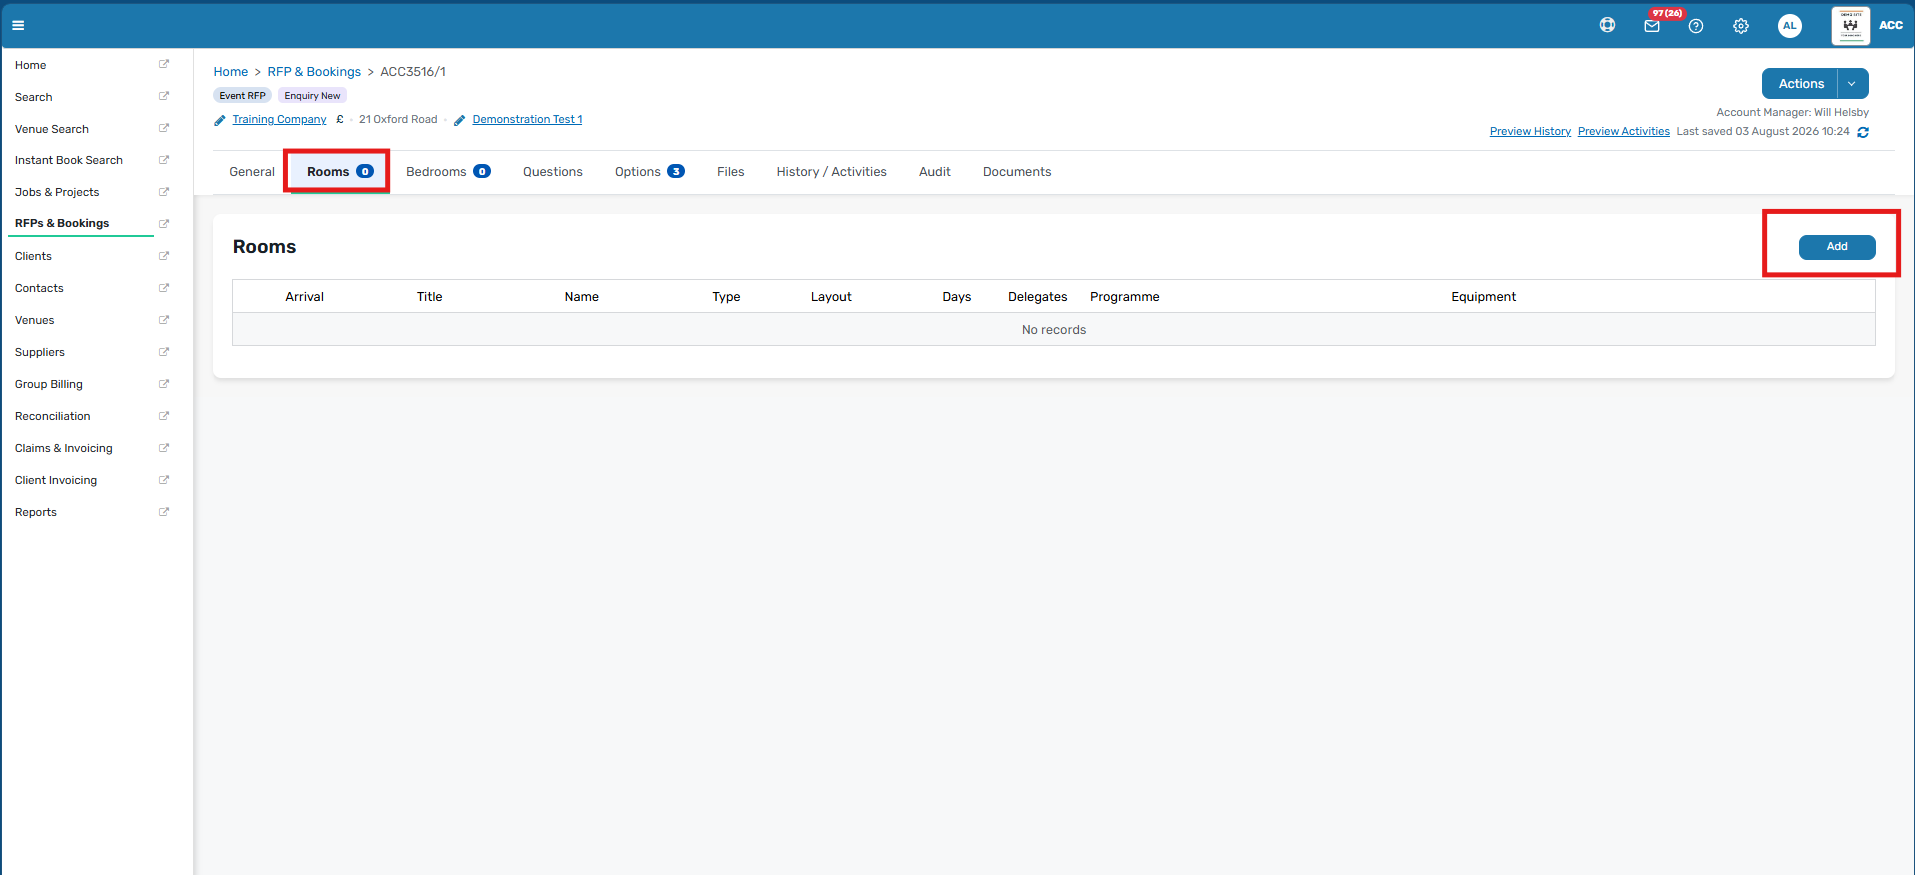
If the record includes meeting space, go to the Rooms tab and click Add.
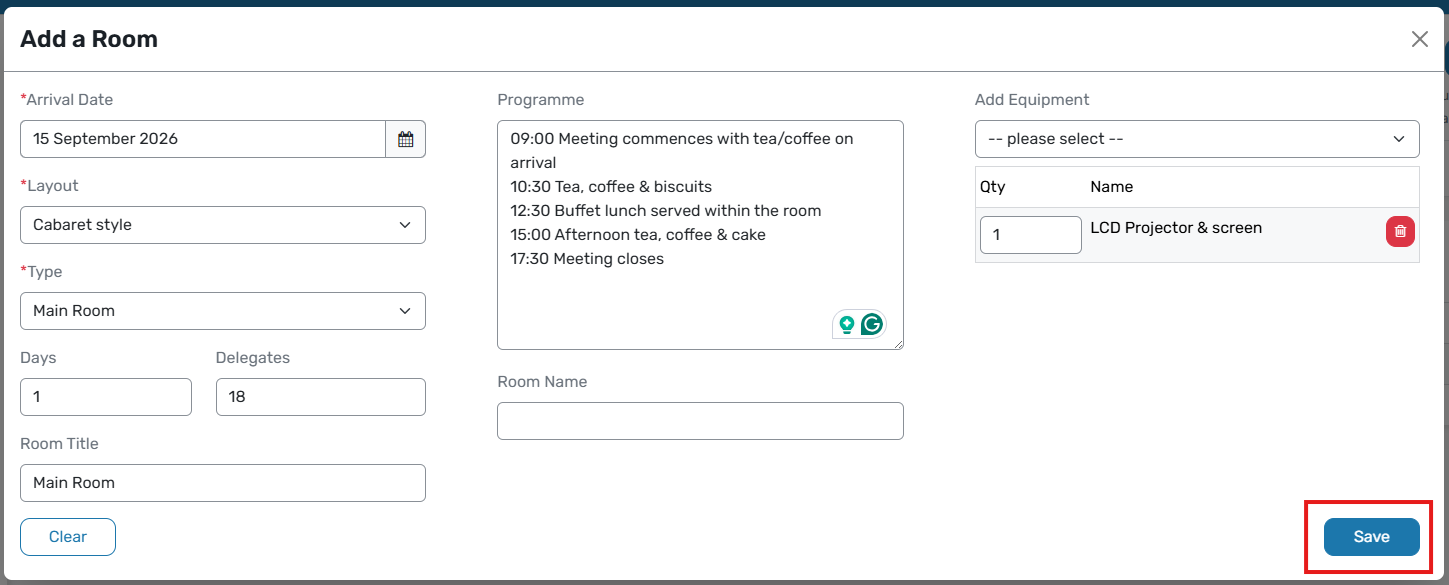
Enter the room layout, timings, equipment and any other room-specific requirements, then click Save to add the room to the record.
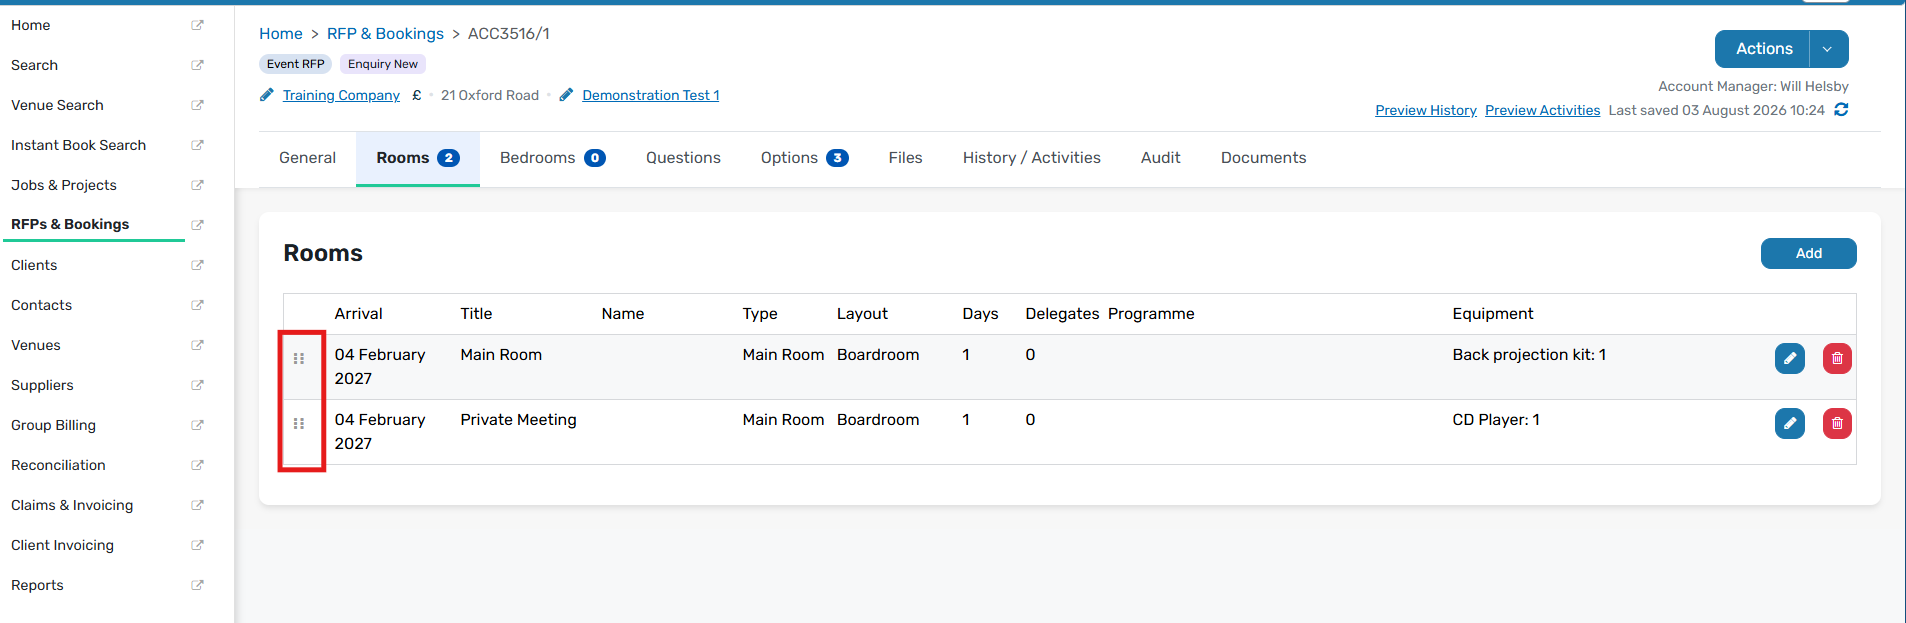
If you need to change the order of rooms, drag and drop them using the six-dot icon. 
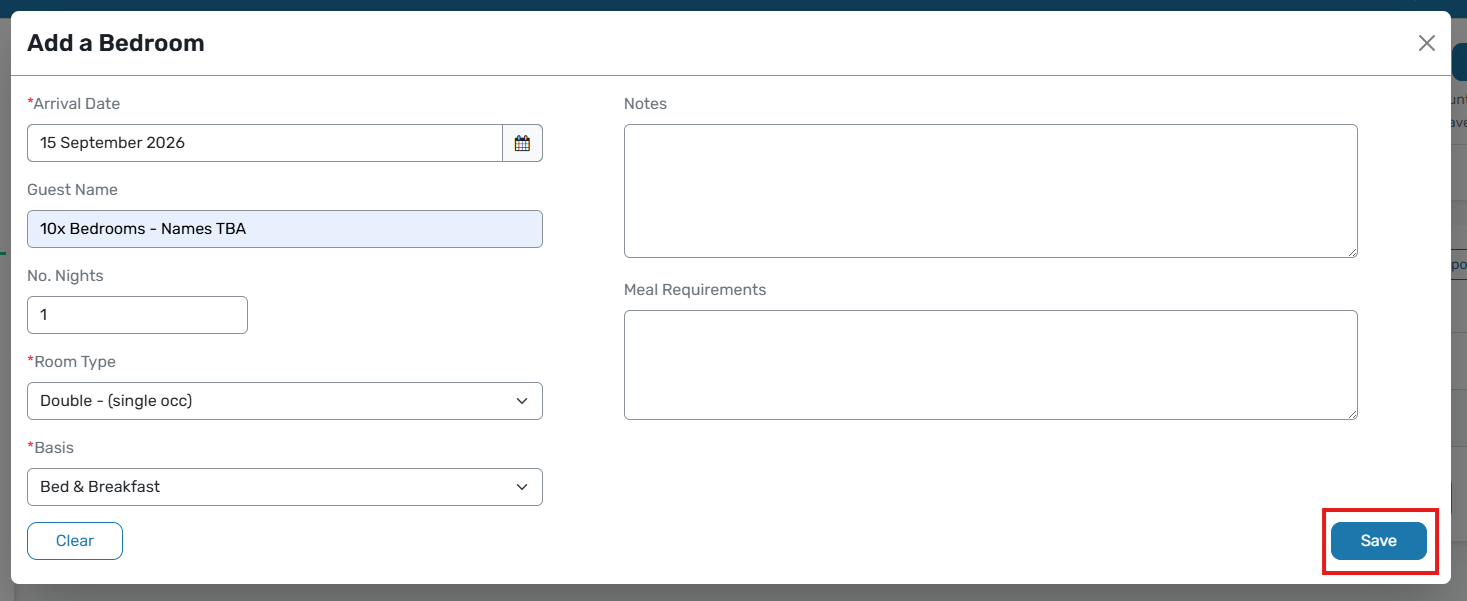
If the booking includes accommodation, use the Bedrooms tab to build the guest list.
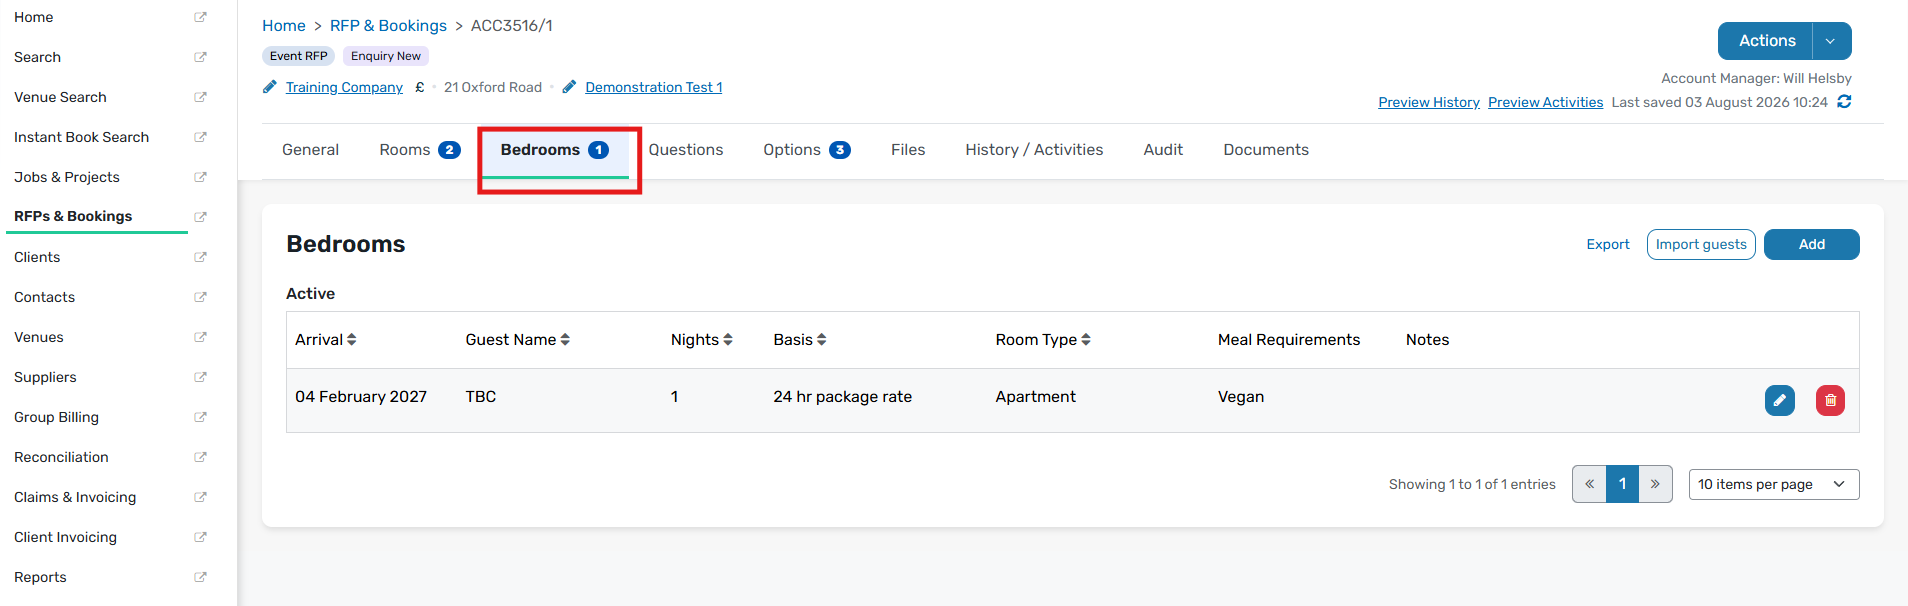
You can record arrival dates, room types, accessibility requirements, notes, and dietary requirements. If names are not yet known, use placeholders such as “10 x Rooms – names to be advised”.
You can also import a guest list by following this guide
3.1 RFP Questions section
To configure and utilise the questions section, please read this additional guide
4. Add venues or suppliers
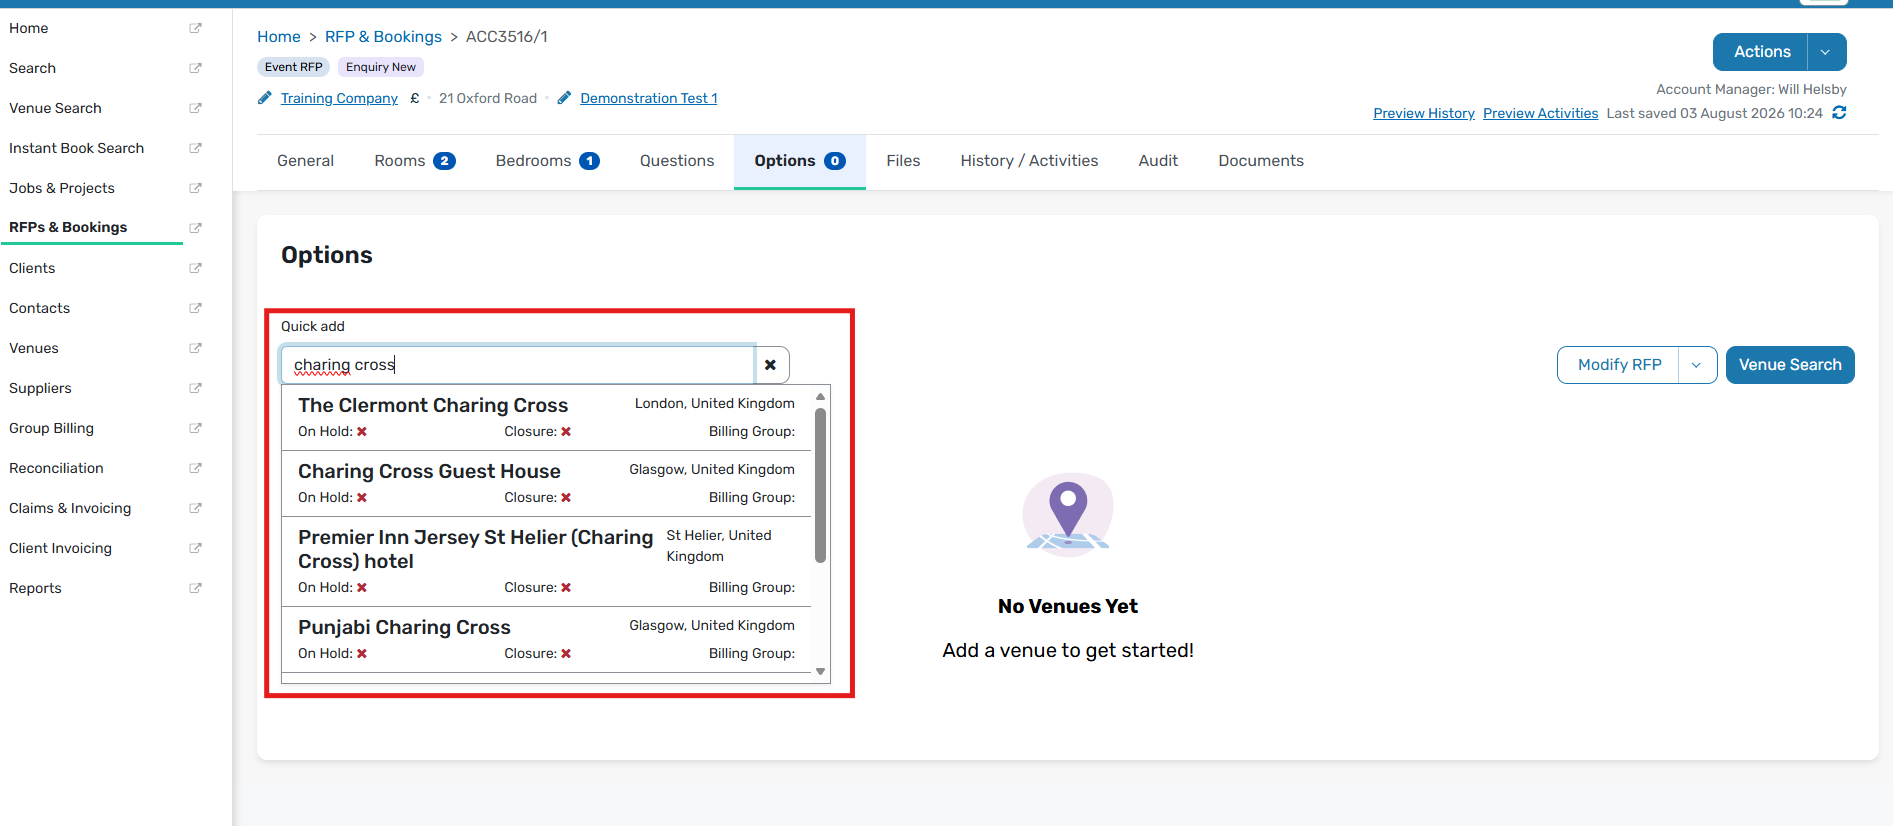
Add venues or suppliers from the Options tab.
Search more directly when you already know the venue
Quick Add is being updated to provide better autocomplete suggestions when a planner enters a venue name.
This is intended to make direct venue-name searching faster and more intuitive.
GRATIS Search V3: how it works, what changed, and what to expect
GRATIS Search V3 is a redesigned venue search experience built to make sourcing faster, clearer, and easier to manage from a single workspace.
Availability may vary by account as rollout continues.
What GRATIS Search V3 is
Search V3 introduces a wider results experience, updated search controls, stronger filtering, and a more integrated map-based workflow for venue sourcing.
At a high level, the goal is to help planners search for venues, compare options, shortlist the right choices, and move more efficiently into the RFP process.
In Venue Search, you can search by location, landmark, destination, postcode, motorway or motorway junction to find venues in the right area.
You can start with the place or reference point you know best, then narrow the results using distance, capacity, facilities and other filters. Venue Search also supports broader transport-based searching, so it can be useful when you are sourcing around stations, airports or other key travel points rather than searching by venue name alone.
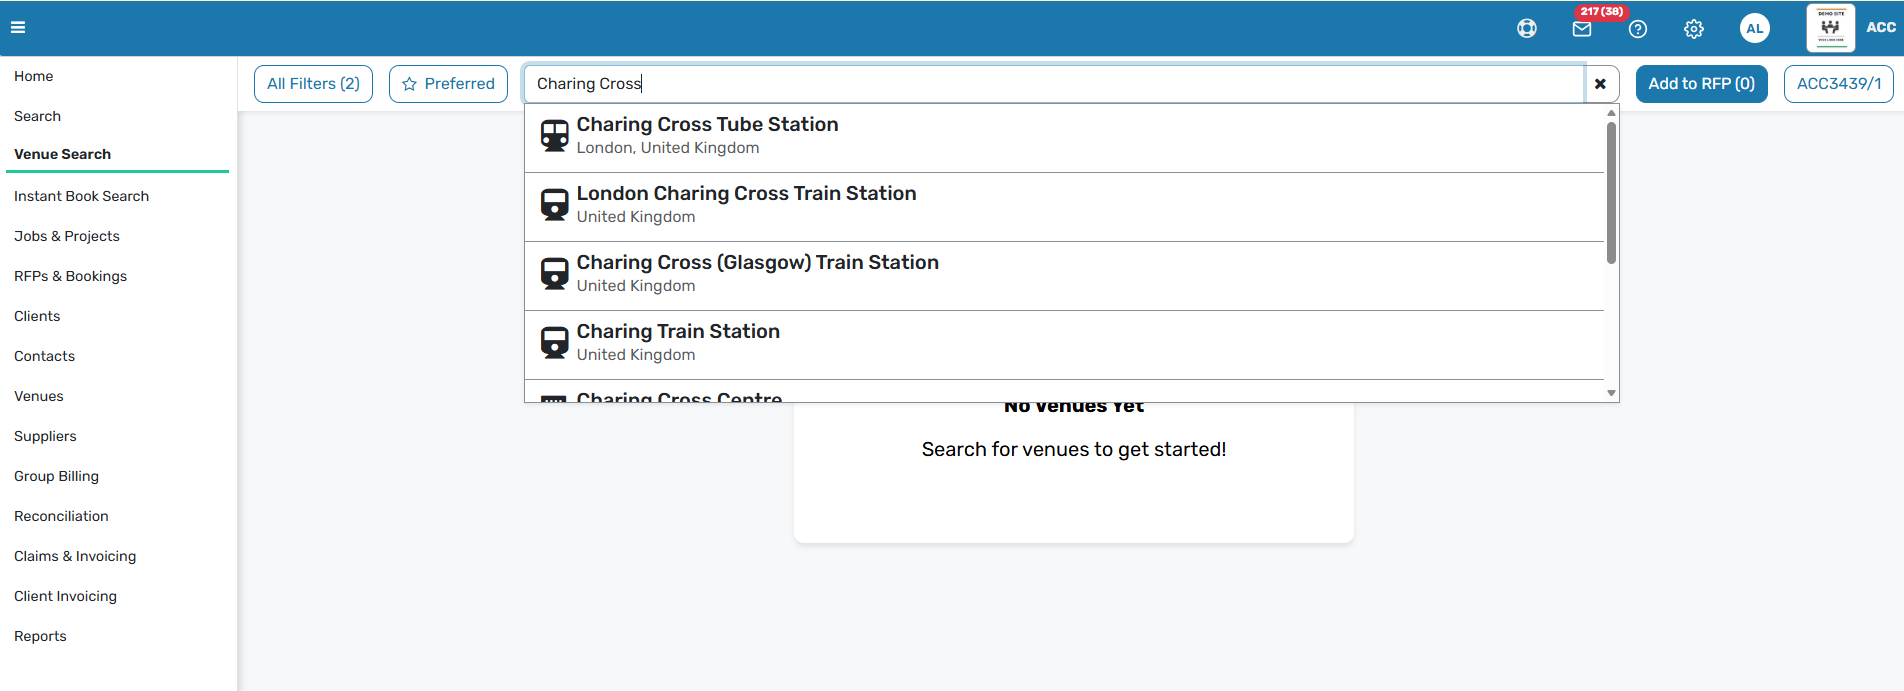
Search V3 is centred around the main details planners use most often, including destination, dates, attendee count, and bed count.
These key search details are designed to stay visible as you move through results, so it is easier to keep track of your criteria while browsing.
Review venues in a wider results view
The search results page is designed as a full-width experience with more room for results, filters, and map interaction.
Promoted venues continue to stand out clearly within the results.
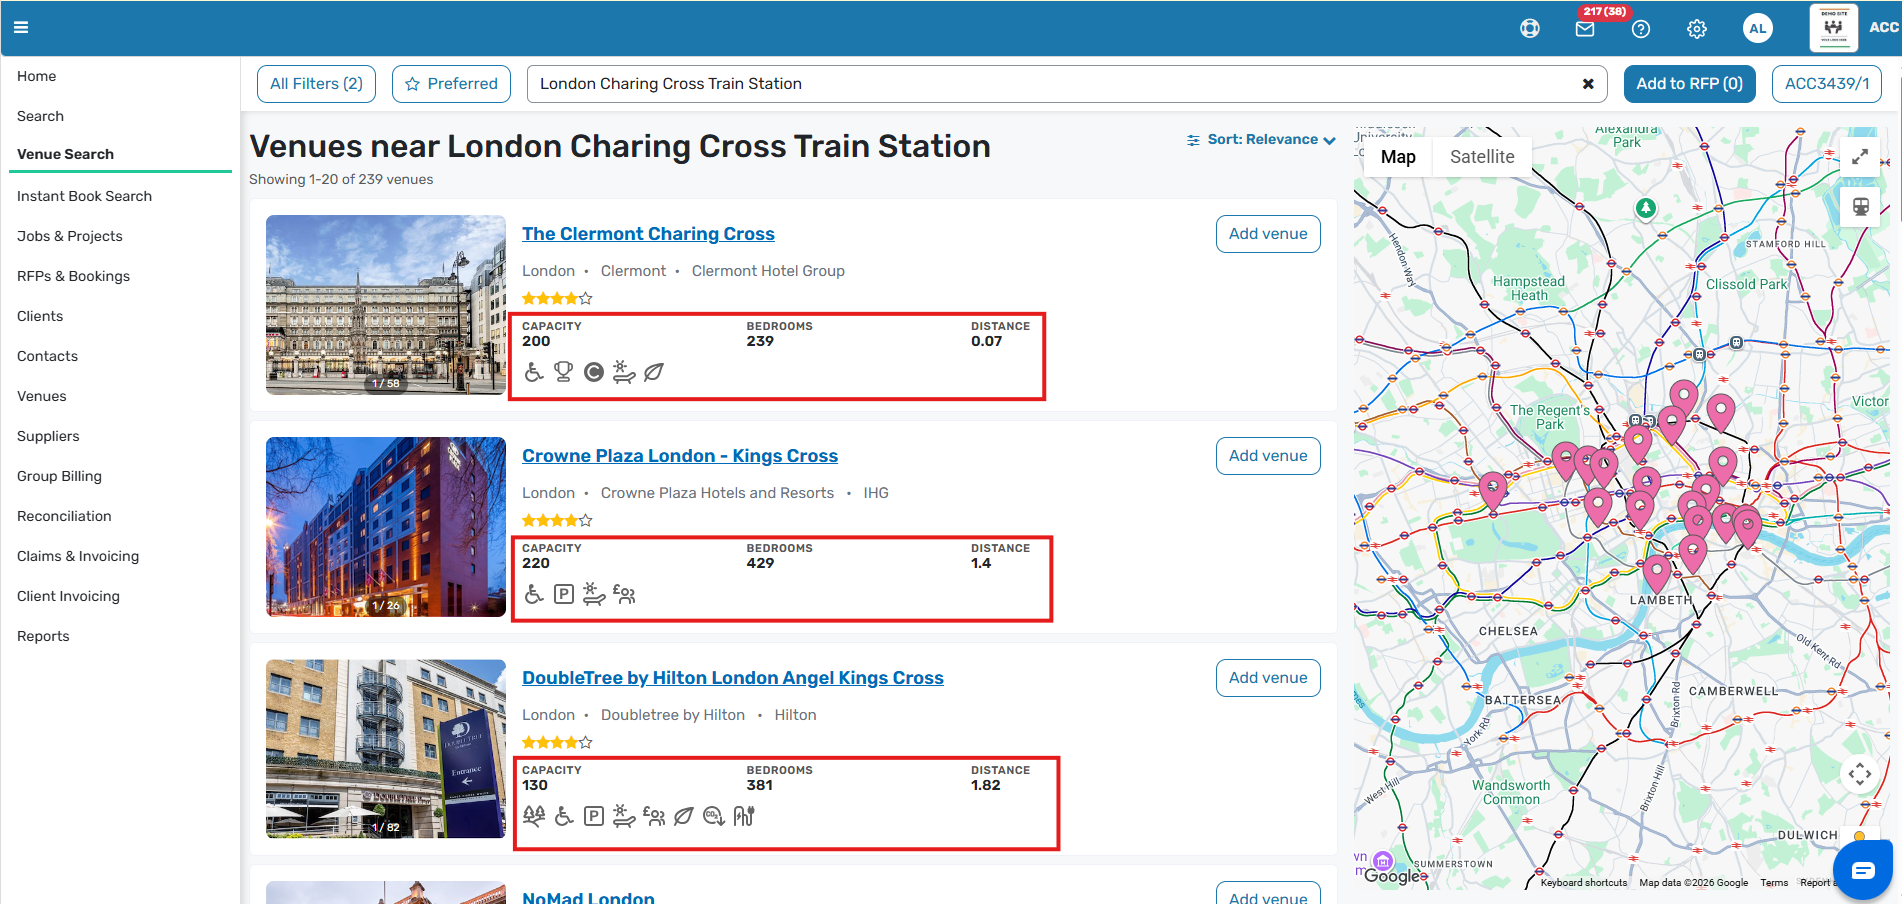
Use map-based search alongside the list view
A major part of Search V3 is the ability to use the map alongside venue results rather than treating map search as a separate step.
The map experience is designed to support multiple viewing sizes, giving planners more flexibility in how they review locations and results together.
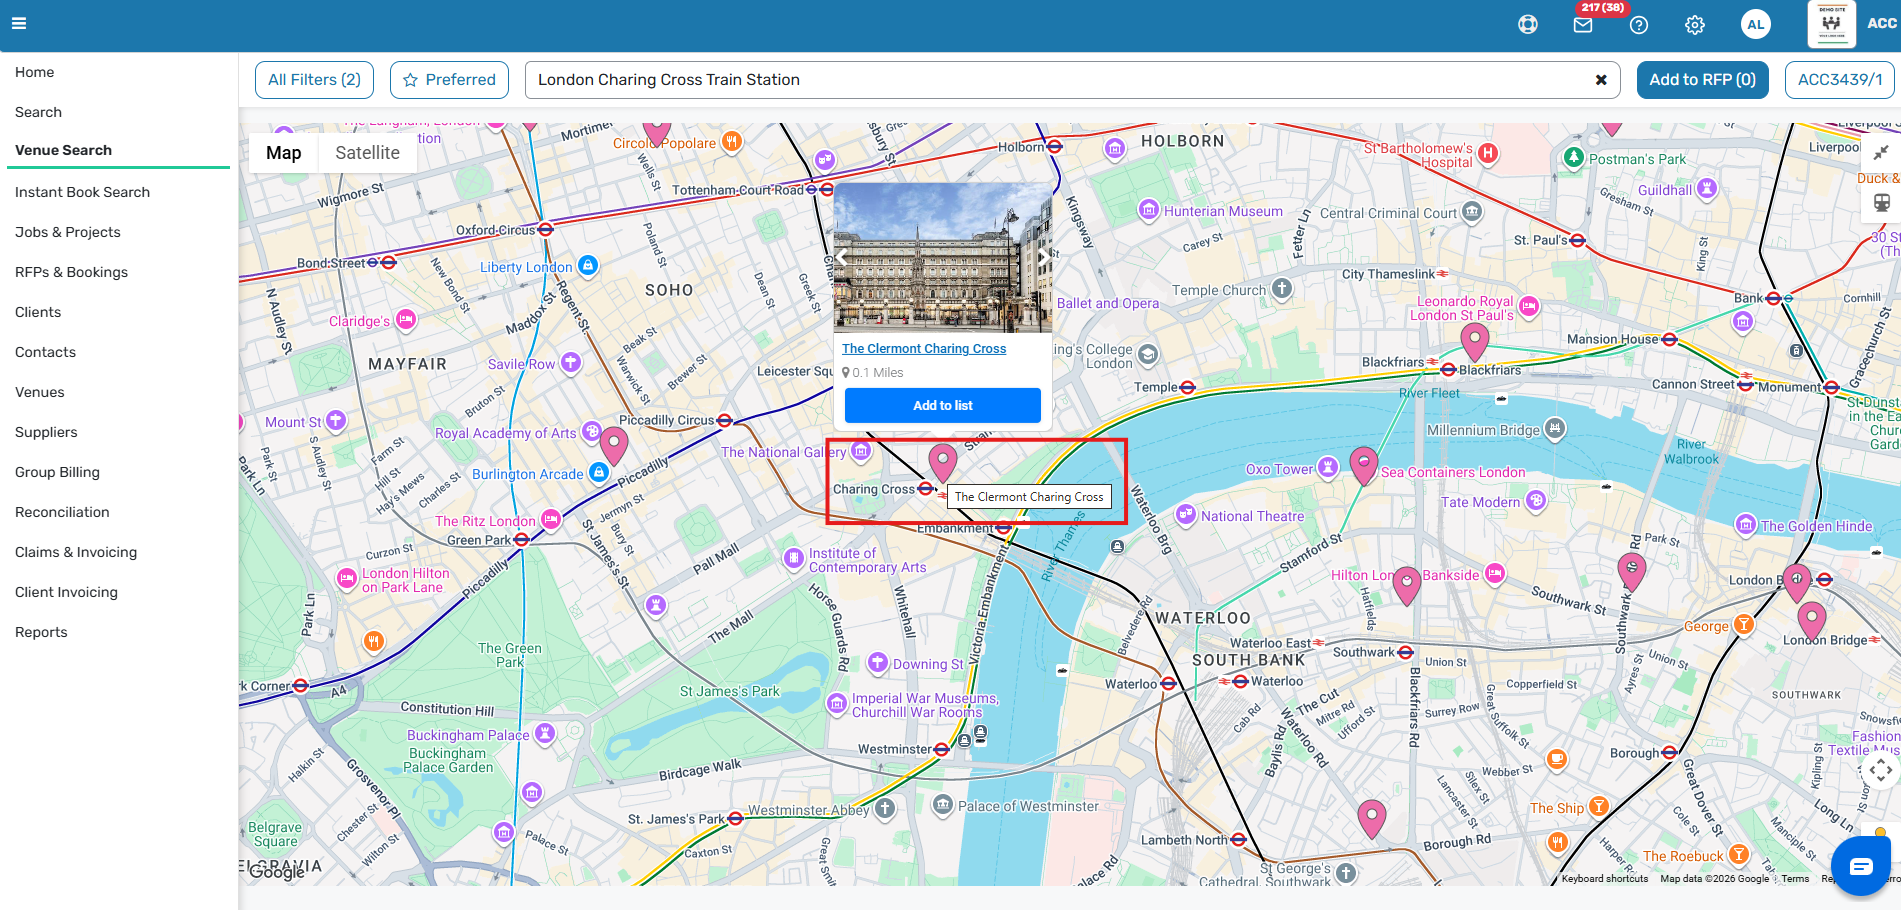
Move from search to shortlist and RFP
Search V3 is designed to support sourcing actions directly from the results experience, including adding venues to a shortlist and moving forward to create an RFP or add venues to an existing one.
Add venues to your list using Add to list or Add Venue
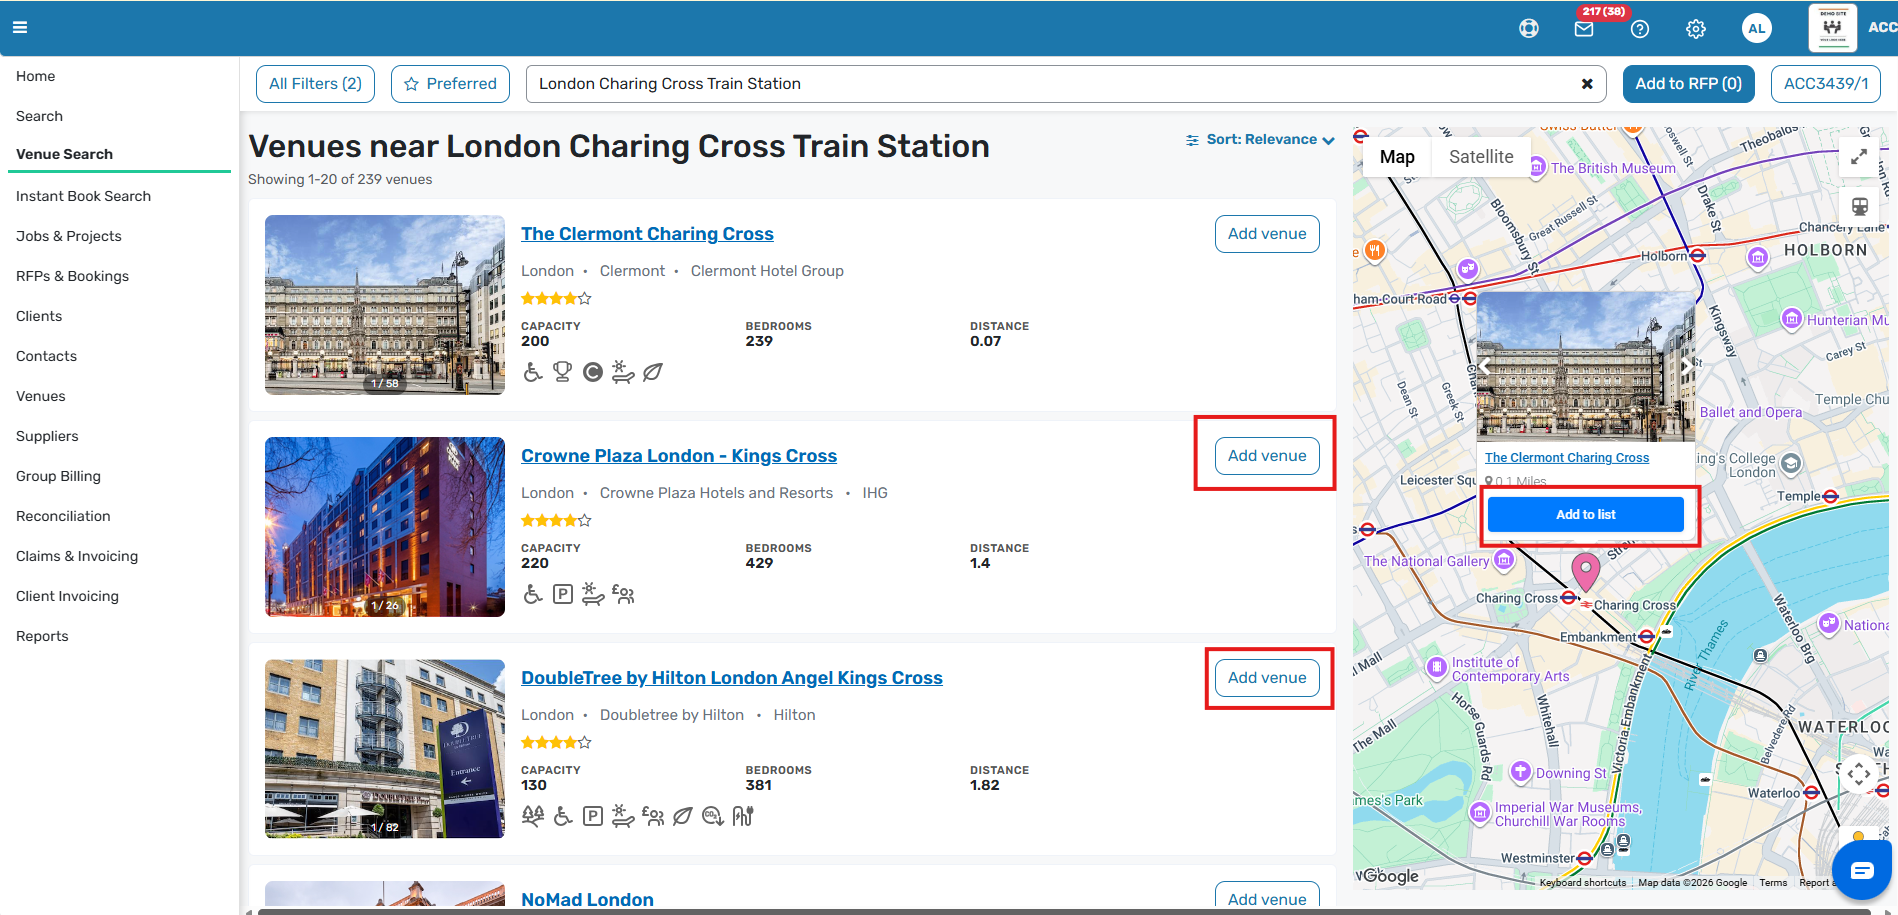
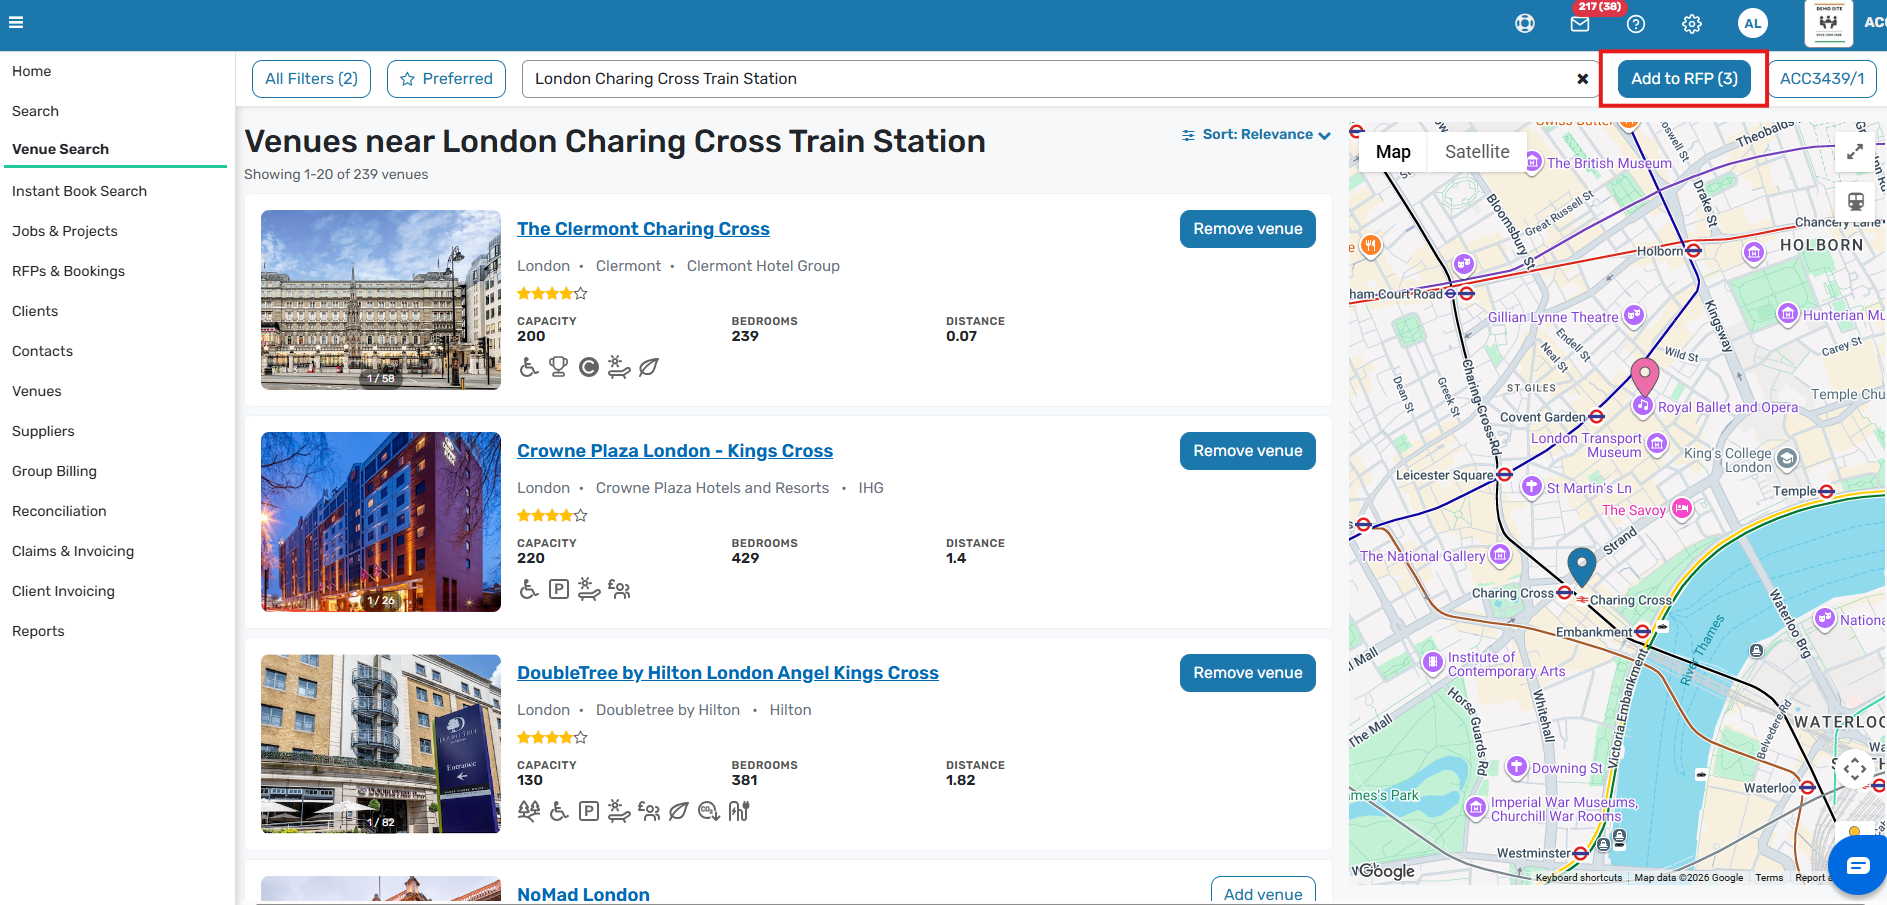
- You can add multiple venues to the same RFP, up to a maximum of 30.
- When you are ready, click Add to RFP at the top right-hand side of the page.
A pop-up will show the venues you are adding, and you can remove any before confirming.
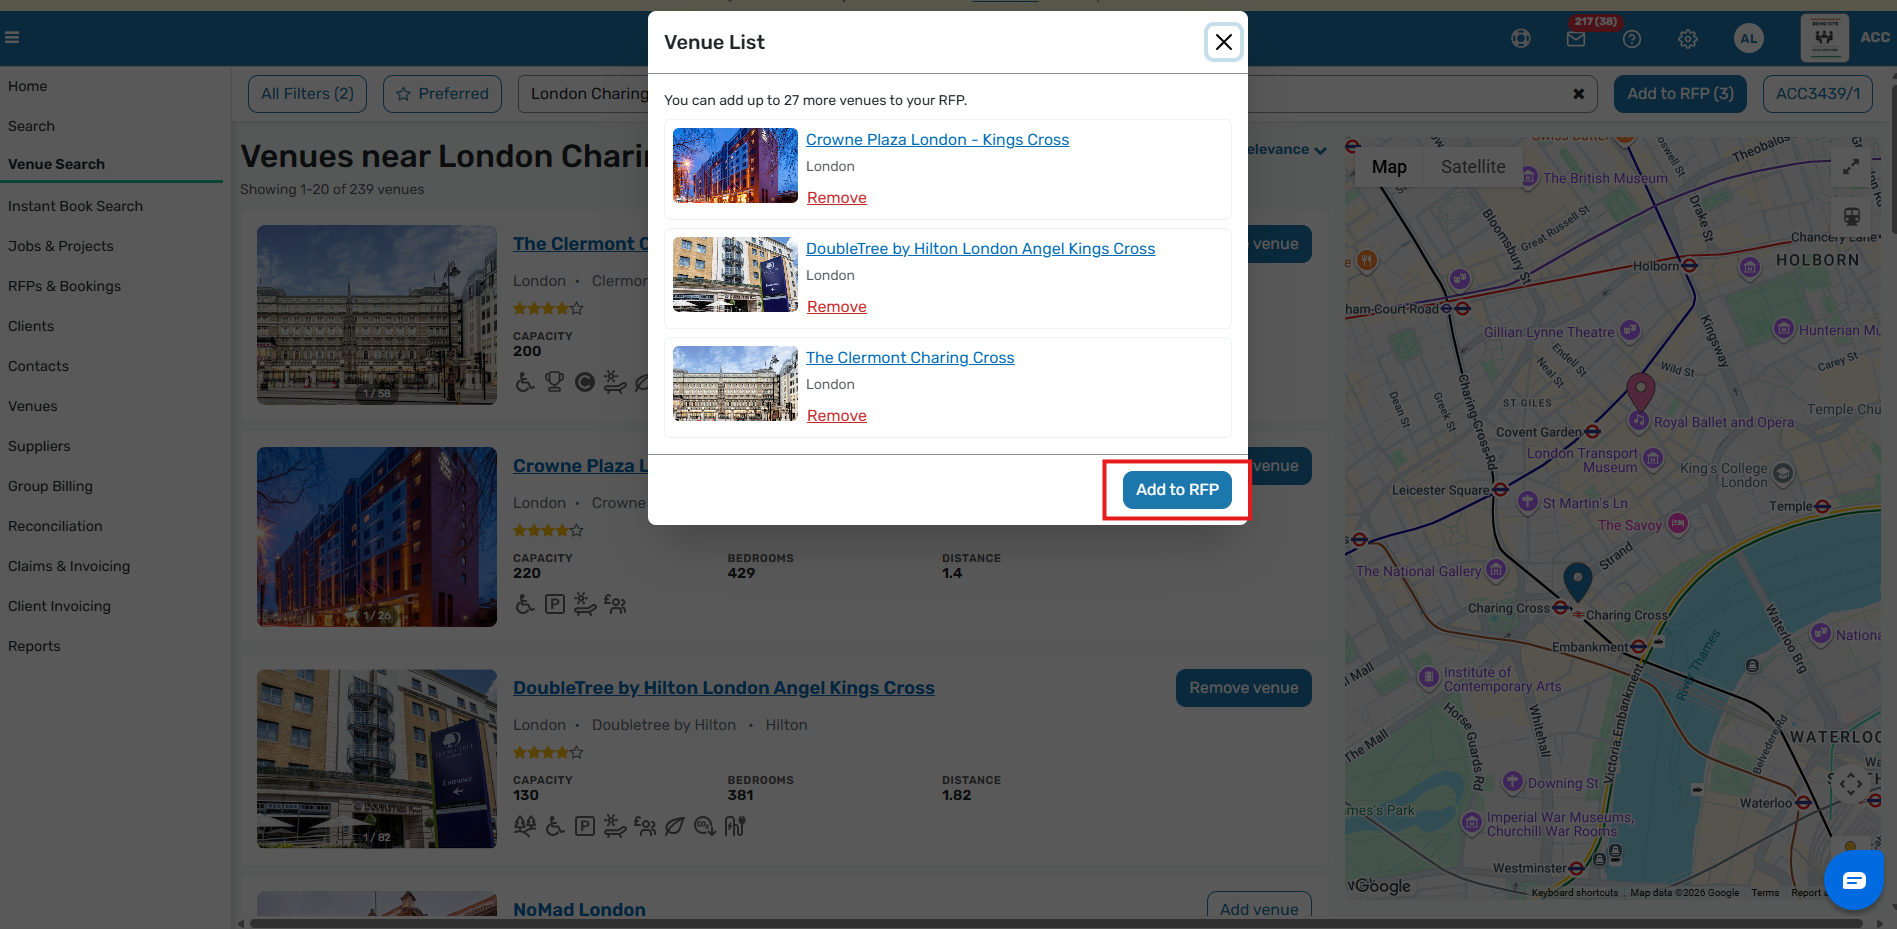
After the venues are added, you will return to the RFP so you can complete the venue details and charges before sending it out.
What changed from the previous experience
The main improvements customers should notice are:
- A wider, more modern search layout.
- Better visibility of the most important search criteria while browsing.
- Improved filtering, including a dedicated Preferred venues filter.
- A stronger map-based search experience integrated with the results page.
- Improved autocomplete for direct venue-name searches.
- A smoother path from reviewing results to shortlisting venues and creating RFPs.
What to expect
For planners moving to Search V3, the day-to-day experience should feel more streamlined and more interactive than the previous version.
You can expect a search experience that is designed to help you:
- enter and keep track of core search criteria more easily,
- refine venue options more efficiently with filters,
- use both list and map views as part of the same workflow,
- and move more quickly from venue discovery to shortlist and RFP actions.
For some searches, especially location-led workflows, the enhanced map experience may play a bigger role in how planners explore results.
5. Complete option details and room or delegate questions
To work on an individual venue, click the binocular icon.
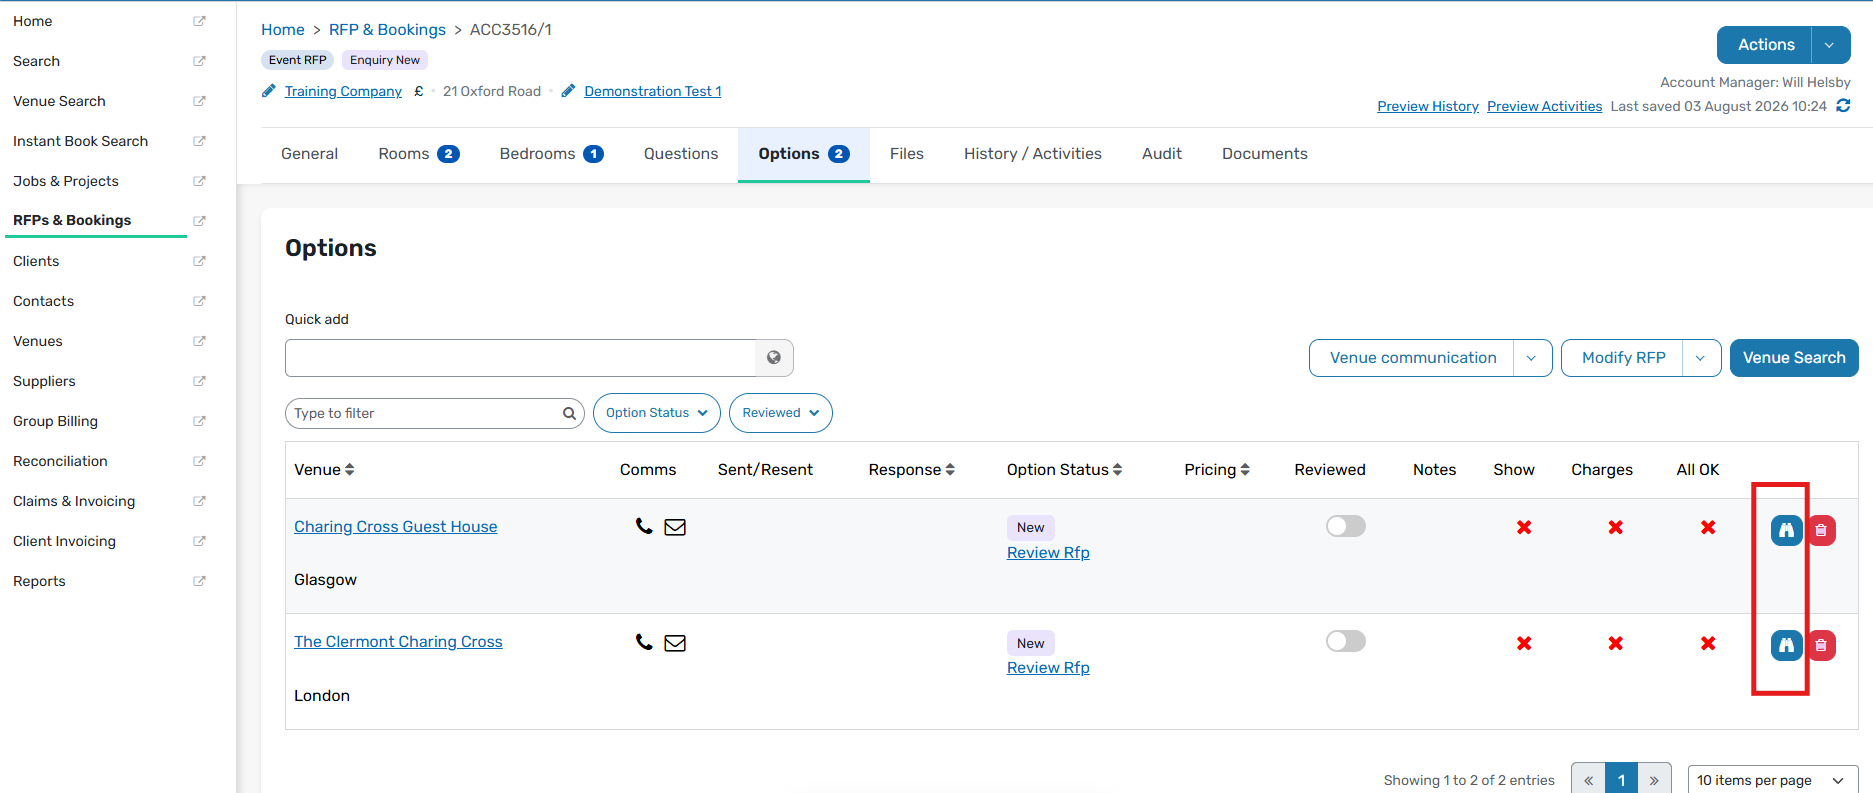
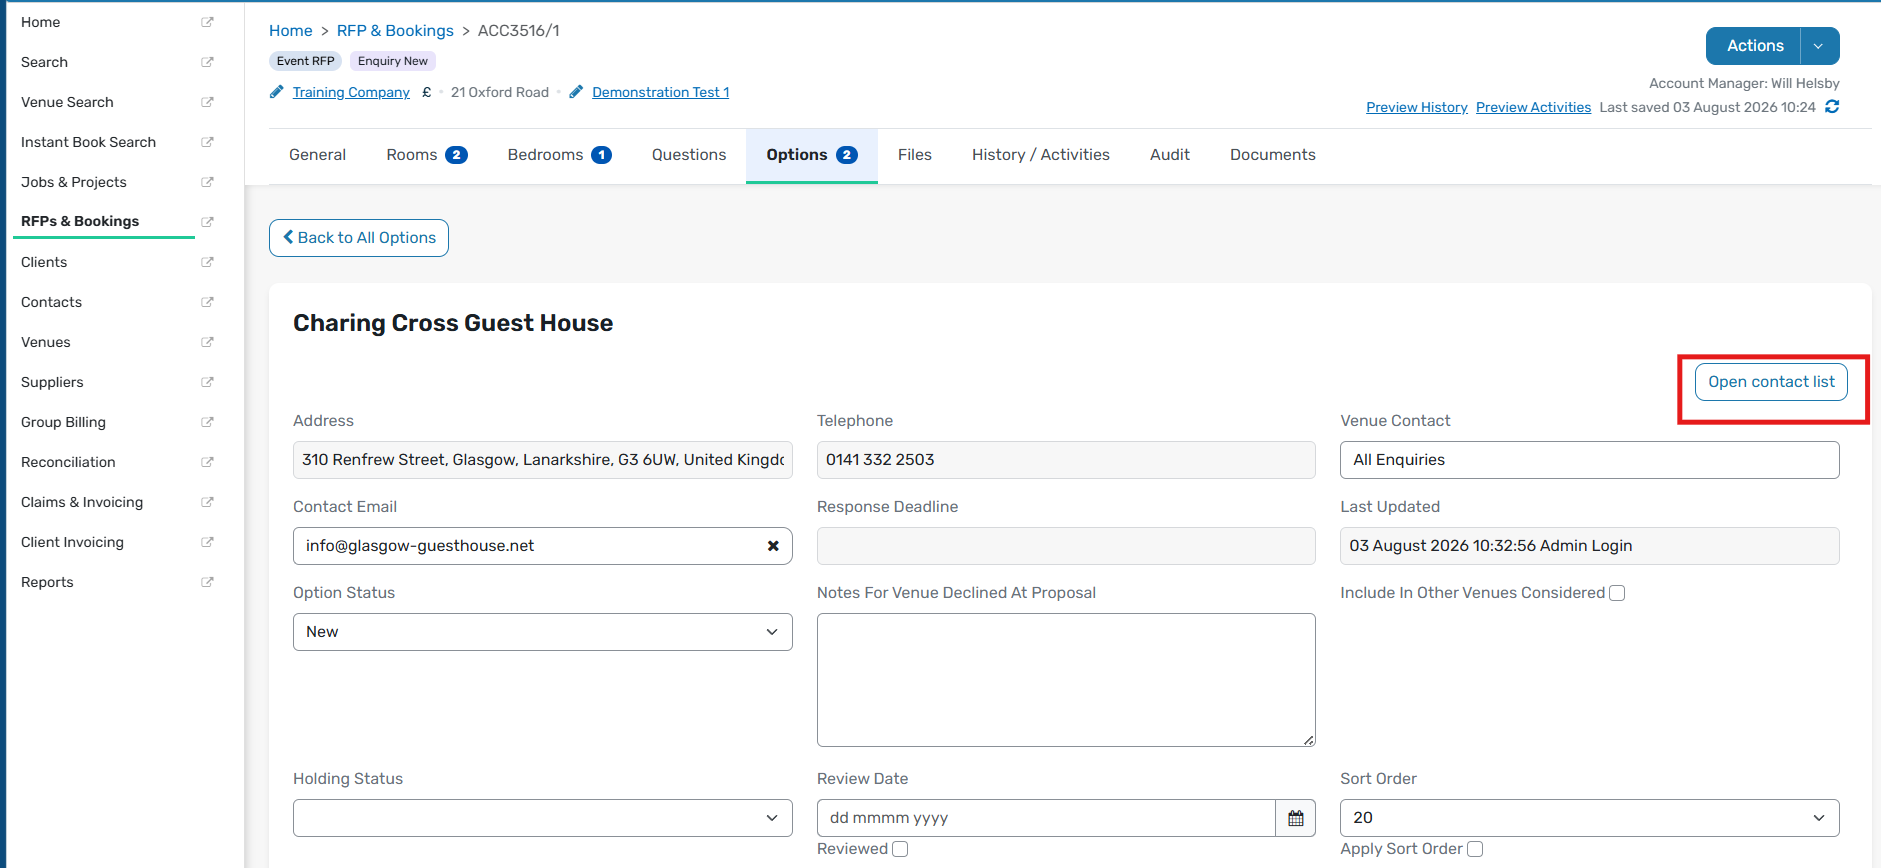
From there, you can:
- Review venue details
- Create the charges table
- Add questions about meeting rooms
- Request details about day delegate packages, 24-hour delegate packages, or supplementary information
- Open the contact list for the venue
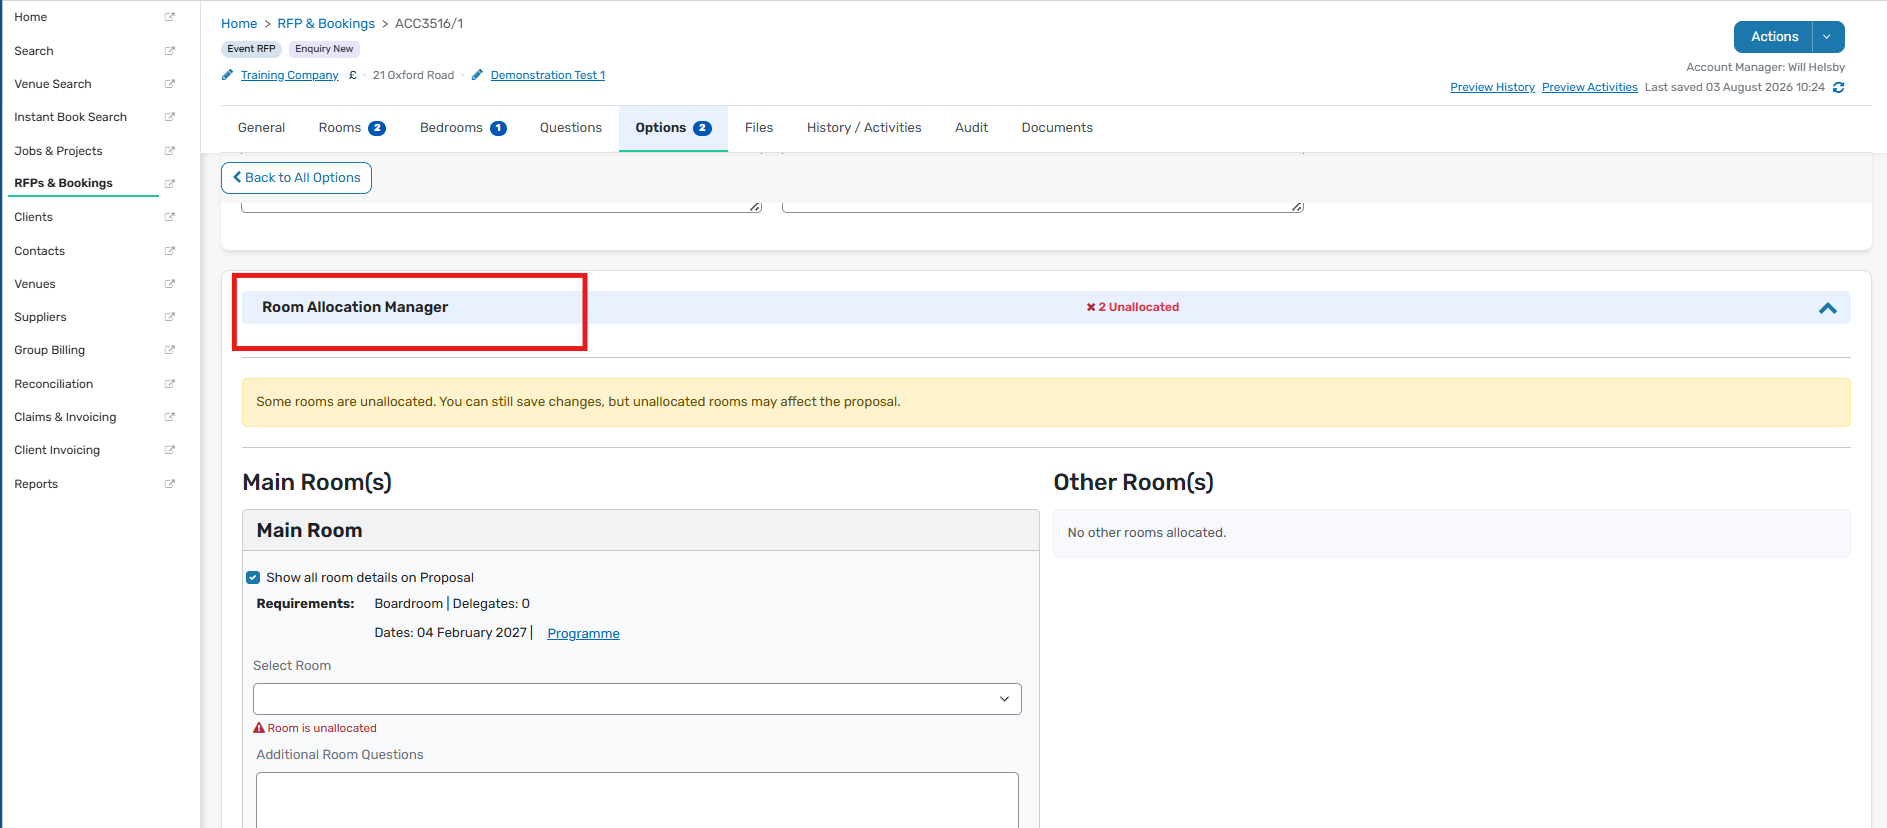
In the Room Allocation Manager section, you can review the meeting rooms requested.
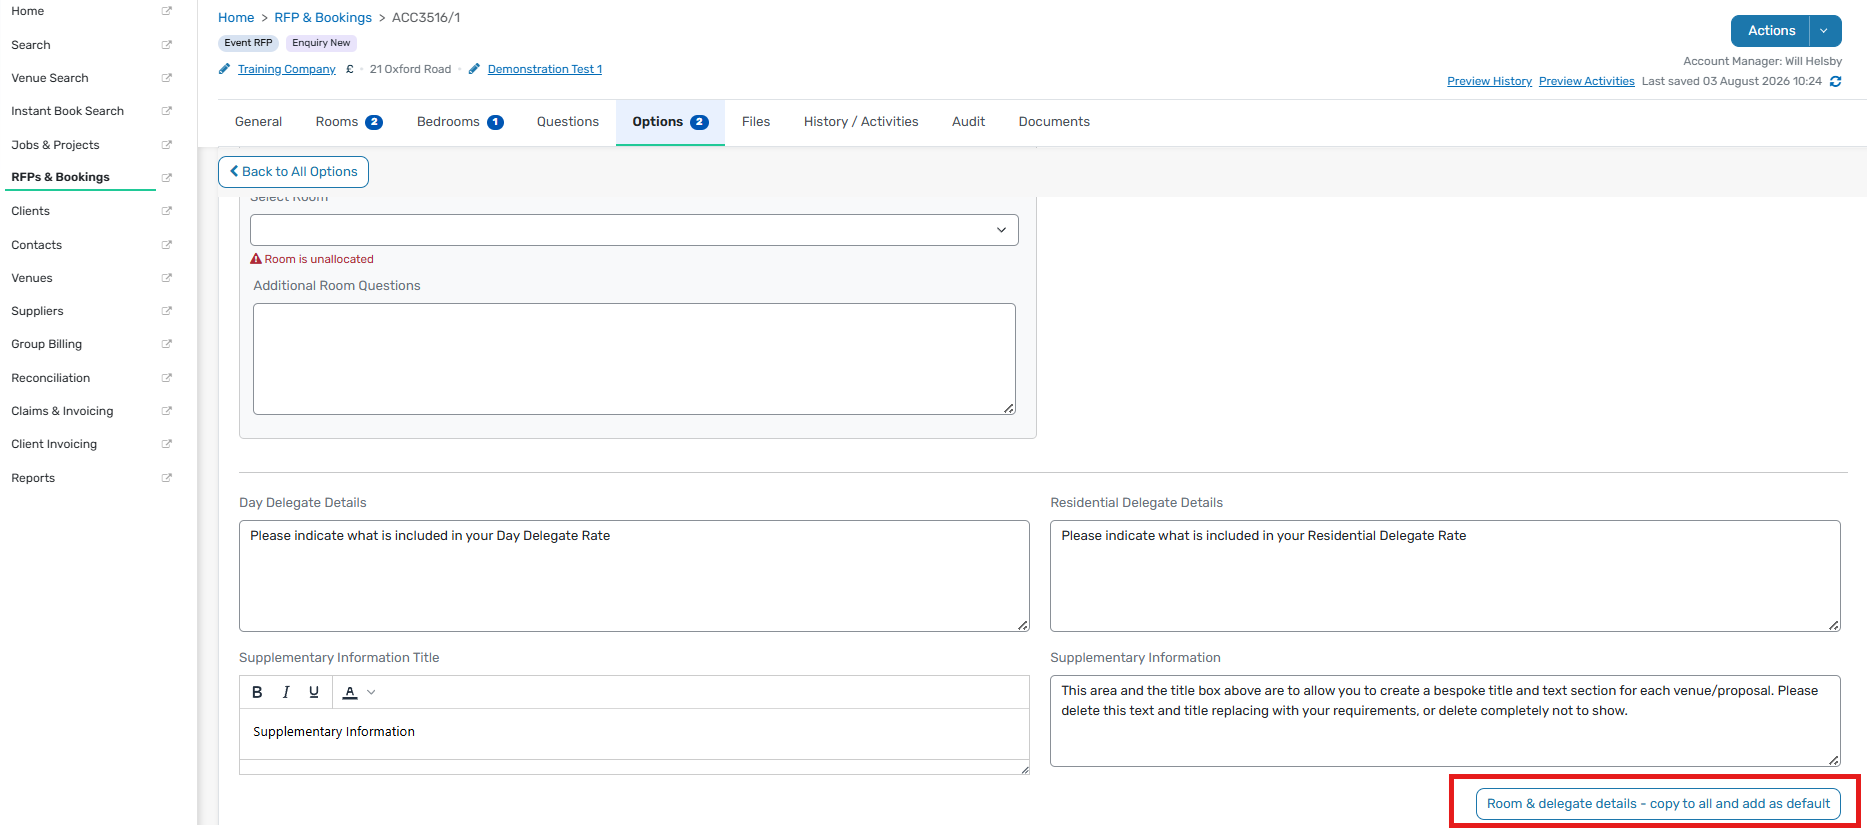
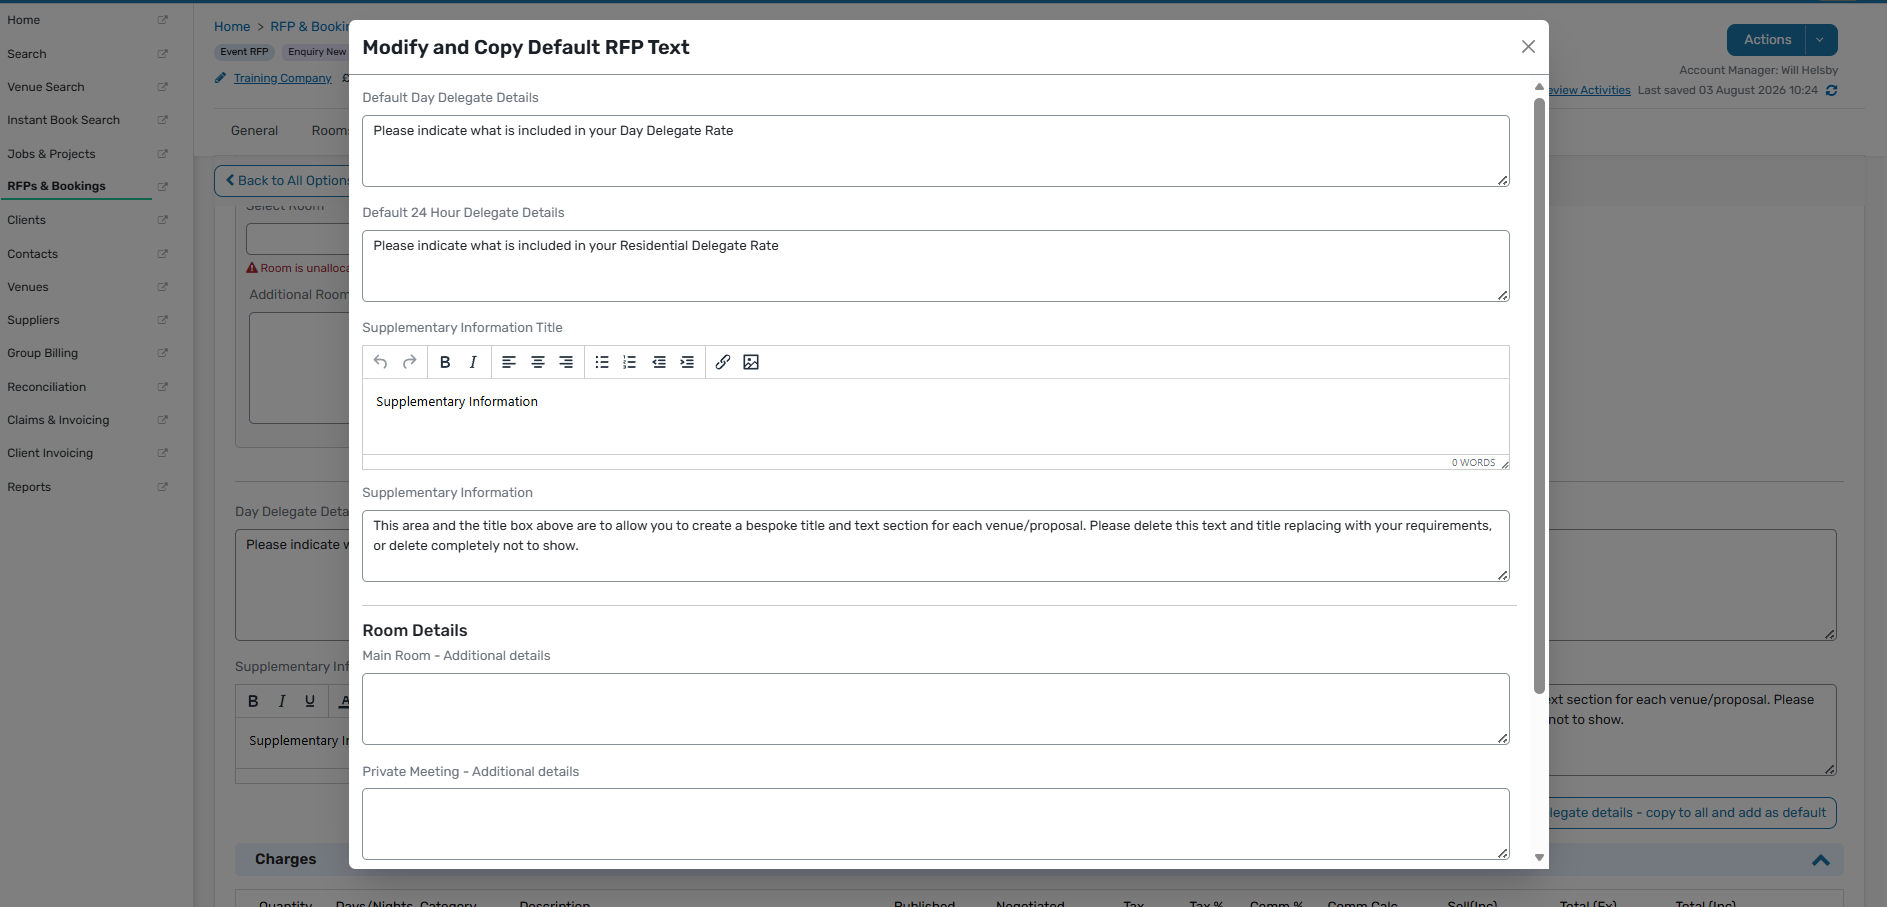
Further down the page, you can add guidance or questions for the venue in the fields relating to delegate packages and supplementary information. For example, you may want the venue to confirm what is included in the day delegate rate or provide room dimensions.
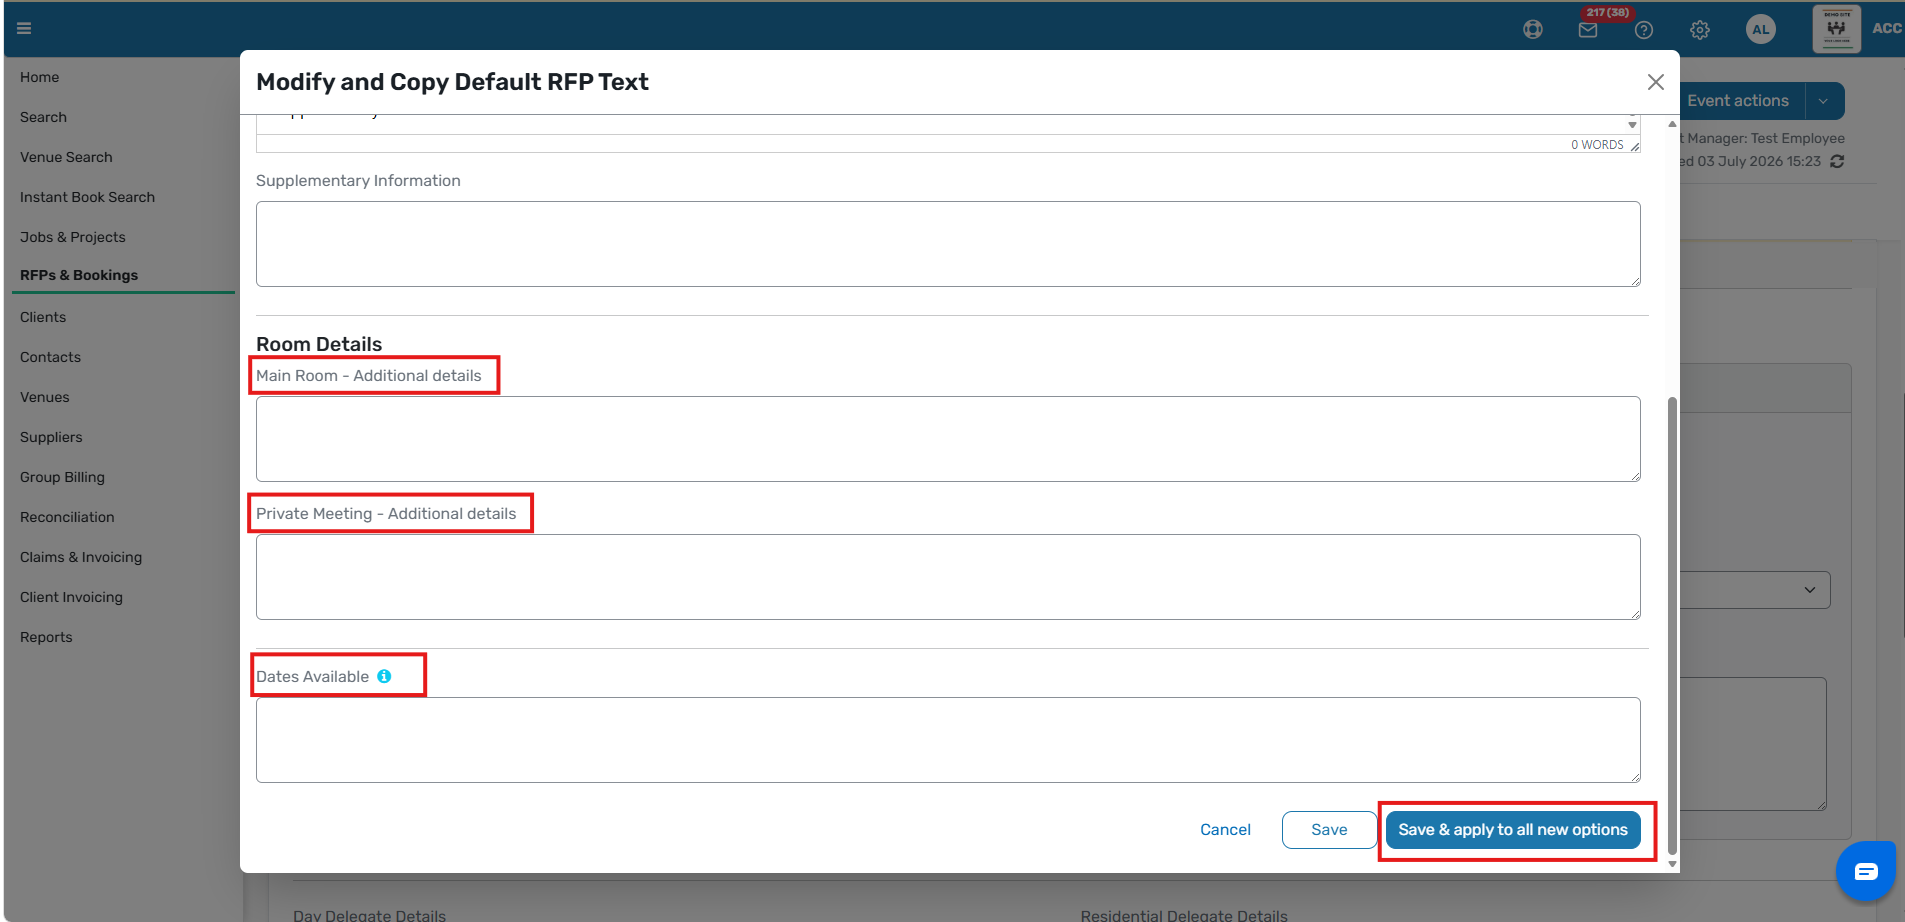
If you want to standardise these questions across all venues in the RFP, use Room & delegate details, then copy the content to all options and save it as the default for new options.
6. Build the charges table
Scroll to the bottom of the option page to create the charges table.
You can either:
- click Add to create charge lines manually, or
- Click Add Default Charges so GRATIS brings through the items it identifies as chargeable based on the details already entered.
Review the charges carefully, then click Save.
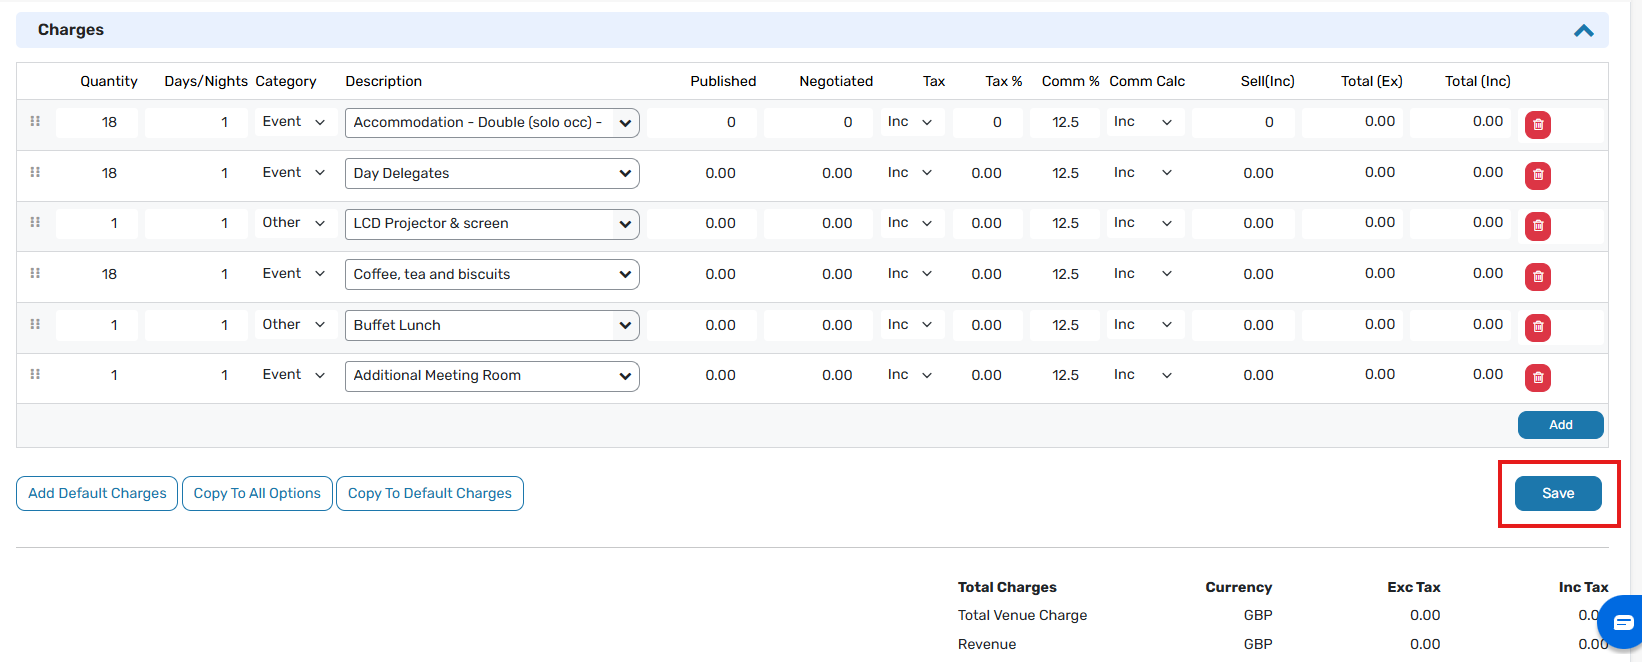
The charges grid is used to capture quantities, sessions or nights, descriptions, published and negotiated rates, tax treatment, commission, and any sell or mark-up values.
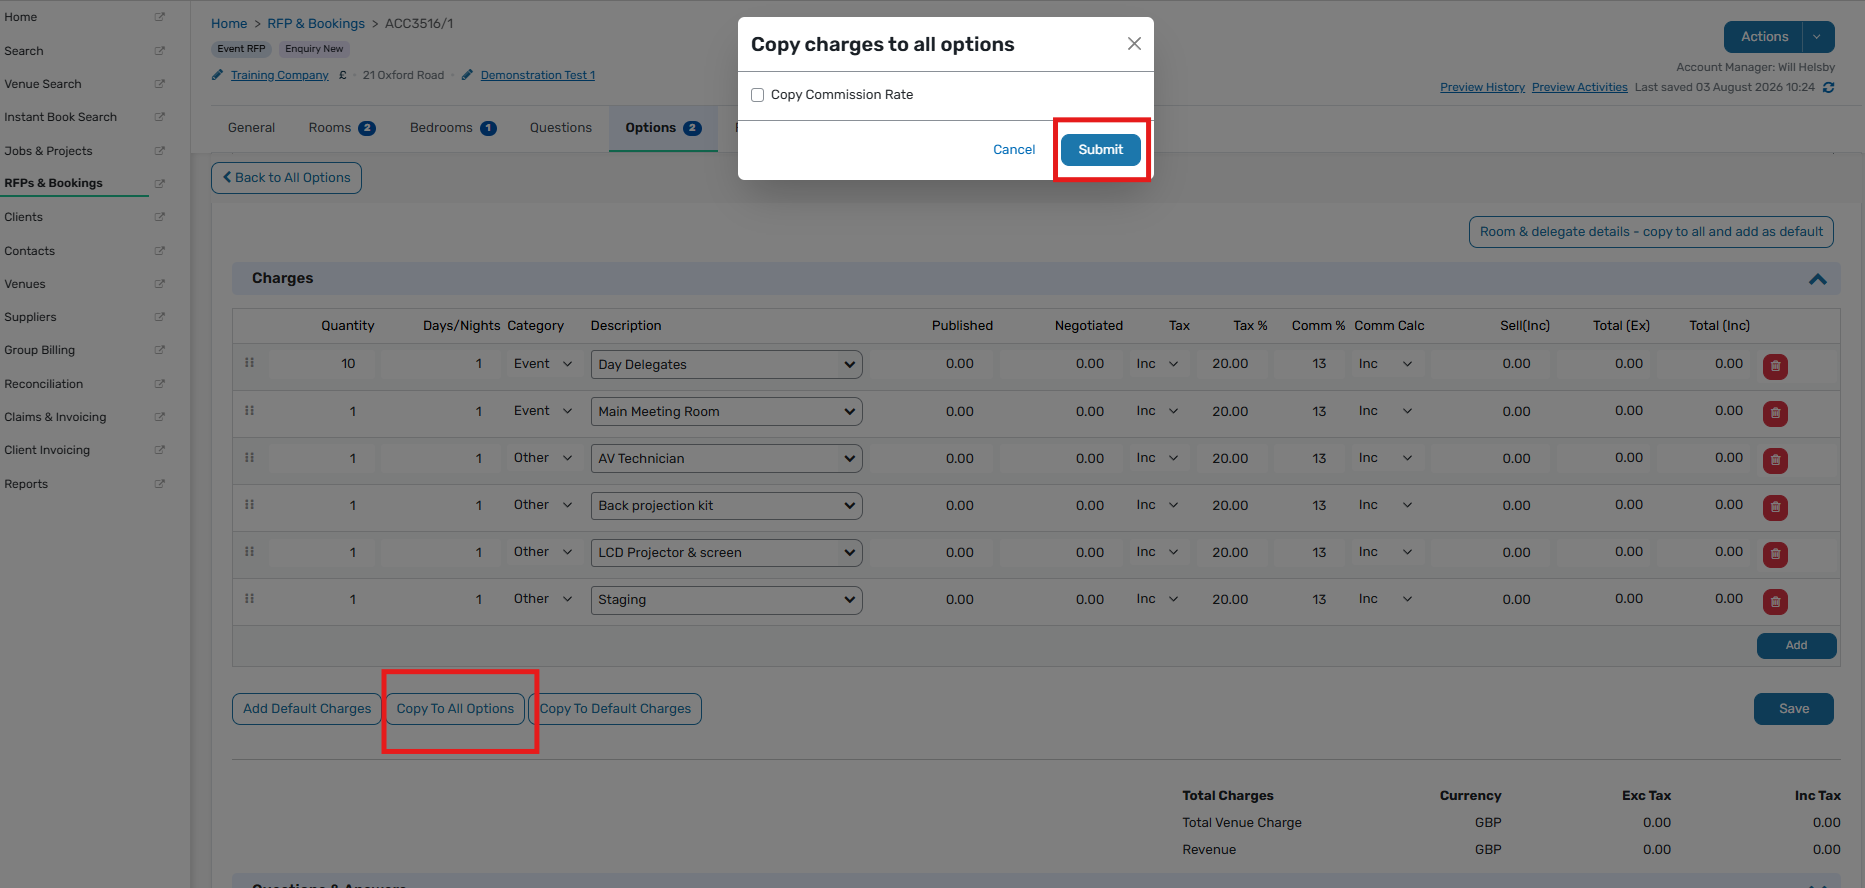
Copy to All Options
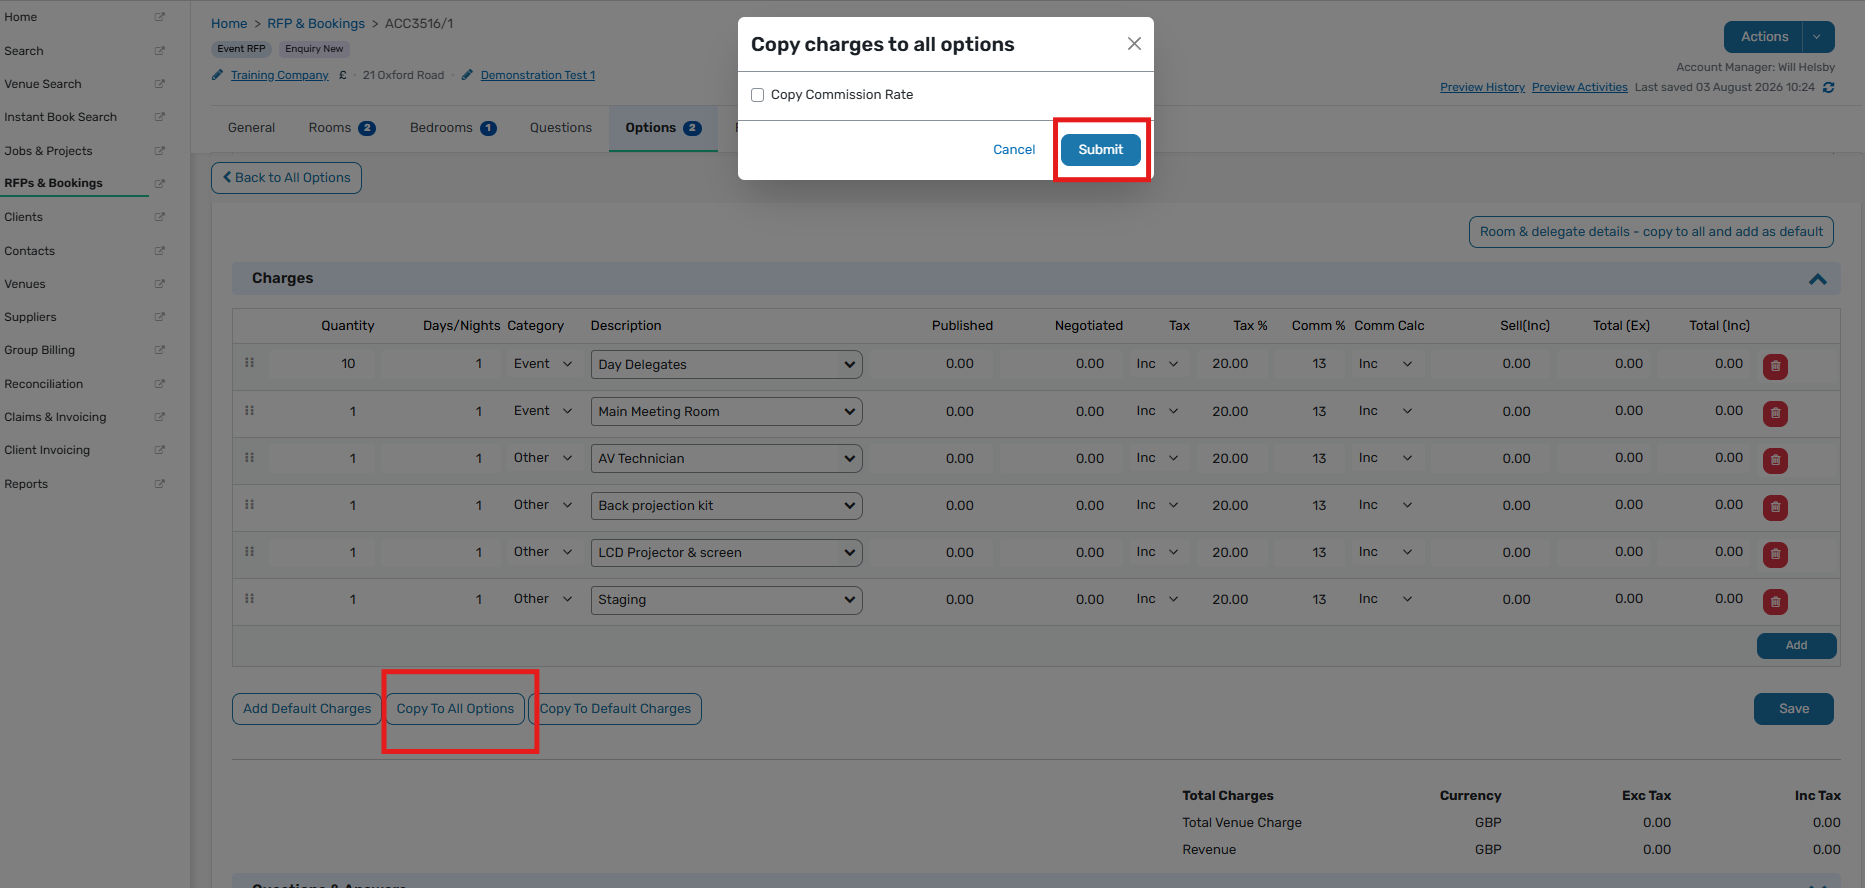
Use Copy to All Options to copy the charges table to the other venue options in the same RFP.
The system can also copy the commission rate from the current venue to the other venue options. Use this carefully. If you choose to copy the commission rate, any commission already shown against other venues in the current RFP will be overwritten.
This affects the current RFP only and does not change the commission agreement stored in the venue record.
Copy to Default Charges
Use Copy to Default Charges to keep the current charges table as the default for this RFP. This is useful if you add more venues later.
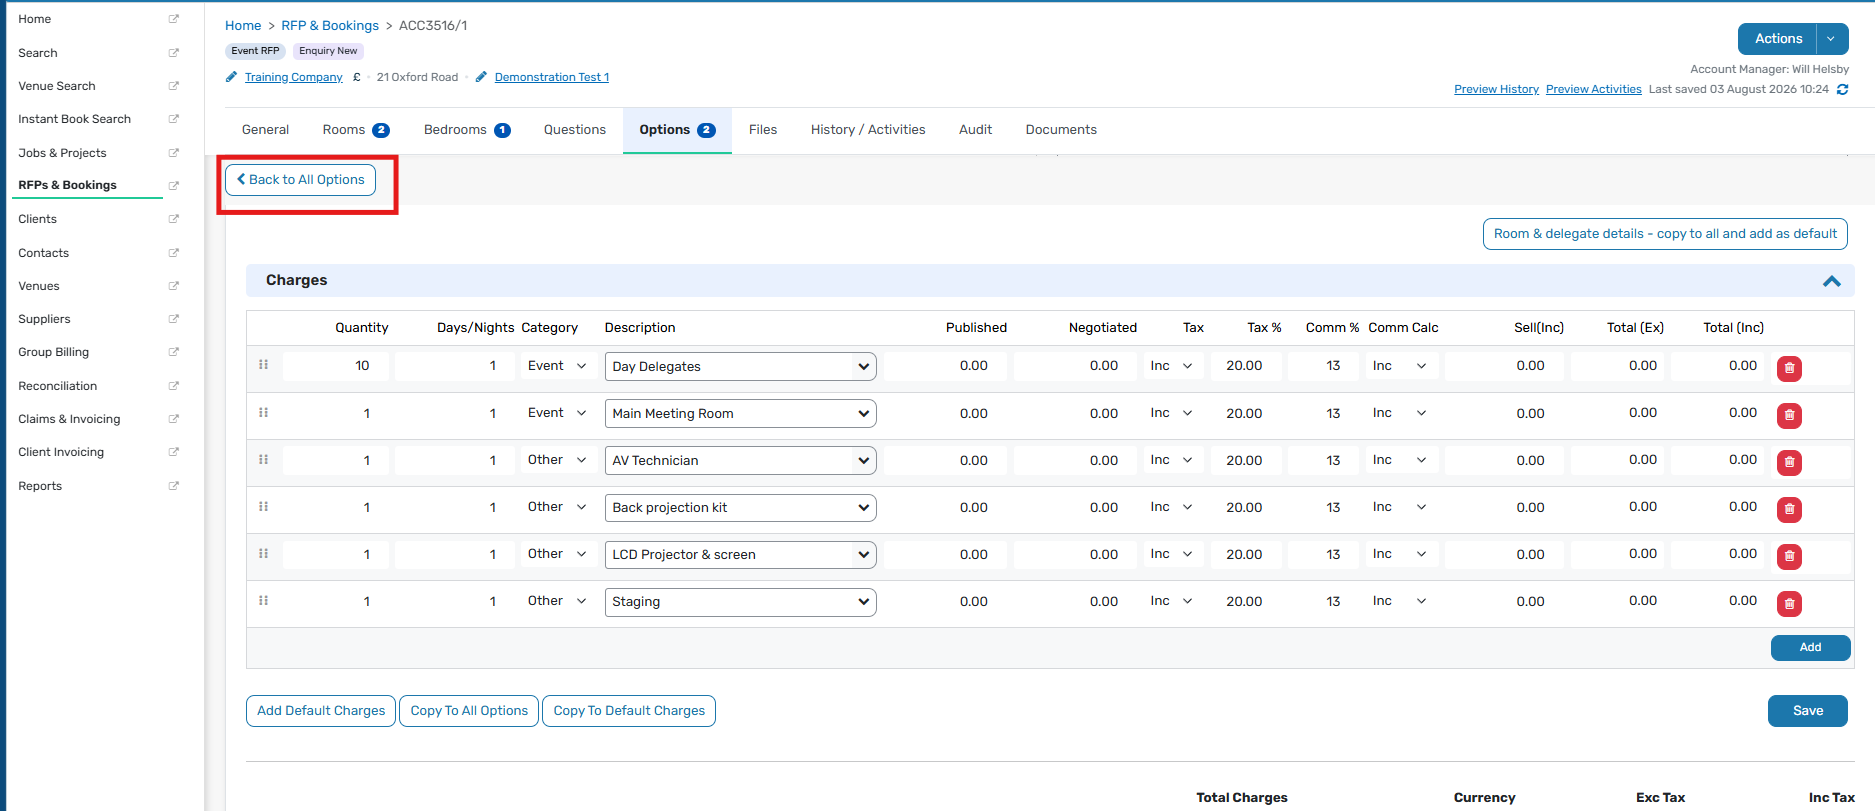
To return to the full venue list, click Back to All Options.
7. Contact venues
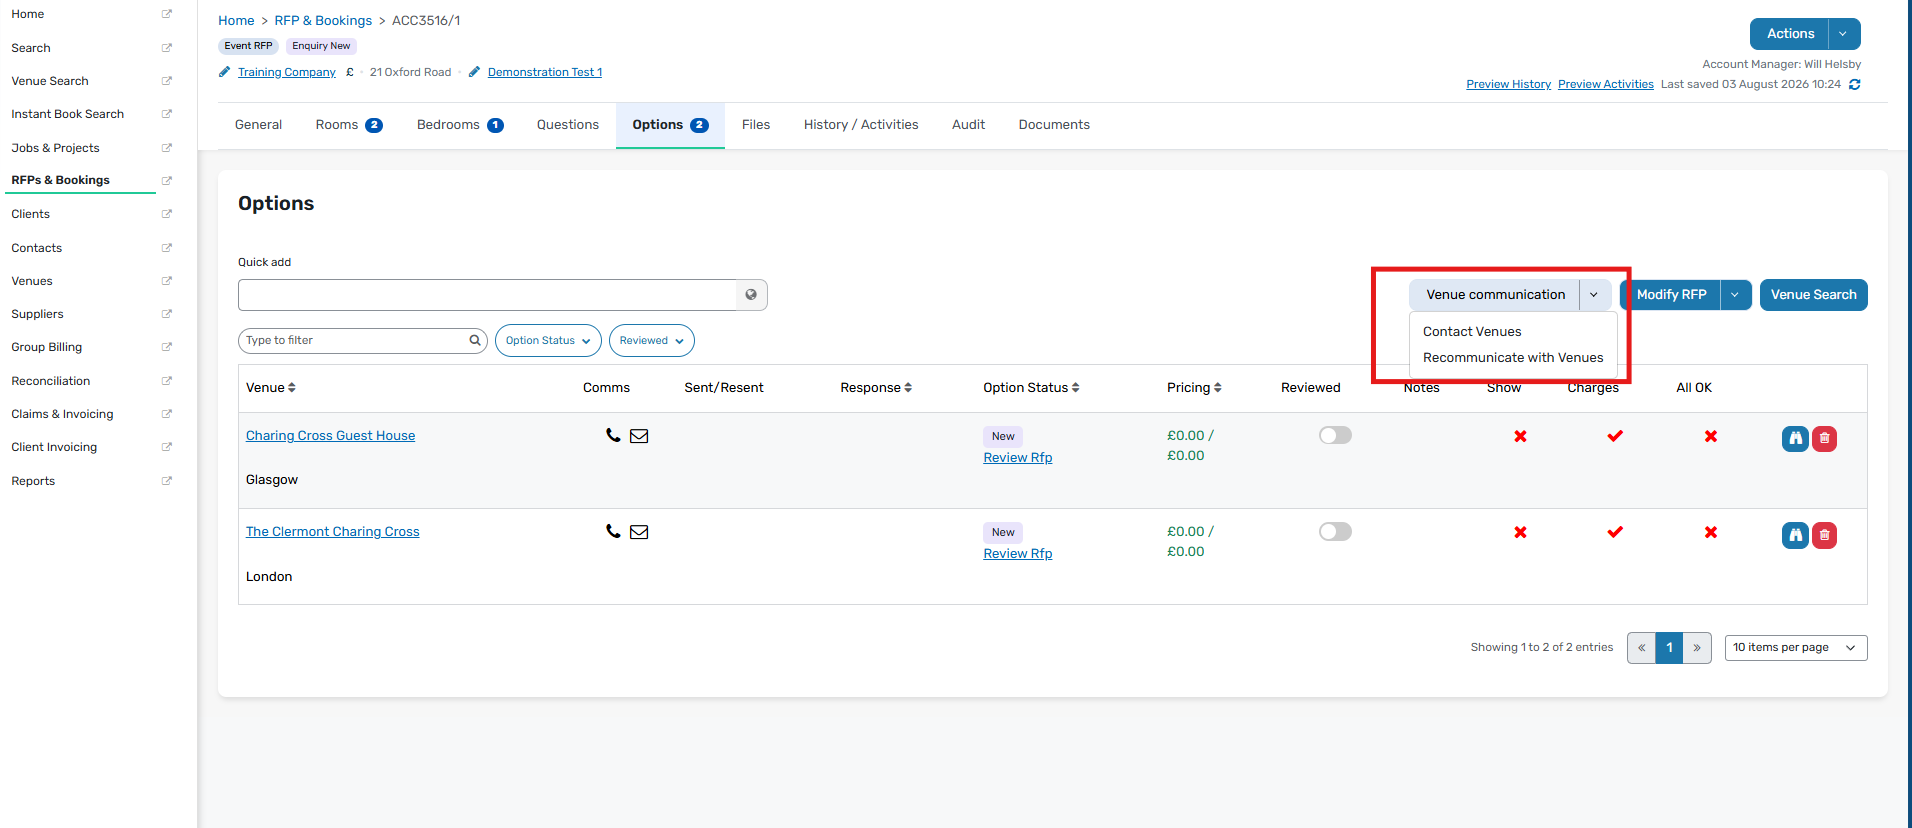
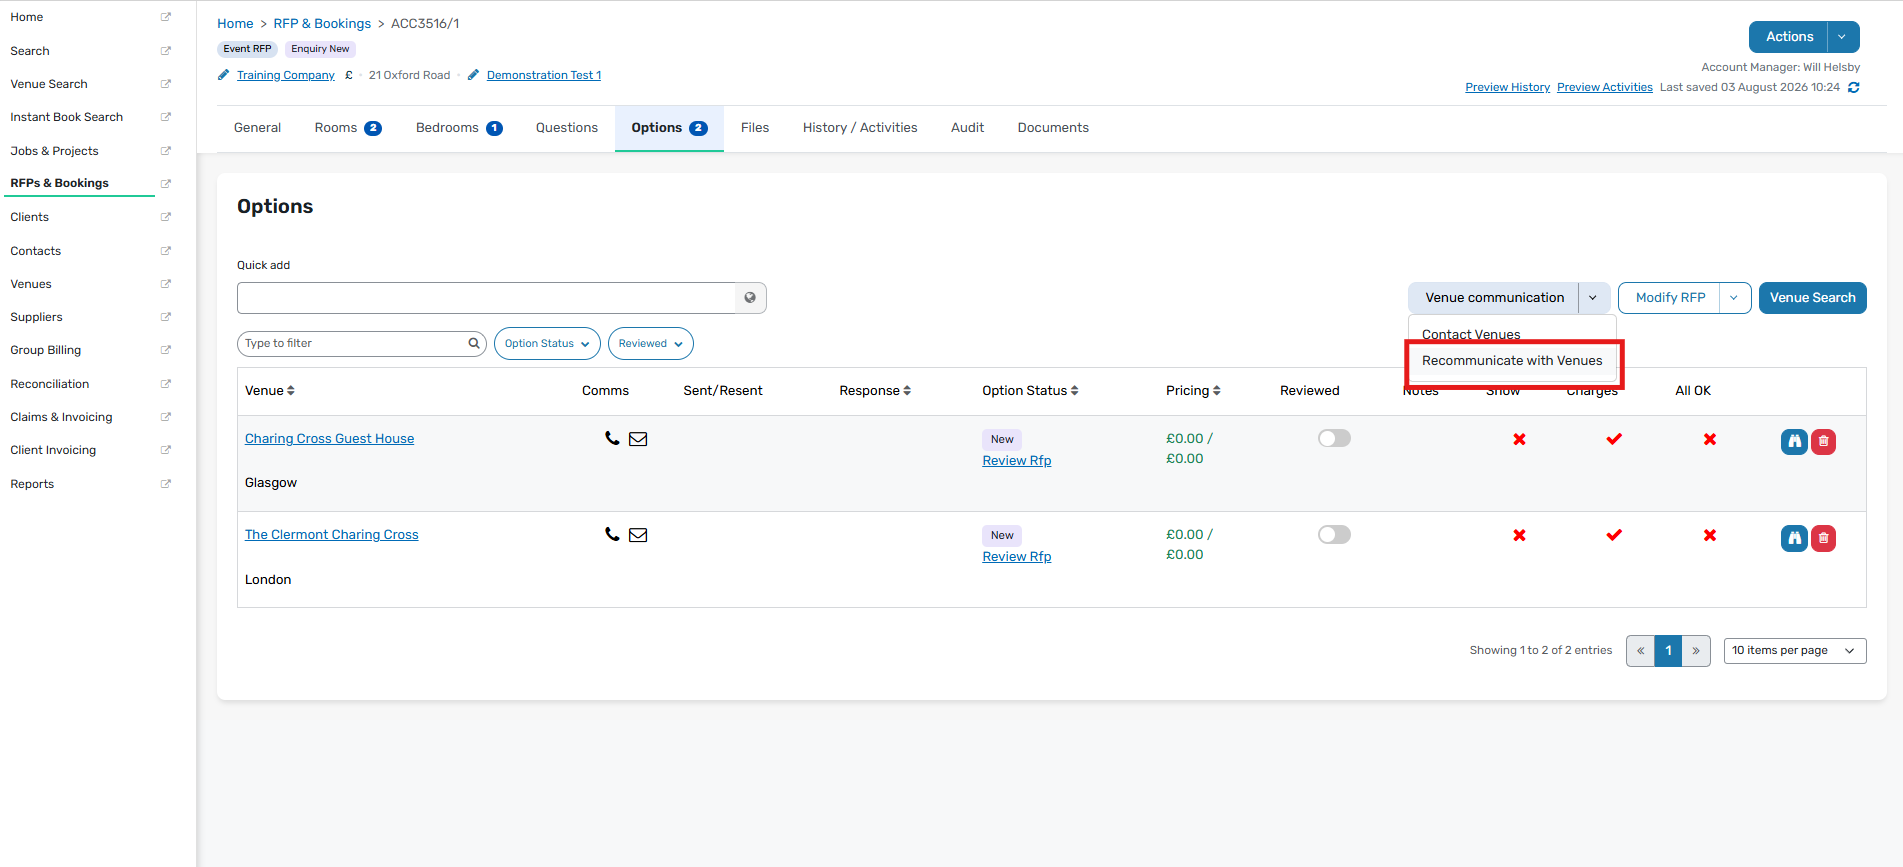
Use Venue Communication above the venues table when you are ready to contact venues.
Click Contact Venues to send the RFP online so venues can respond through the system.
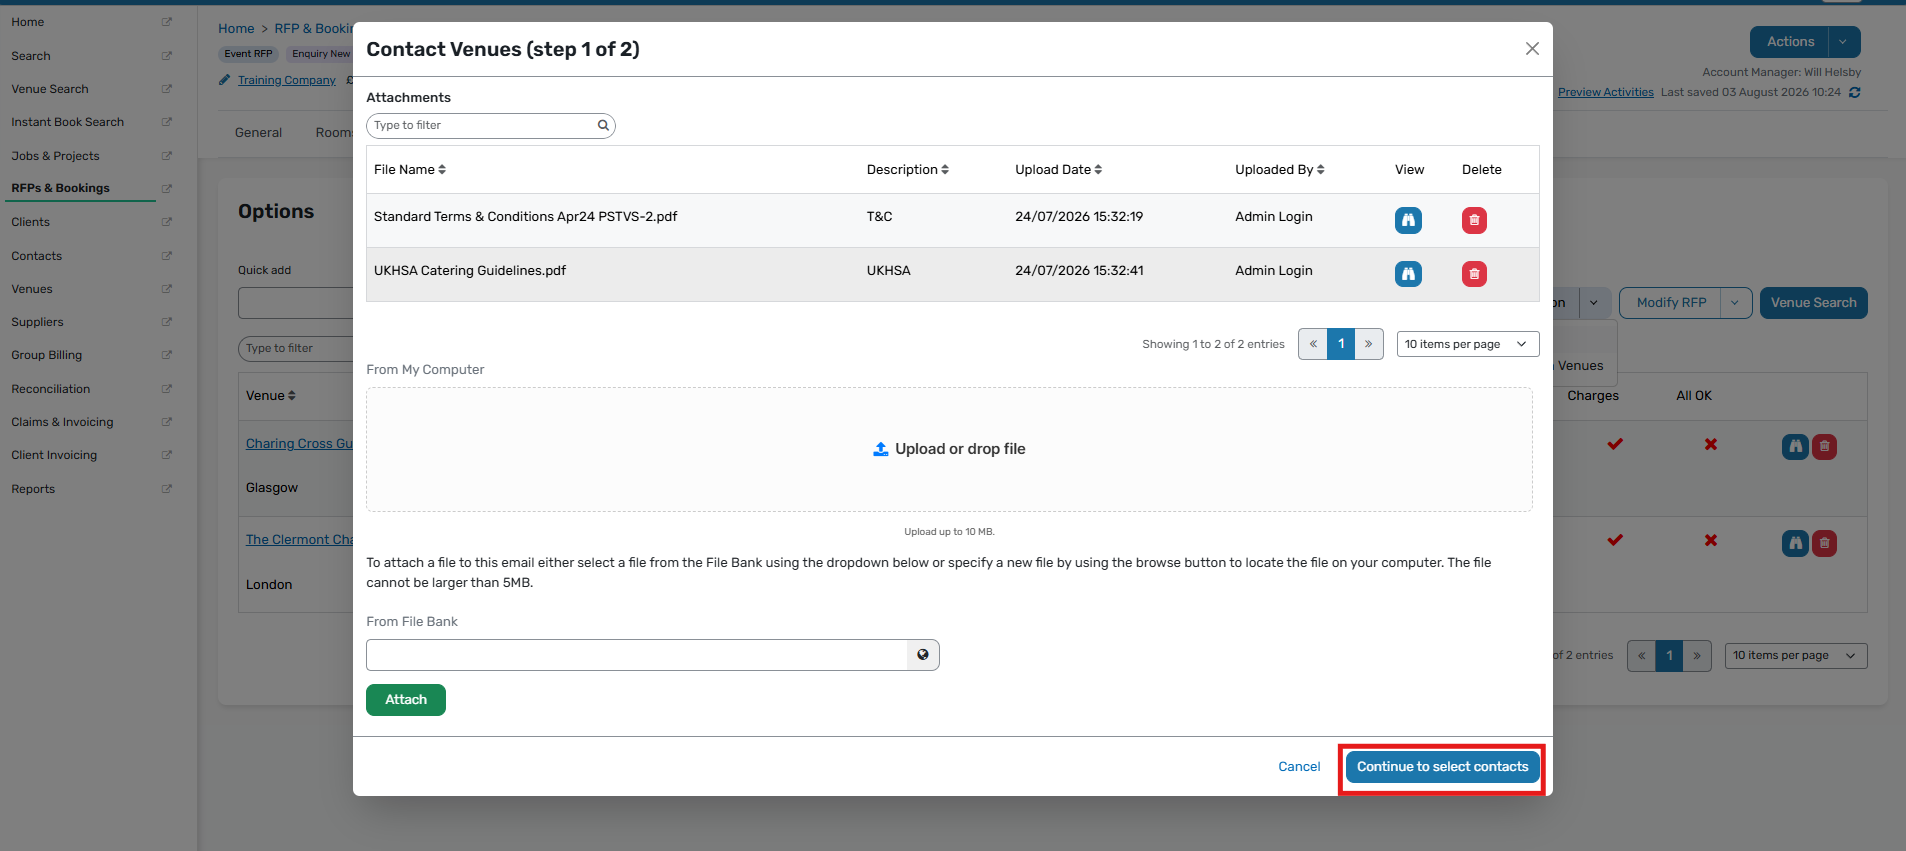
In the pop-up window, you can attach a file from your computer or from the file bank, then click Continue to select contacts.
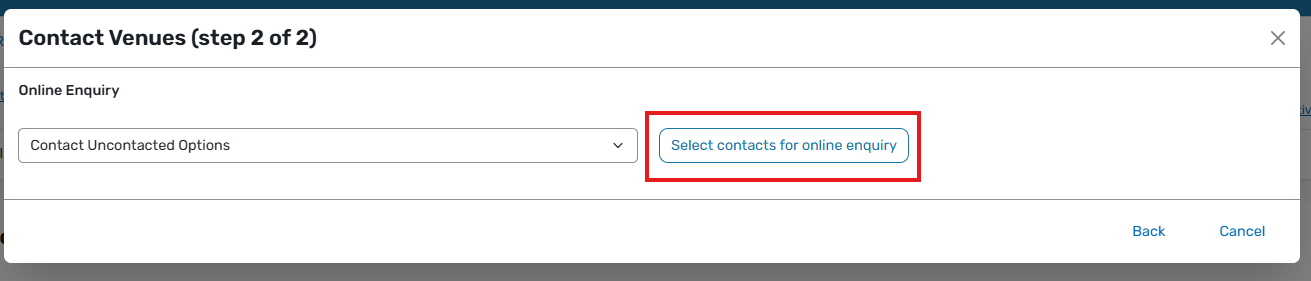
For a first send, the system normally defaults to Contact Uncontacted Options, which is usually the best choice.
Click Select contacts for online RFP to review the available contacts for each venue.
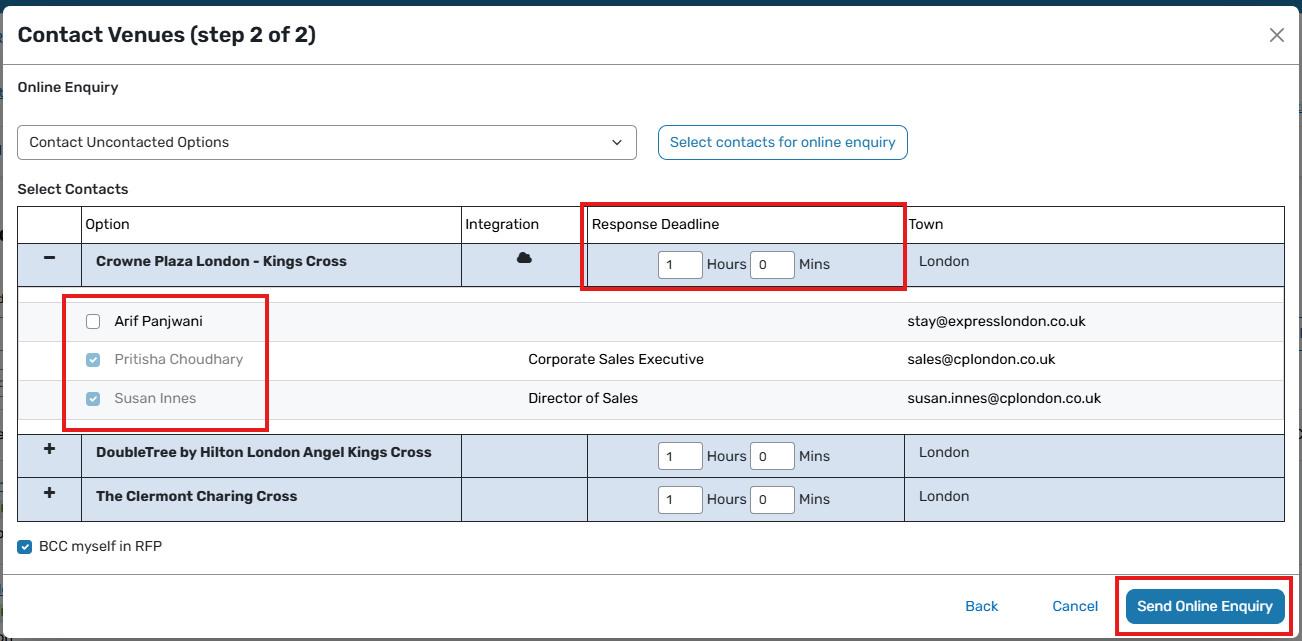
If a contact is greyed out, they will automatically receive the new RFP notification email. If the checkbox next to a contact can be selected, you can choose whether to include them.
You can also adjust the deadline for venue responses before clicking Send online RFP.
Recommunicate with Venues
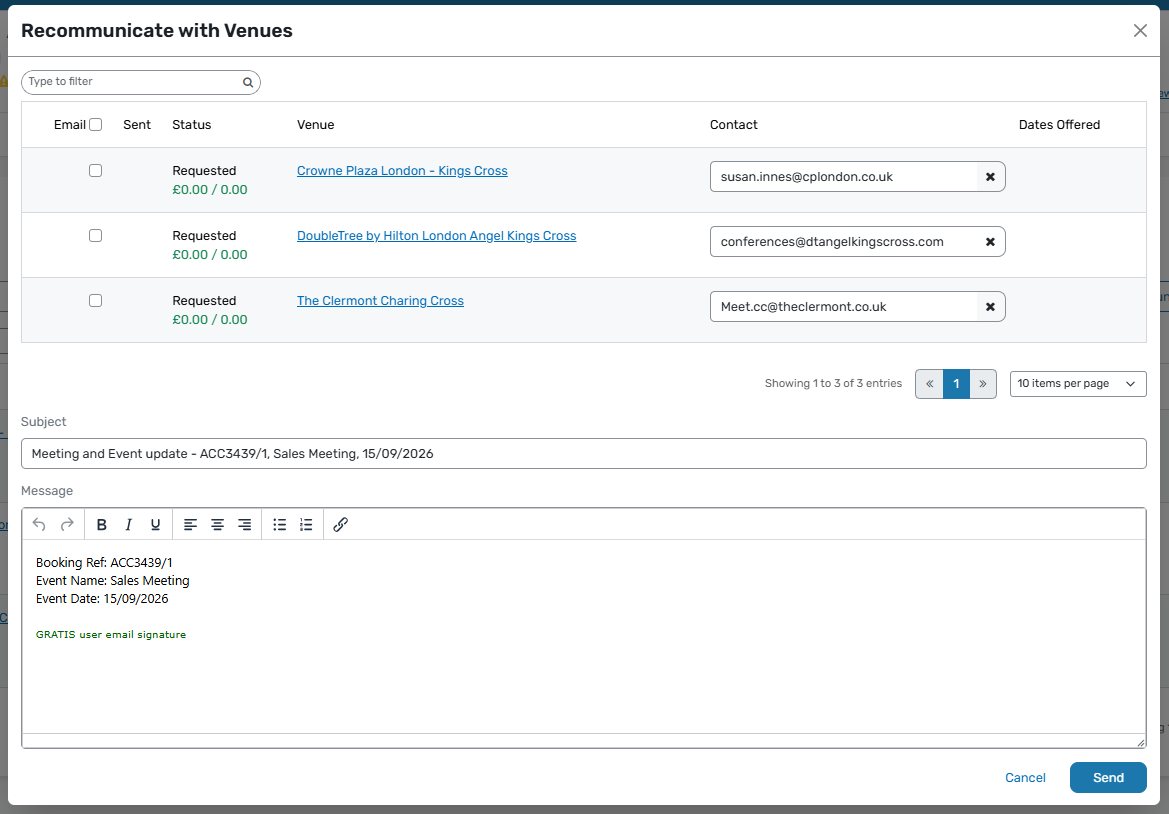
Use Recommunicate with Venues to follow up with venues that have not responded or to keep a record of ongoing communication about the RFP.
Please note that if a venue replies to an email sent using Recommunicate with Venues, the reply is sent to your inbox. Responses only appear in GRATIS when the venue submits its quote through the RFP process.
Modify RFP
If you add new venues after the RFP has already been sent, use Modify RFP to keep the record consistent.
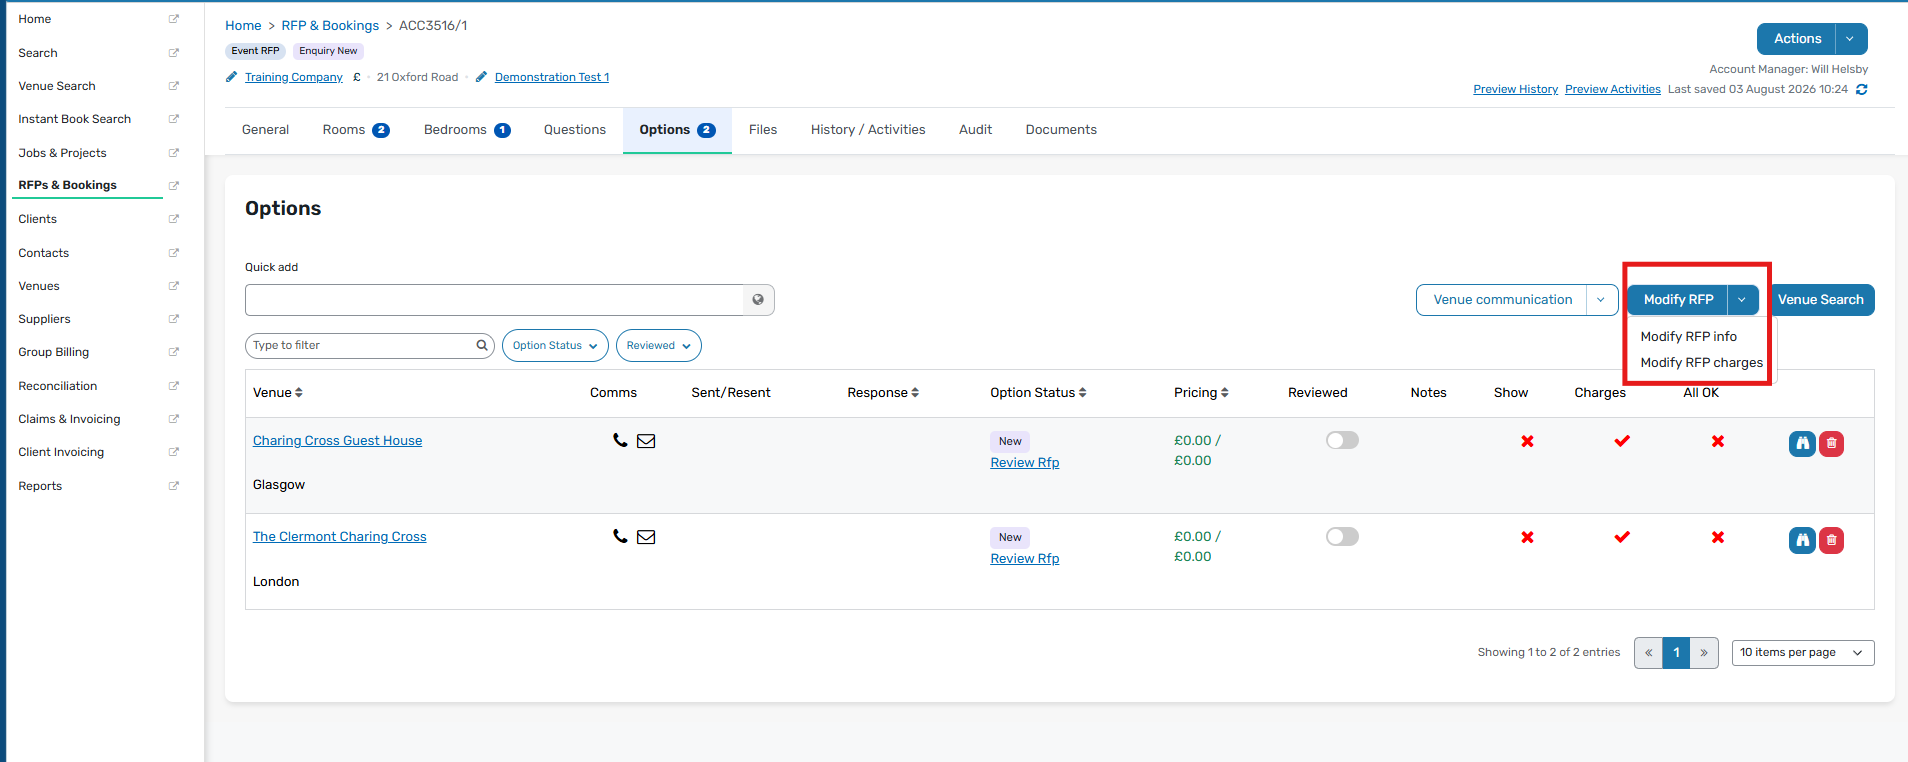
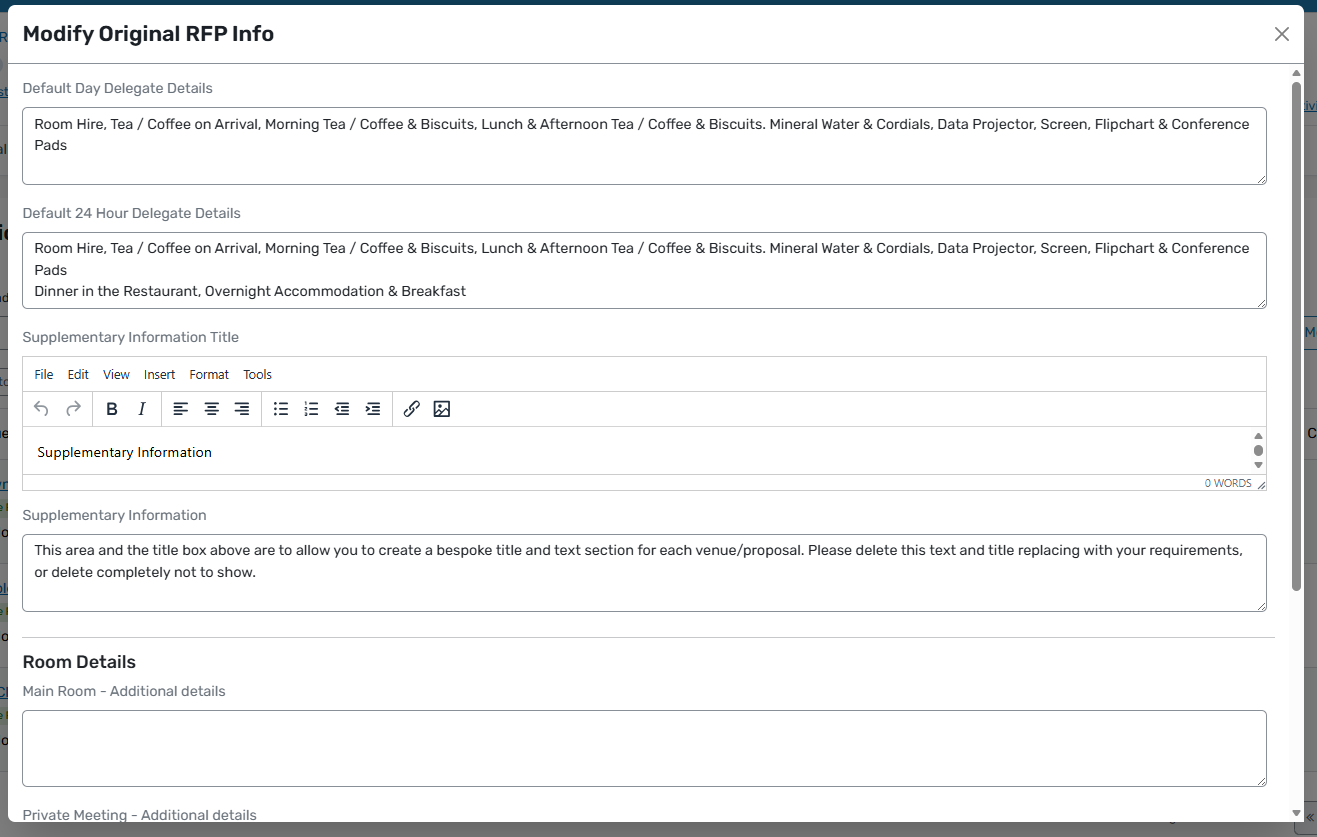
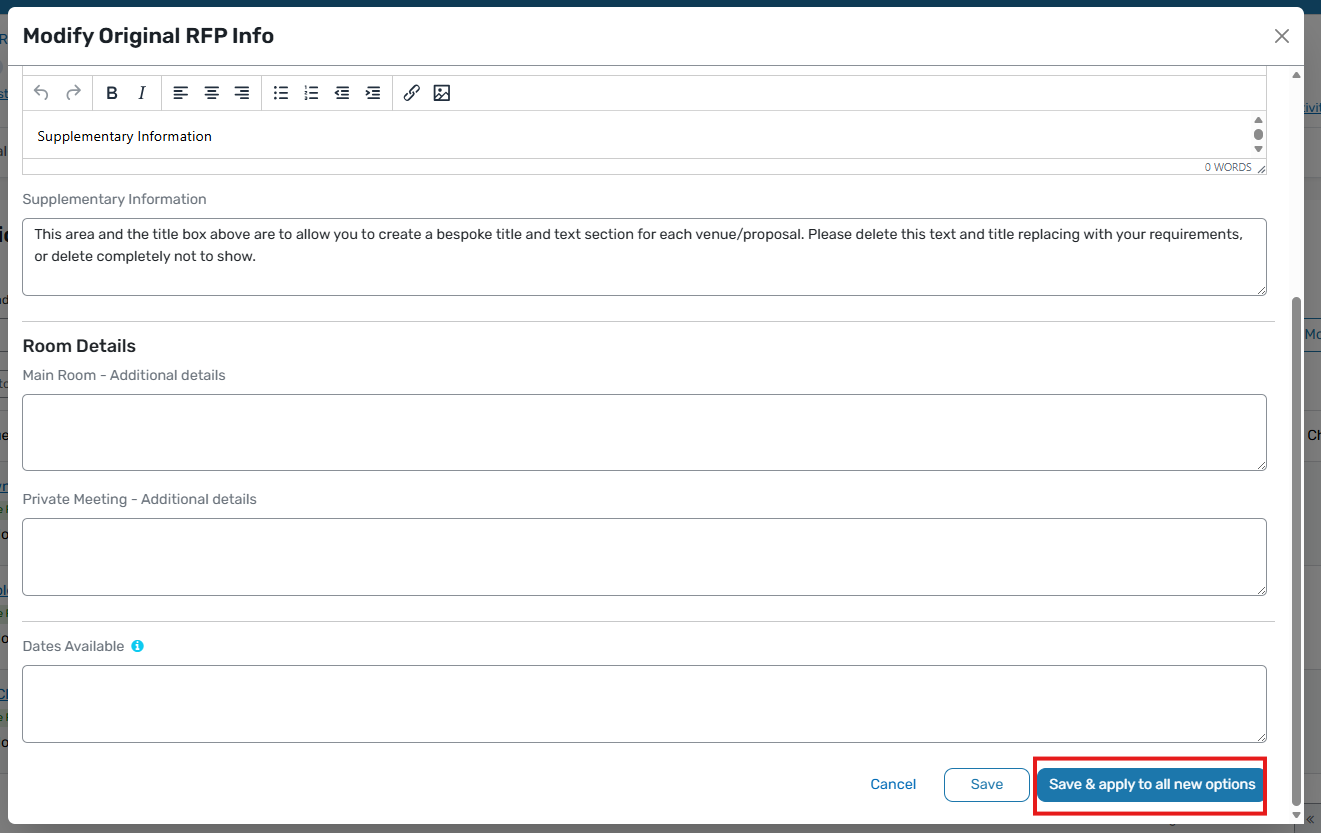
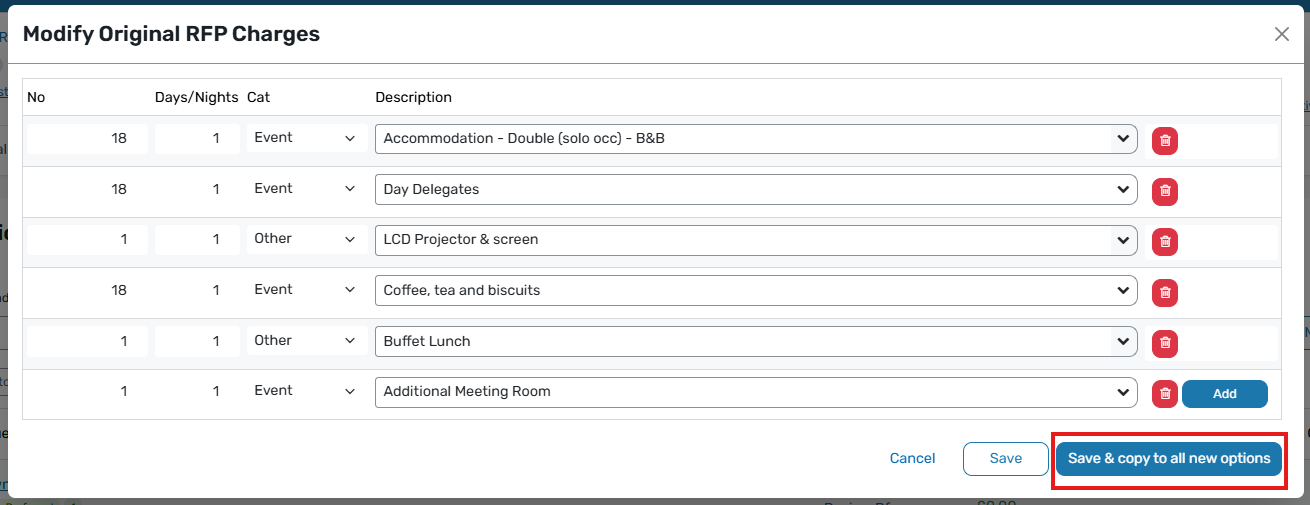
The available options are:
- Modify RFP Info, which copies the room, delegate, and supplementary information questions to the new venues

- Modify RFP Charges, which copies the existing default charges table to the new venues

8. Review venue responses
To review a venue response, click the binocular icon next to that venue.
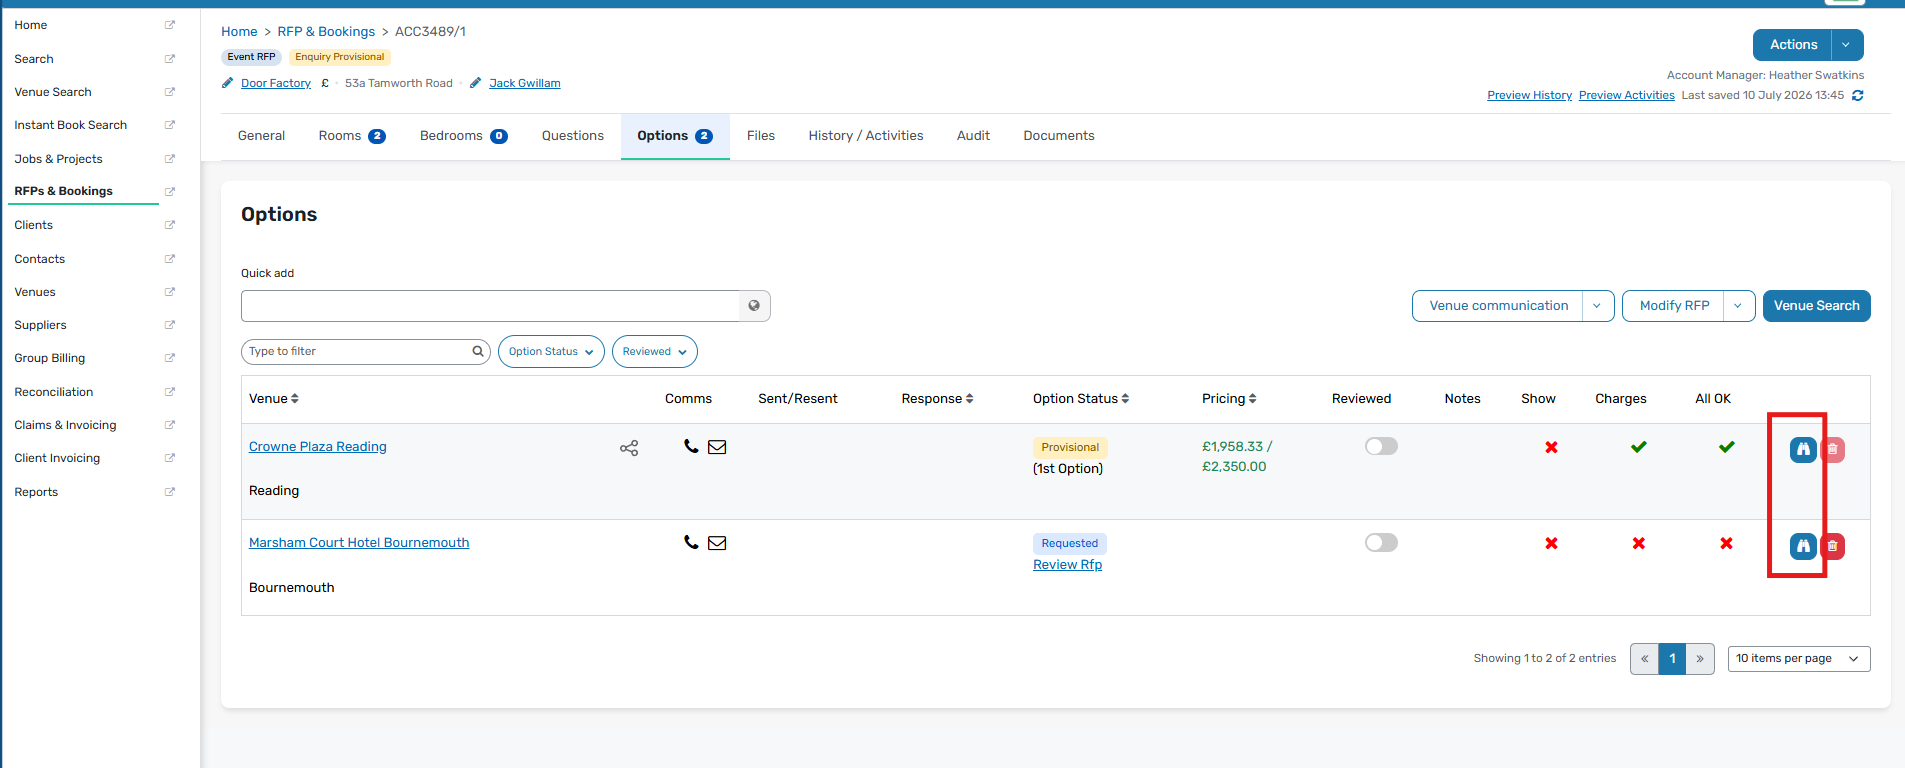
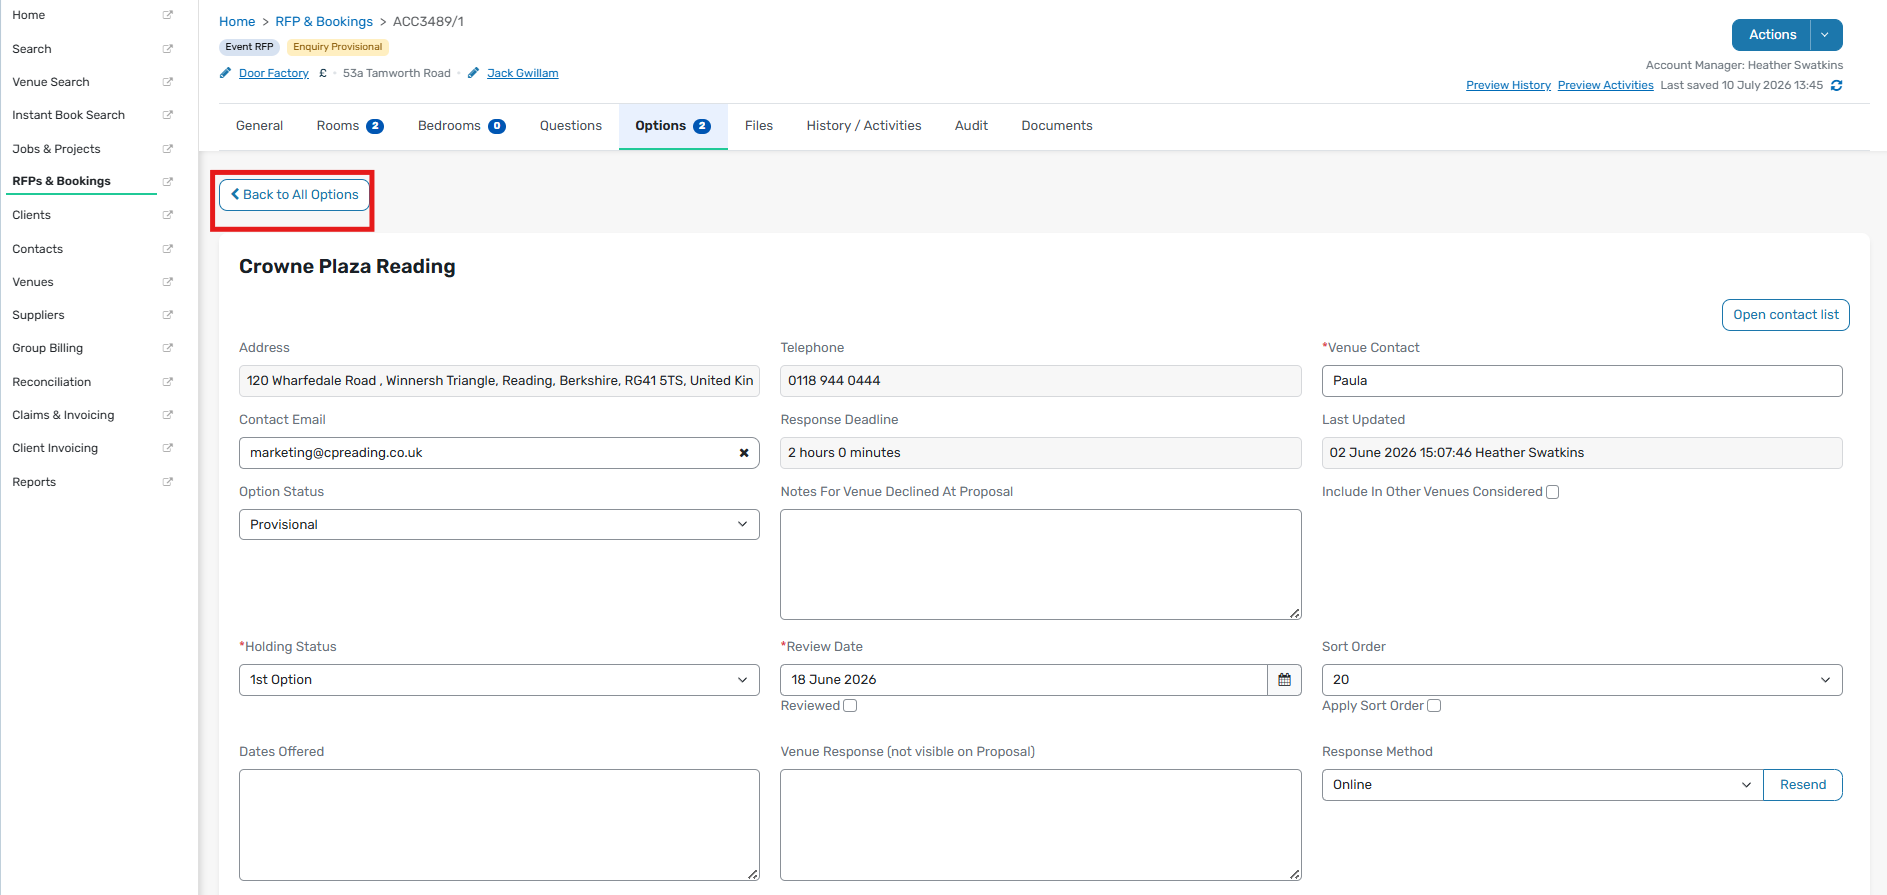
If you update areas such as meeting rooms, dates offered, or notes, the system saves those changes automatically.
However, changes made to the charges table are not auto saved. If you amend the charges table, you must click Save underneath it.
To return to the venue list, click Back to All Options.
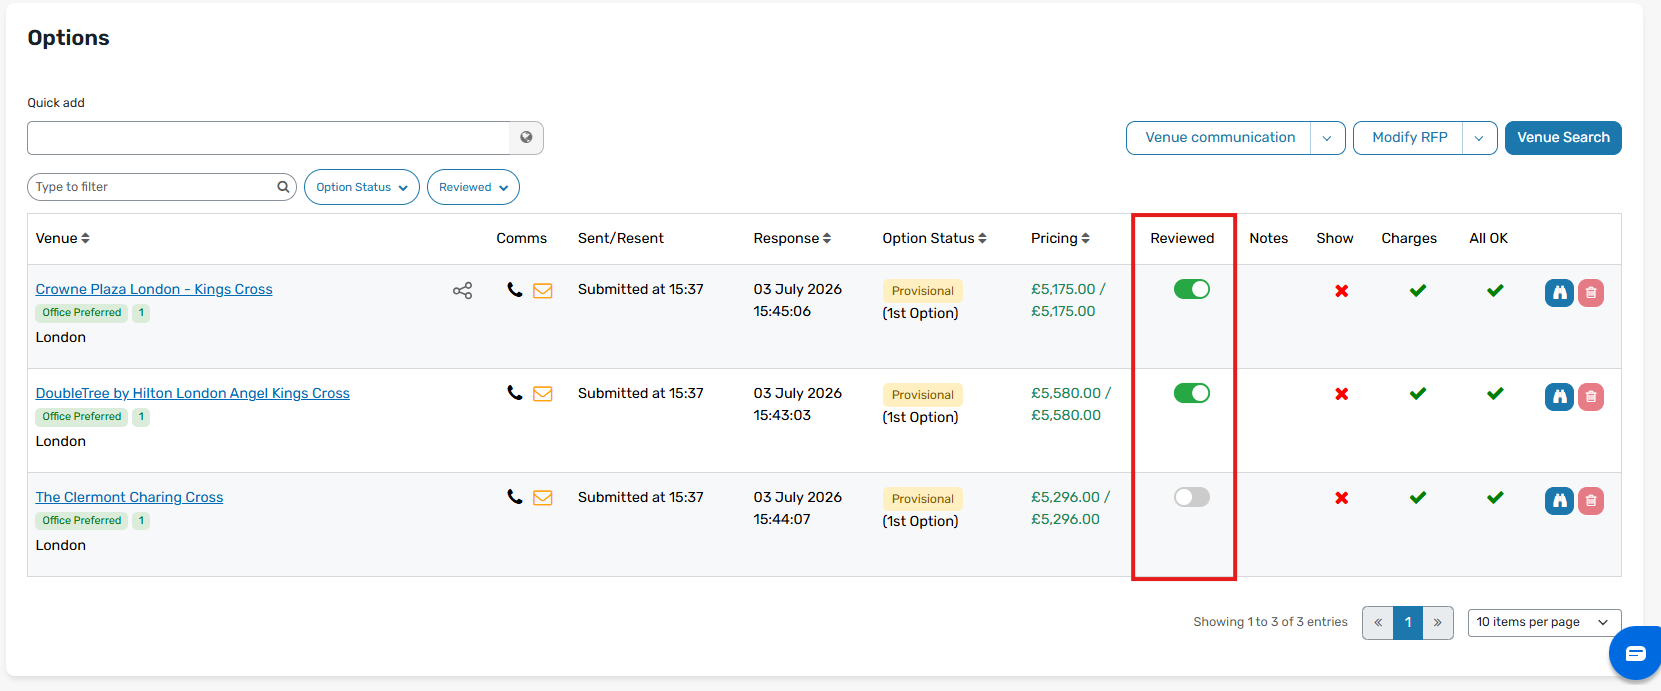
You can use the Reviewed toggle to mark a venue response as reviewed.
9. Using The Actions Button
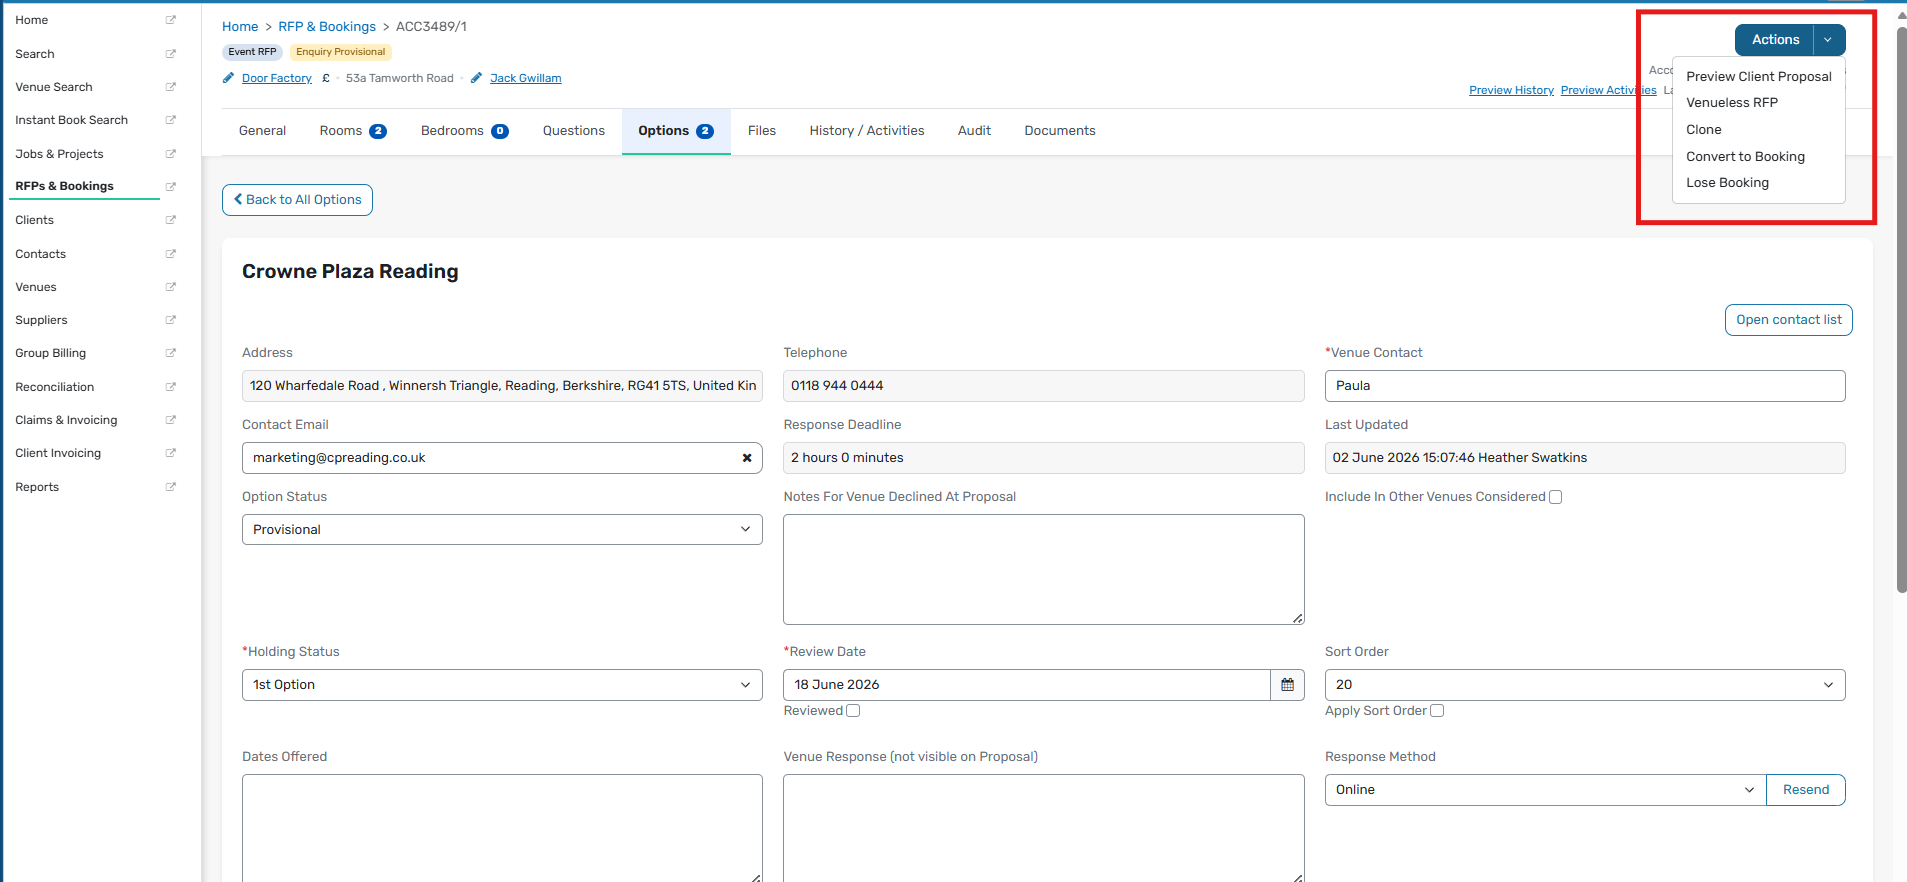
The Actions button at the top right-hand side of the page gives you access to the main record actions.
Depending on the stage of the record, you can use it to:
- Preview the client proposal
- Create a venueless RFP for venues that do not use Venue Directory platforms
- Clone the RFP
- Convert the RFP to a booking
- Lose the RFP
- Generate documents
- Cancel the booking
Convert the RFP to a booking
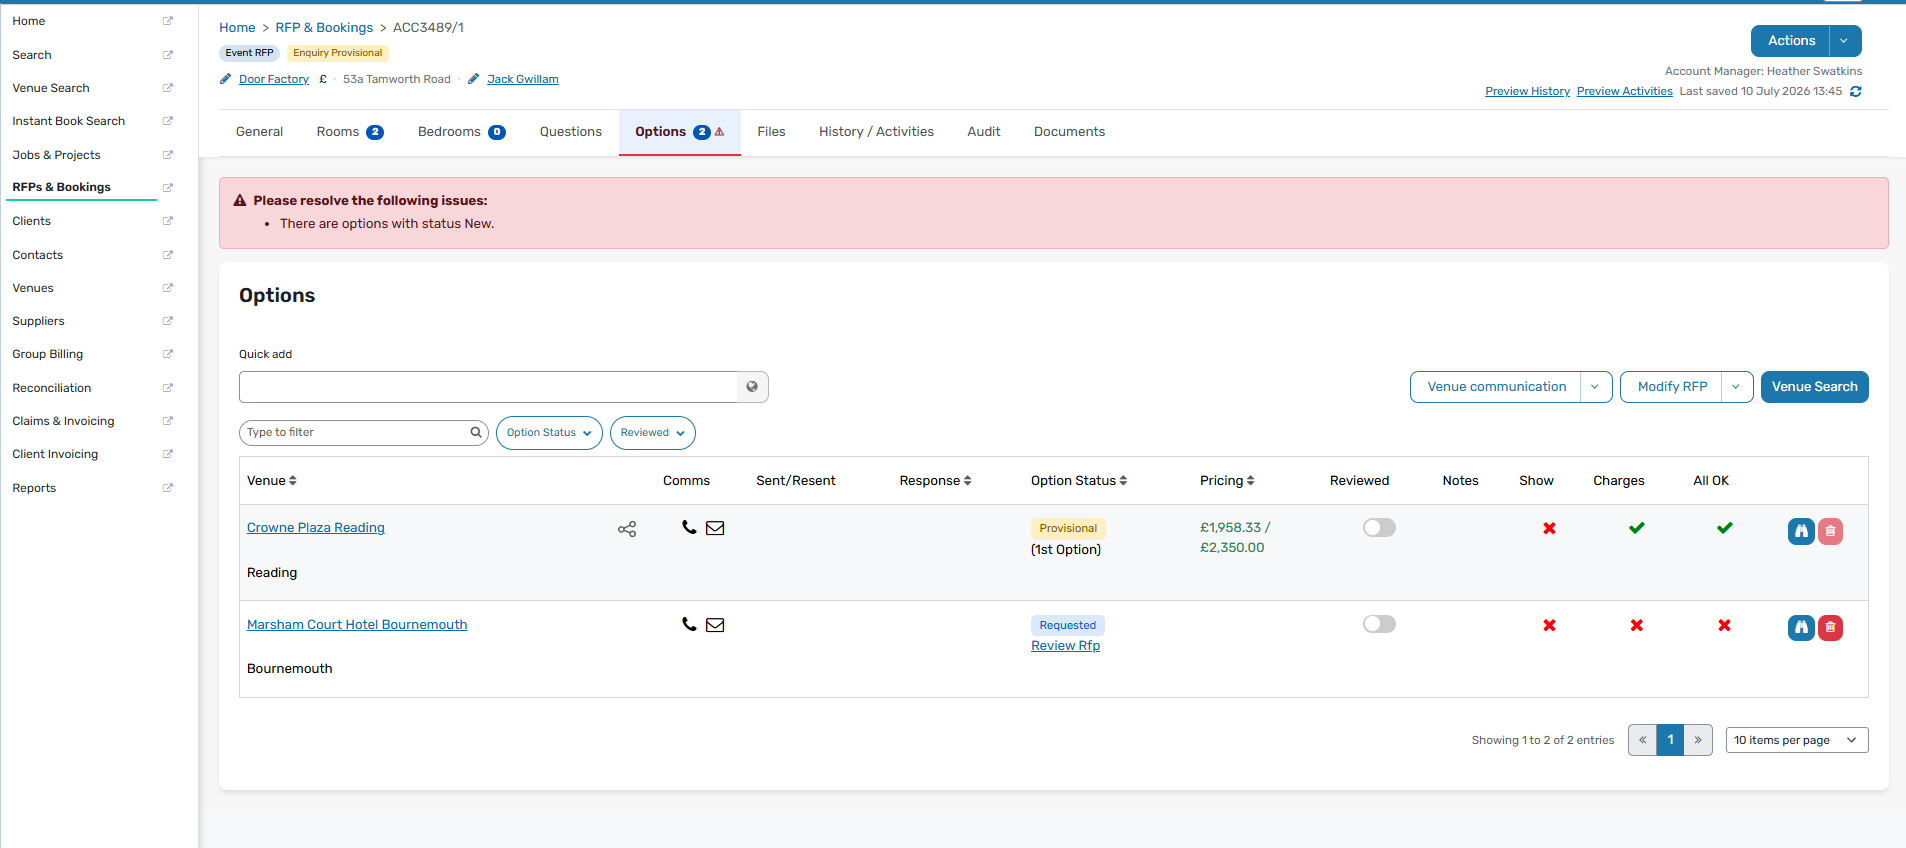
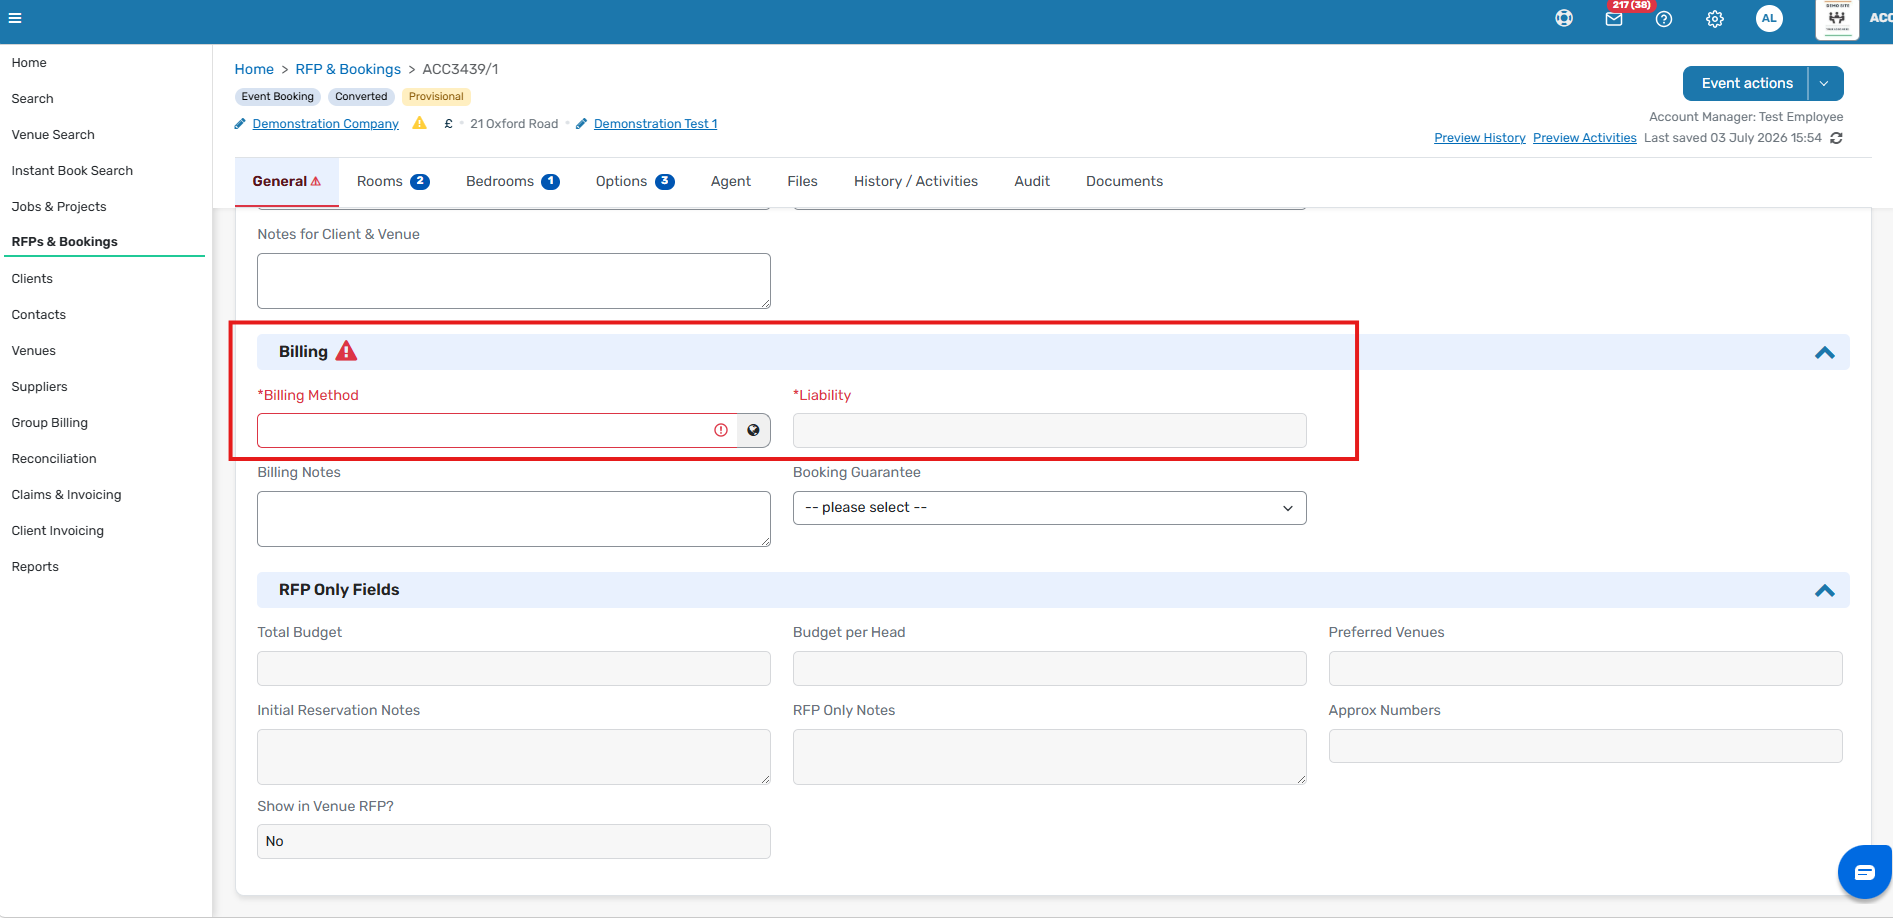
Click Actions, then Convert to Booking.
The booking page opens in the same tab. If anything is missing, the system shows a validation message with the fields that must be completed before you can move on.
Generate proposal documents
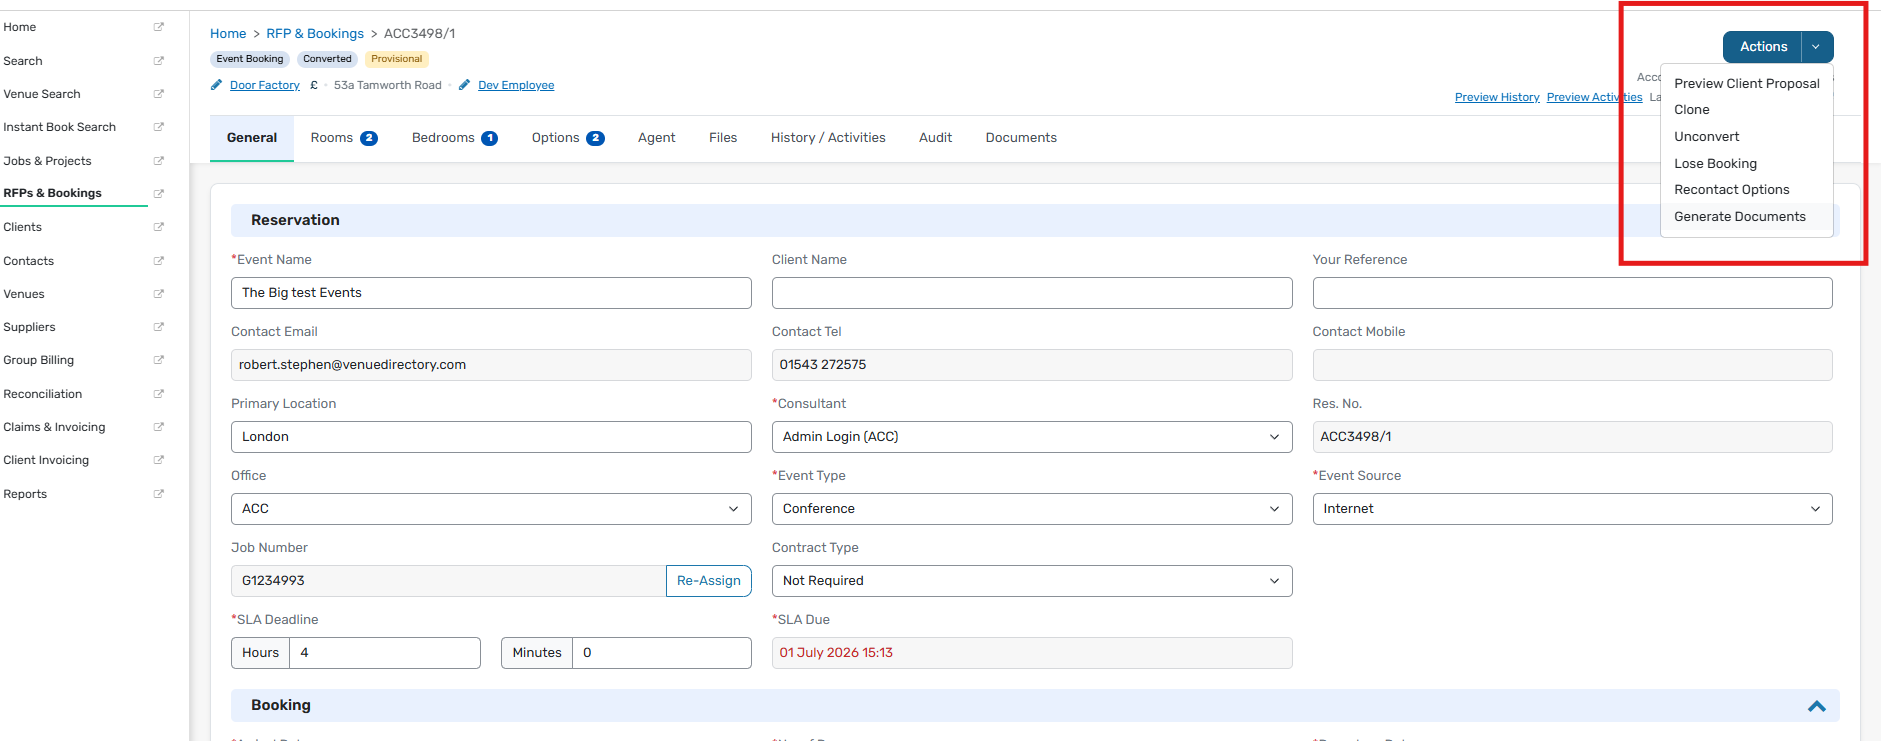
Click Actions, then Generate Documents.
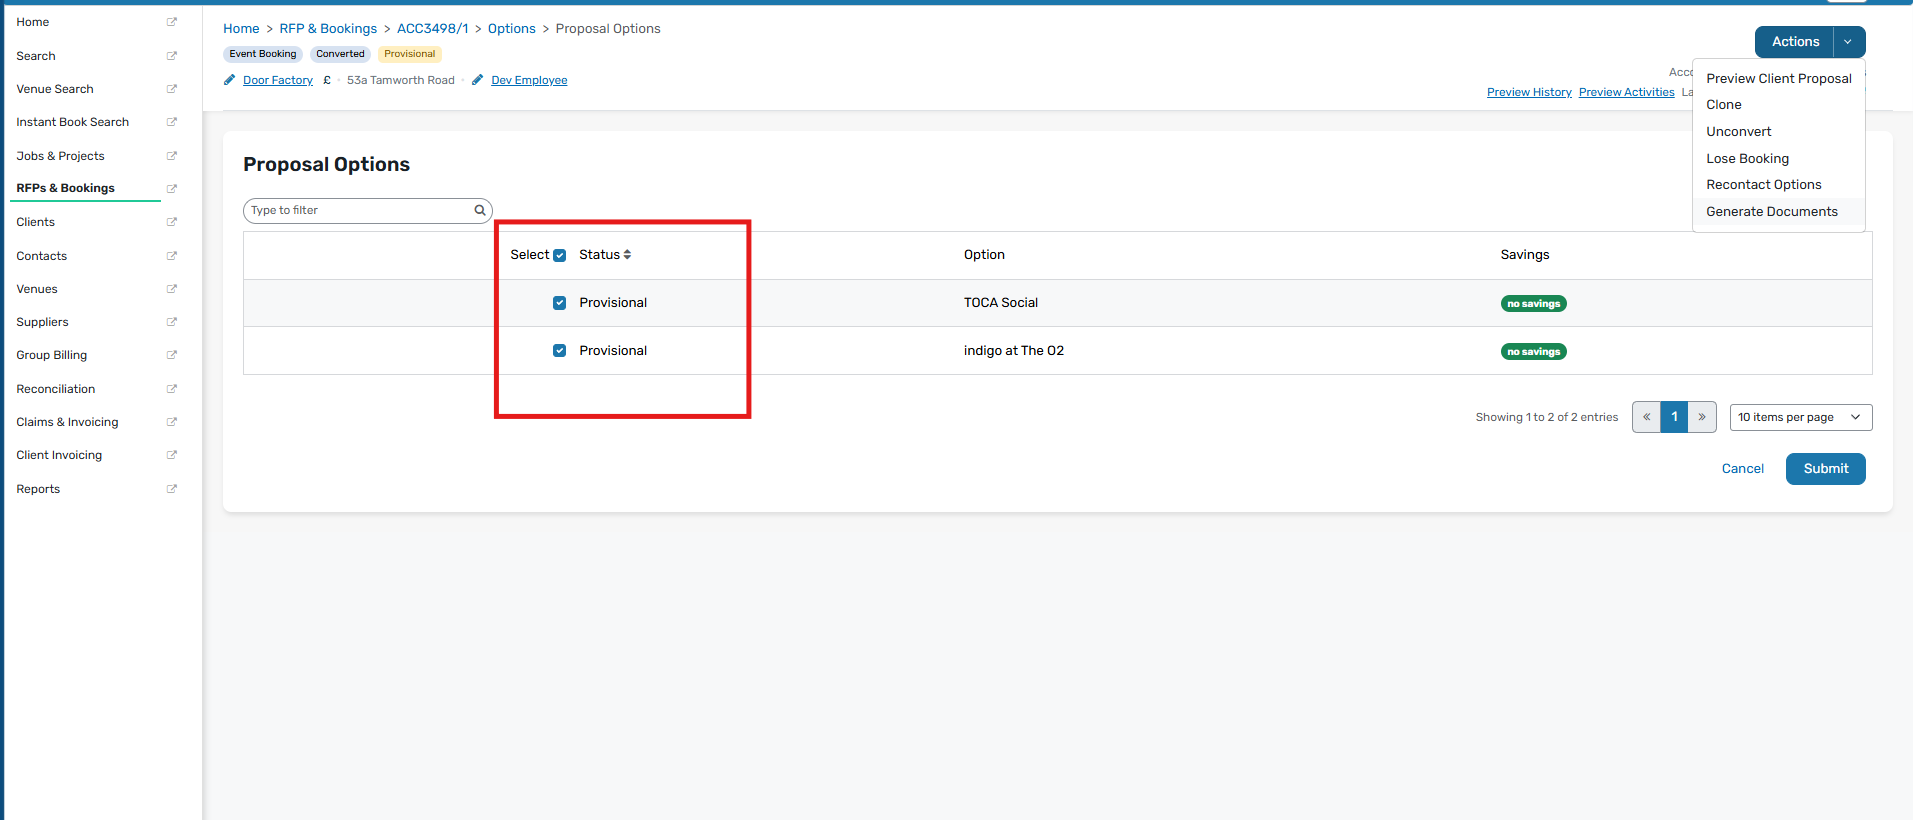
You can now choose the venues that will appear on the proposal. Click Submit, and you will be taken to the Documents tab, where you can review both the venue and client documents.
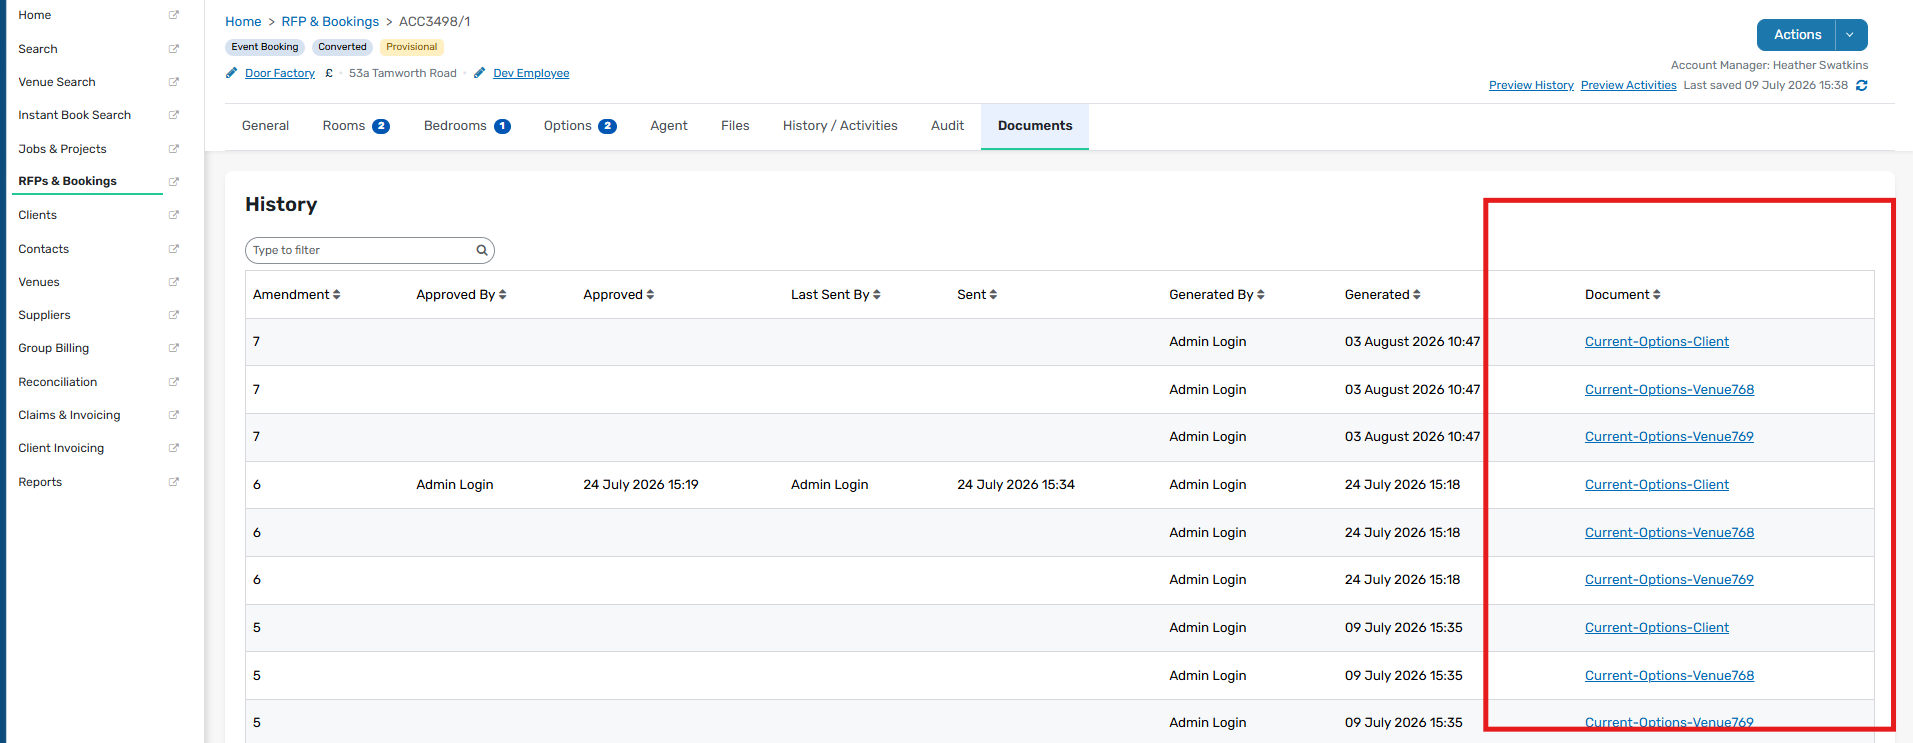
Send proposal documents
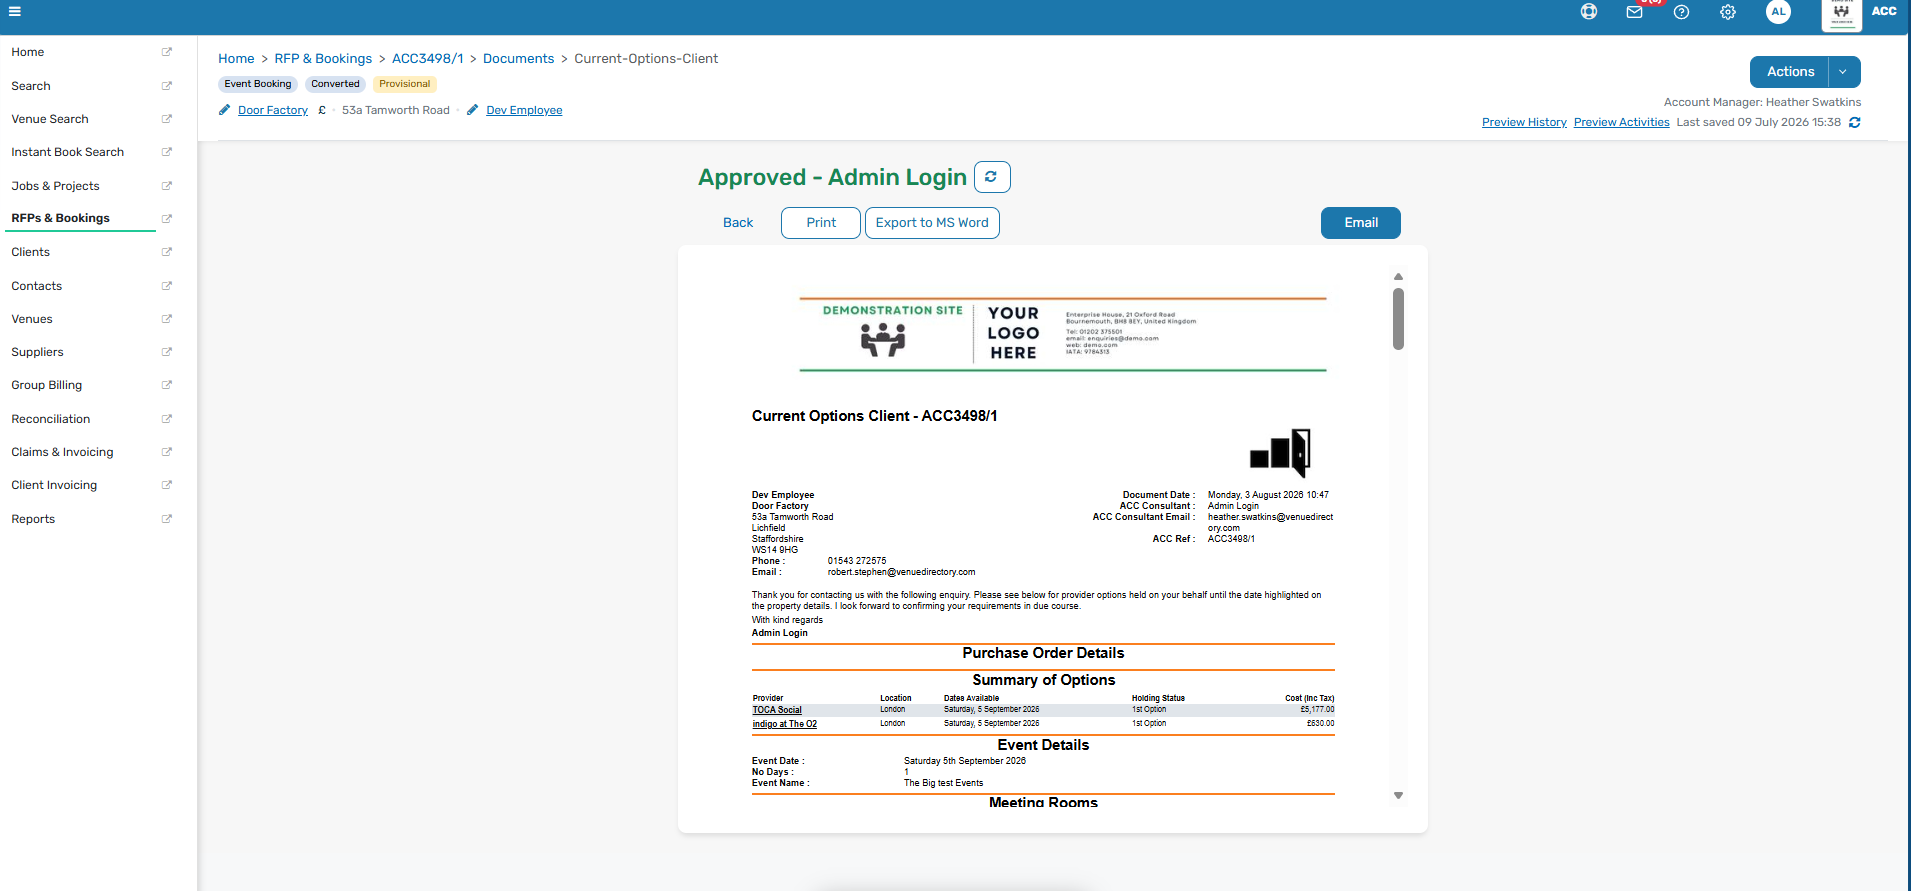
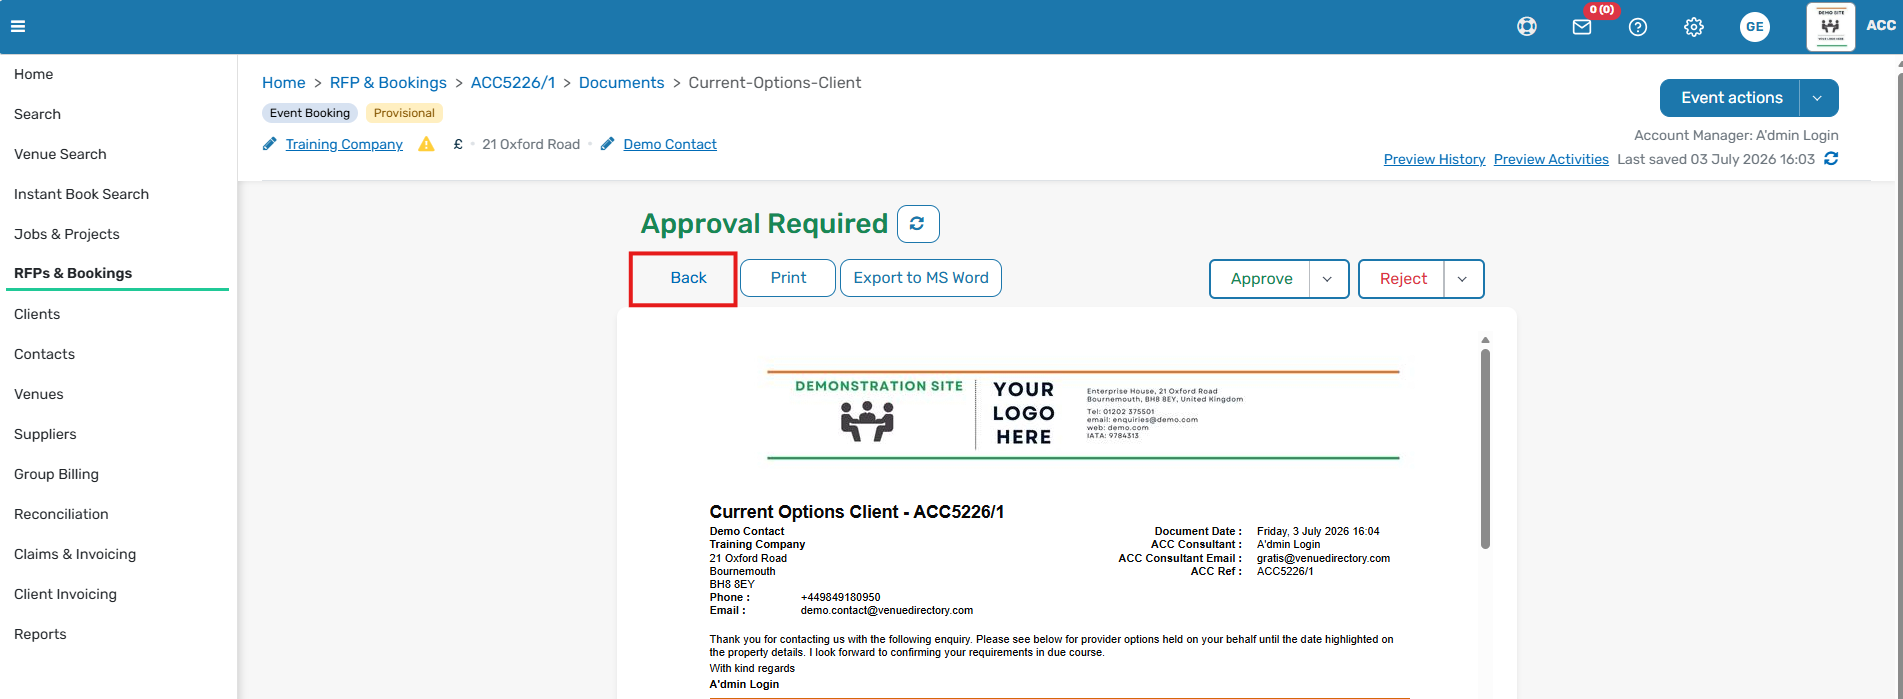
Open the document you want to send by clicking on it.
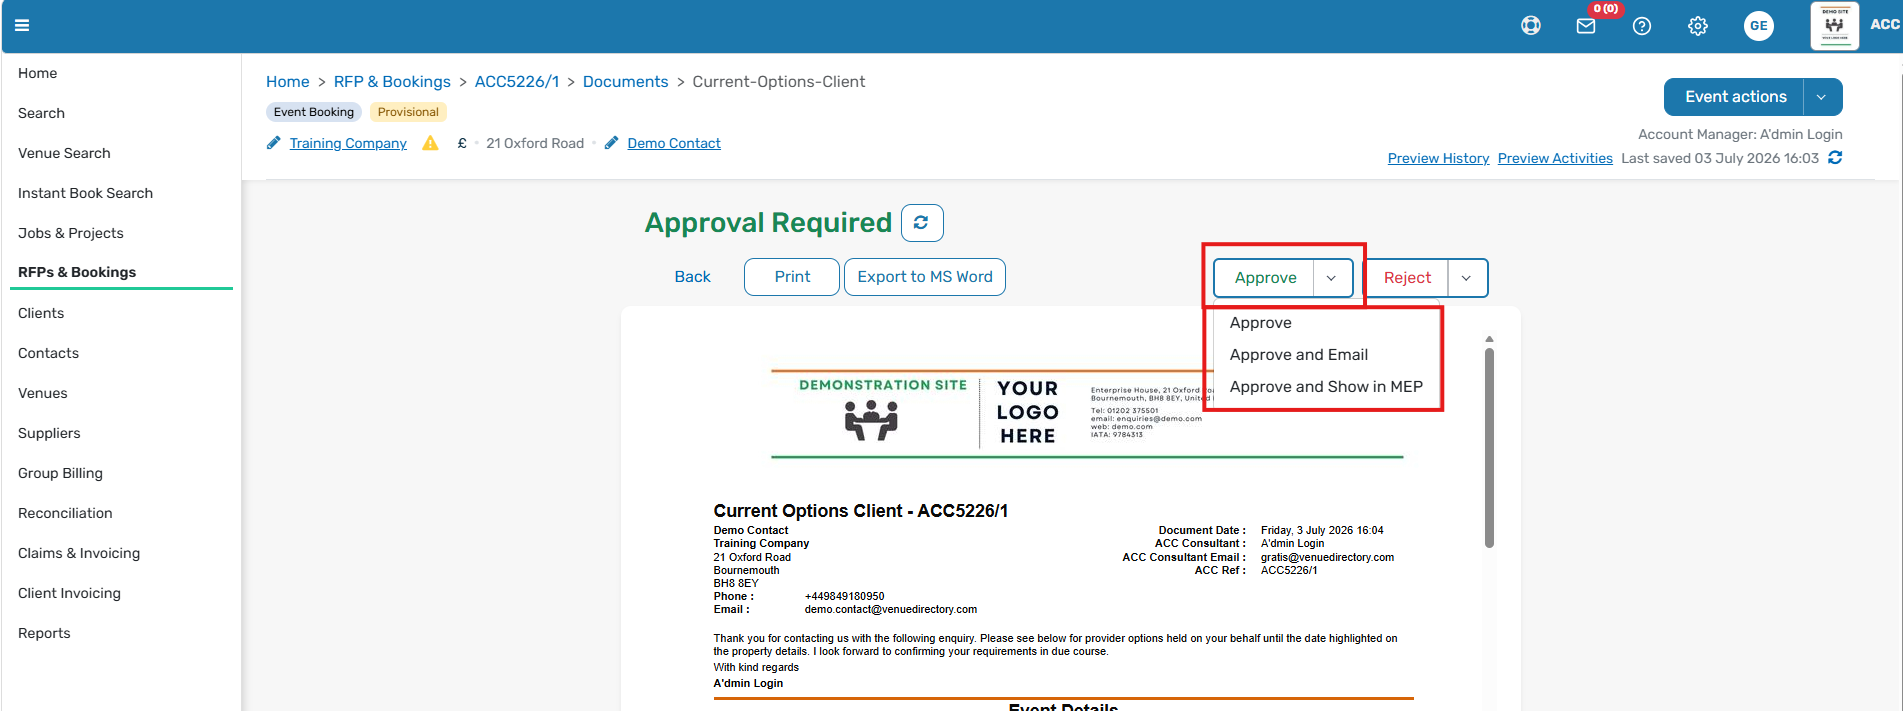
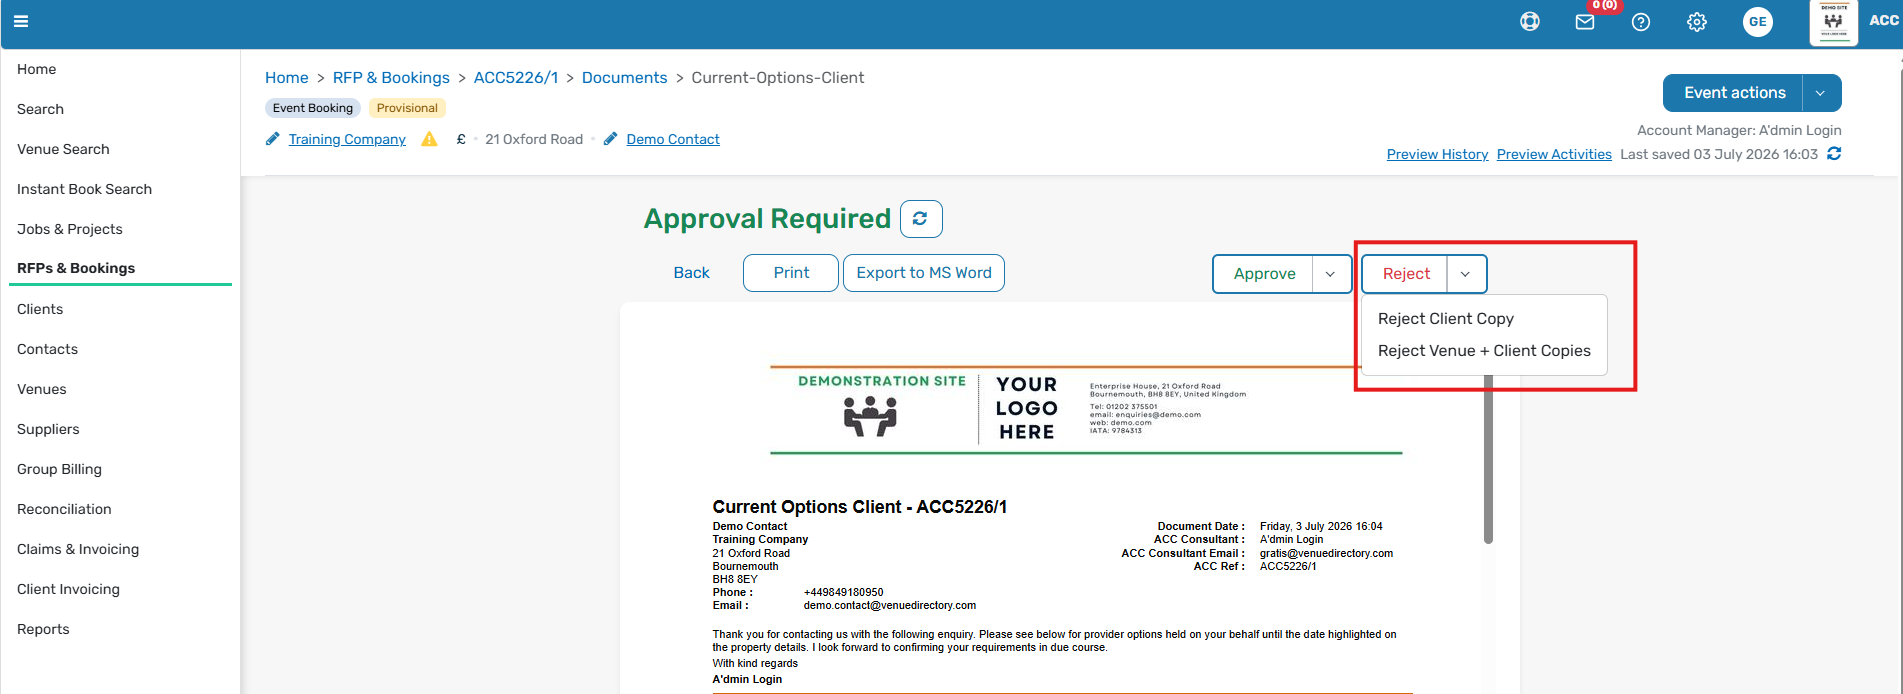
From there, you can print it, export it to Microsoft Word, approve it, or reject it.
The approve and reject actions include different options. For example, you can approve a document only, approve and email it to the client, or approve it and make it available in My Events Portal.
You can also reject just the client document or reject both the client and venue documents.
To return to the booking, click Back at the top left-hand side of the screen.
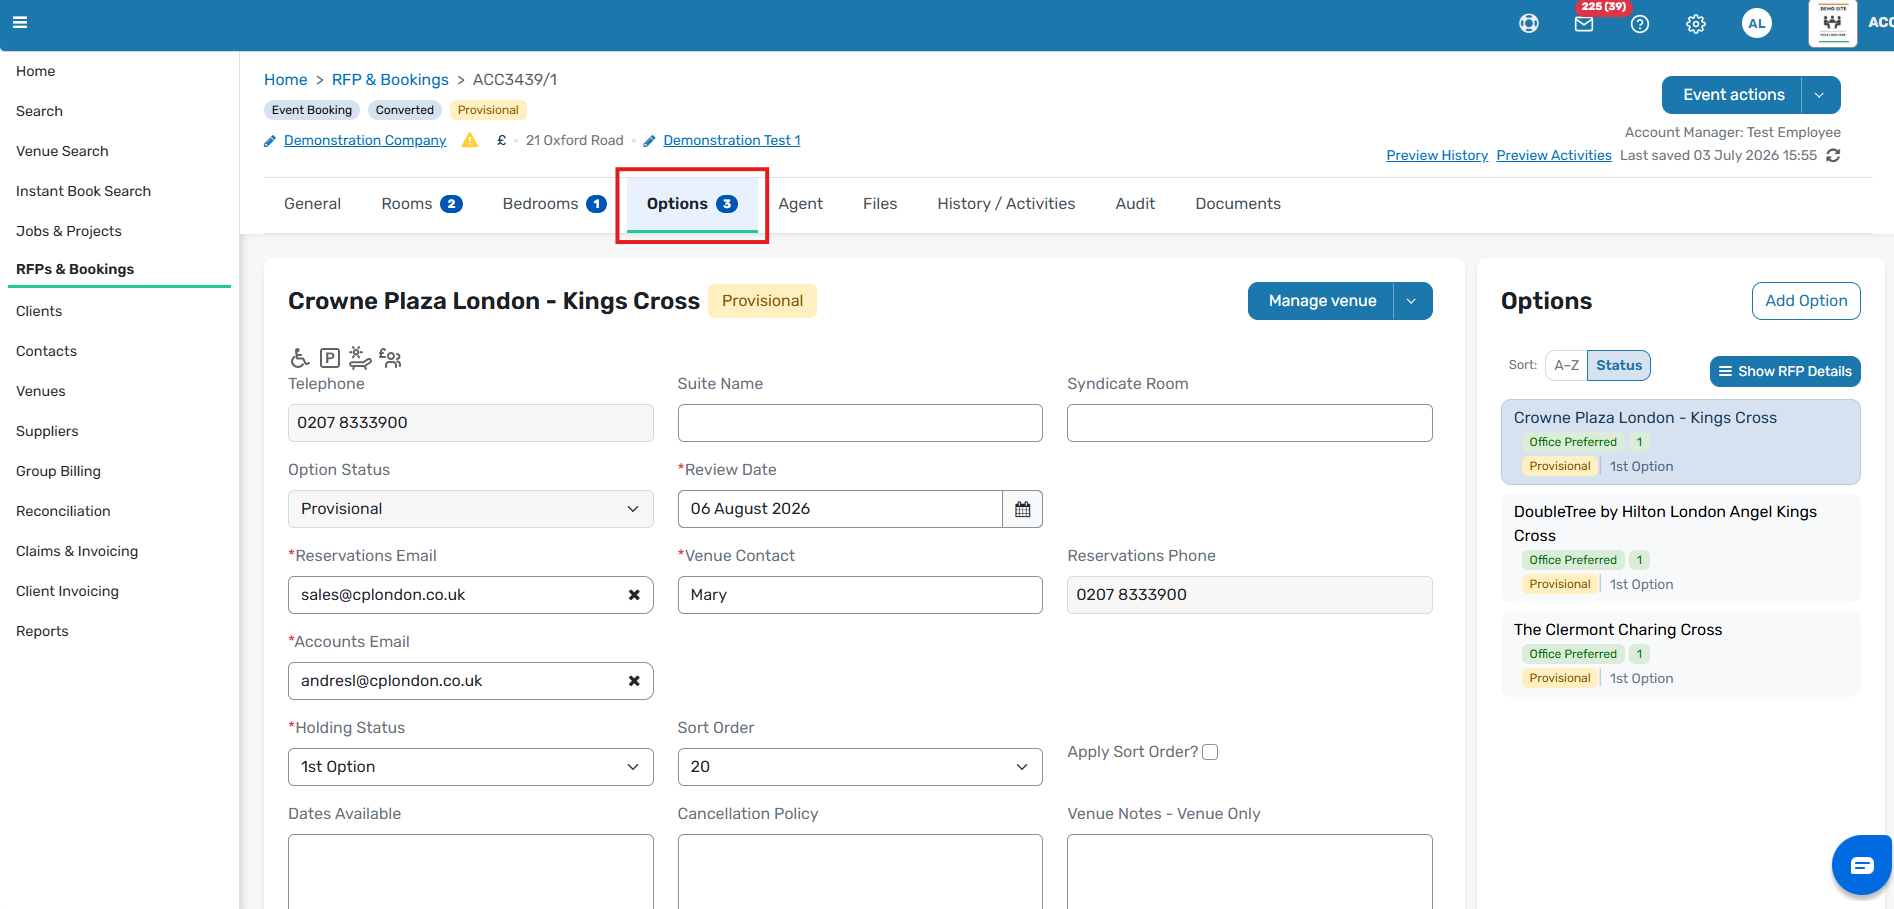
10. Work with booking options
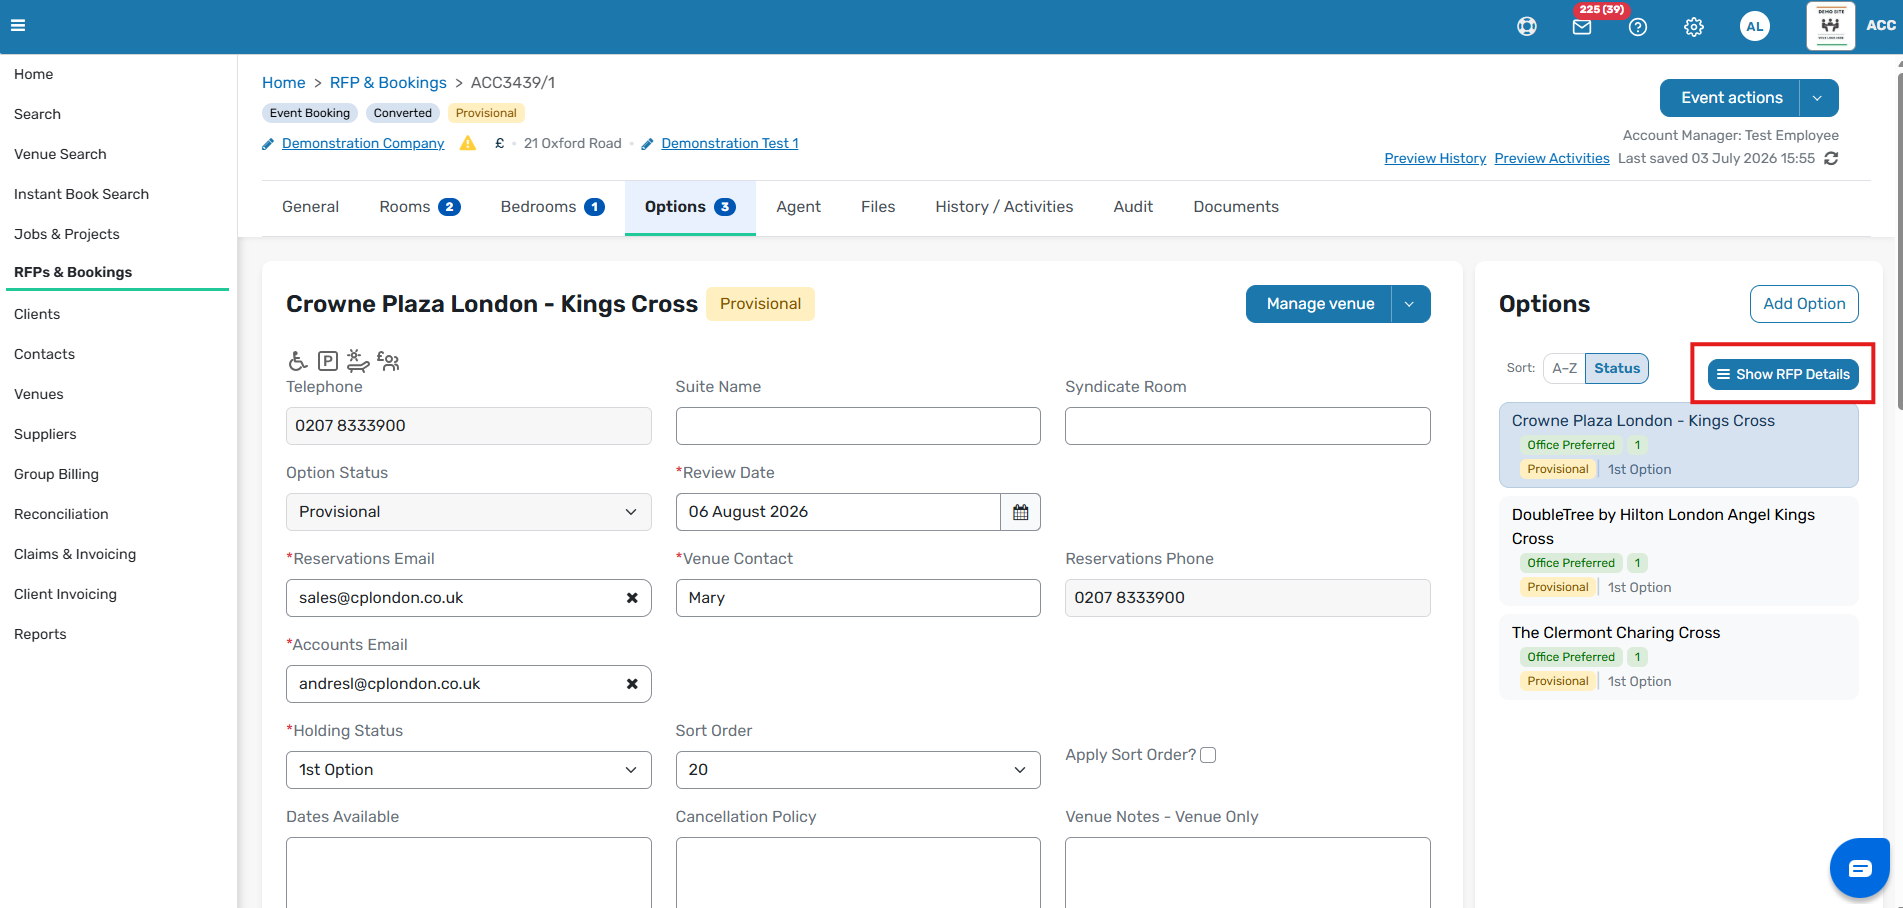
Once the RFP has been converted, venue details appear in the Options tab.
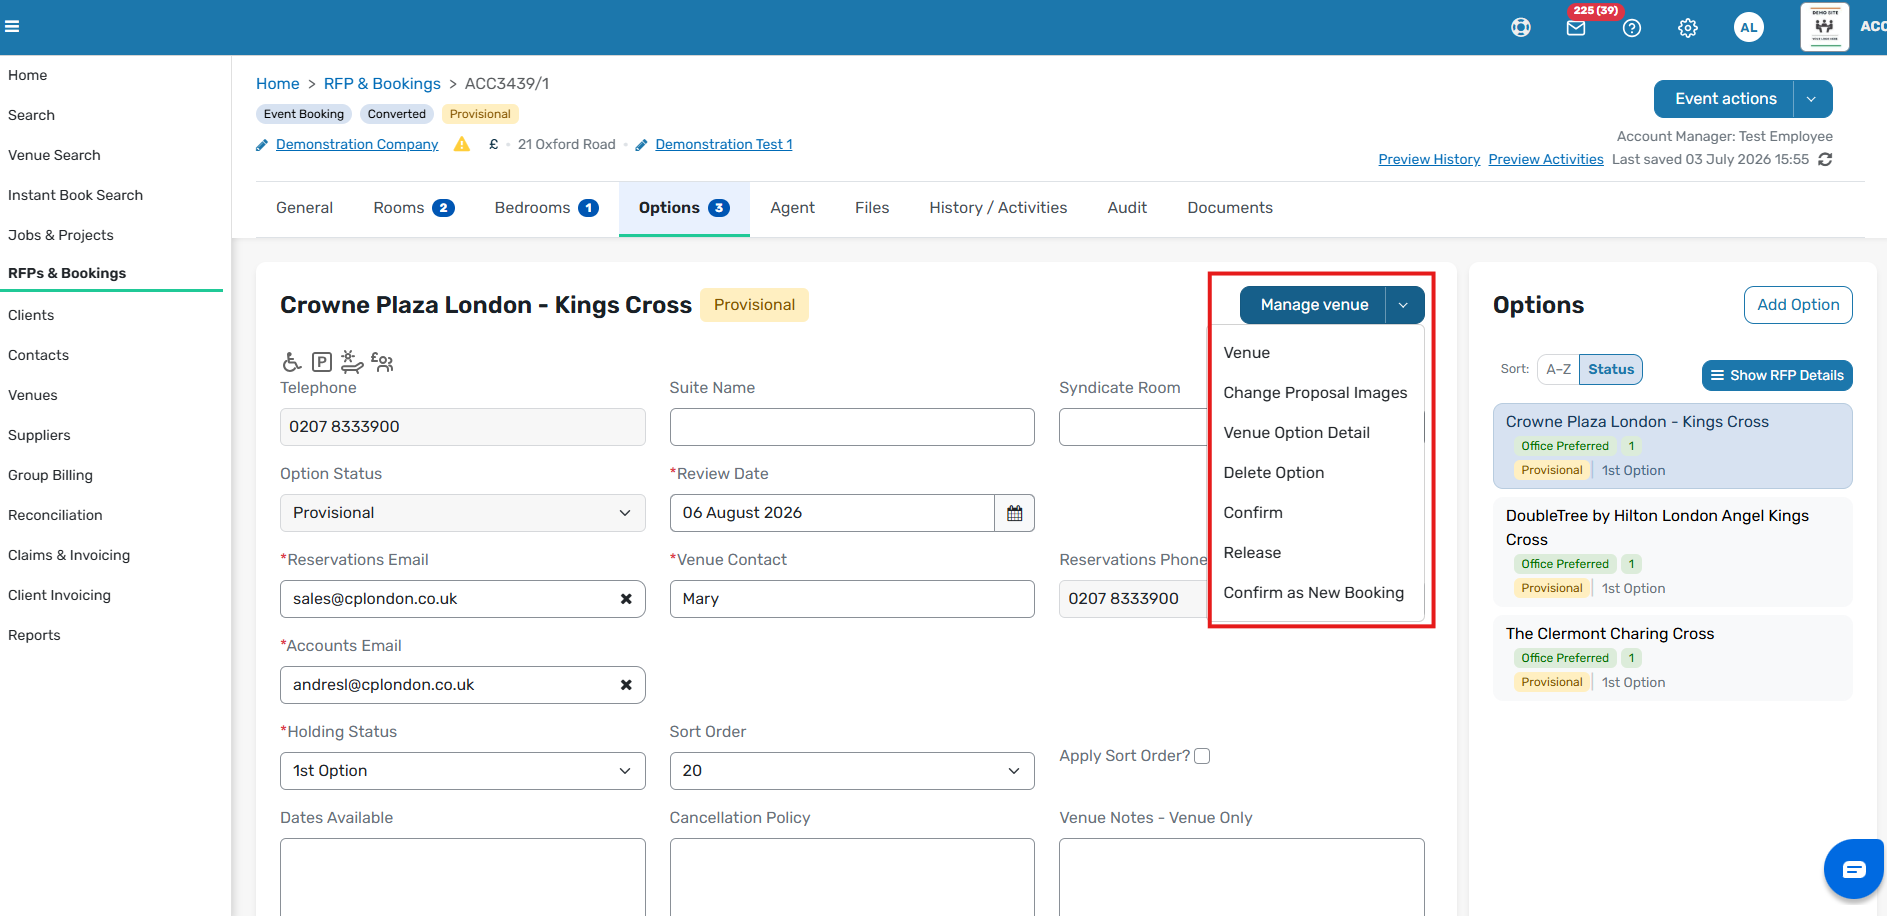
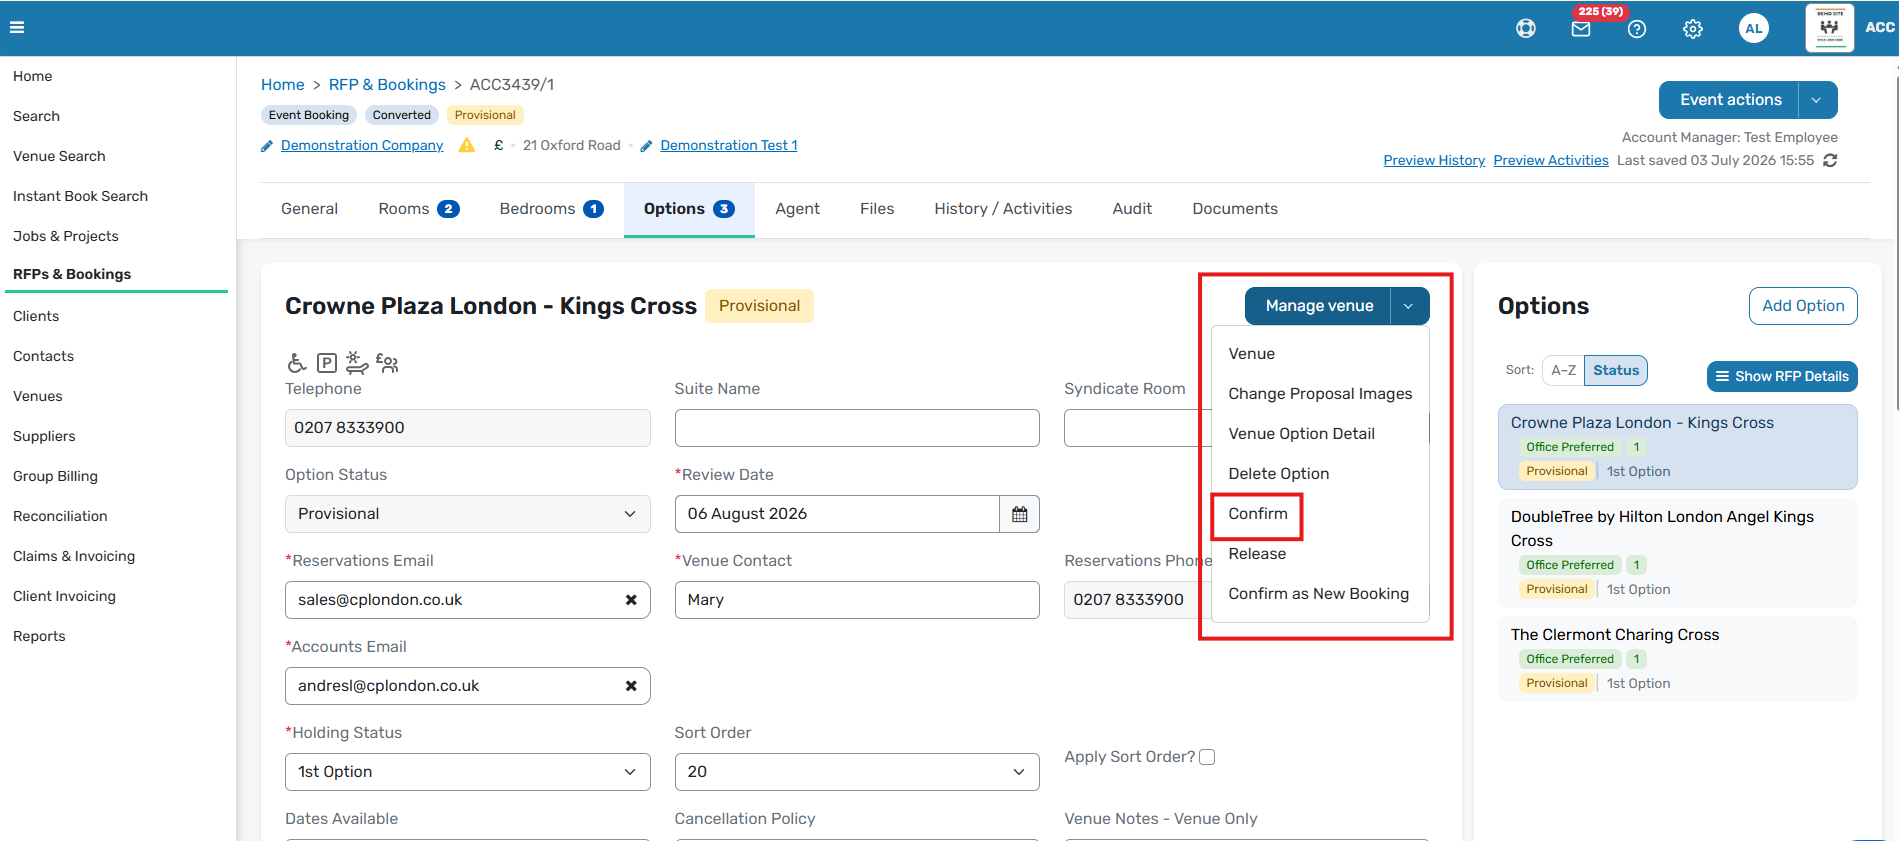
From Manage Venue, you can:
- Open the venue record in GRATIS
- Change the images shown on the proposal
- Edit the venue details shown on the proposal
- Delete the venue option
- Confirm the venue
- Release the venue
- Use Confirm as New Booking if required
Delete a venue only if you added it at the booking stage, and it has not already been presented to the client as an option. If the venue was contacted during the RFP stage and is no longer needed, release it instead.
On the right-hand side, you can see all venues linked to the booking, regardless of status.
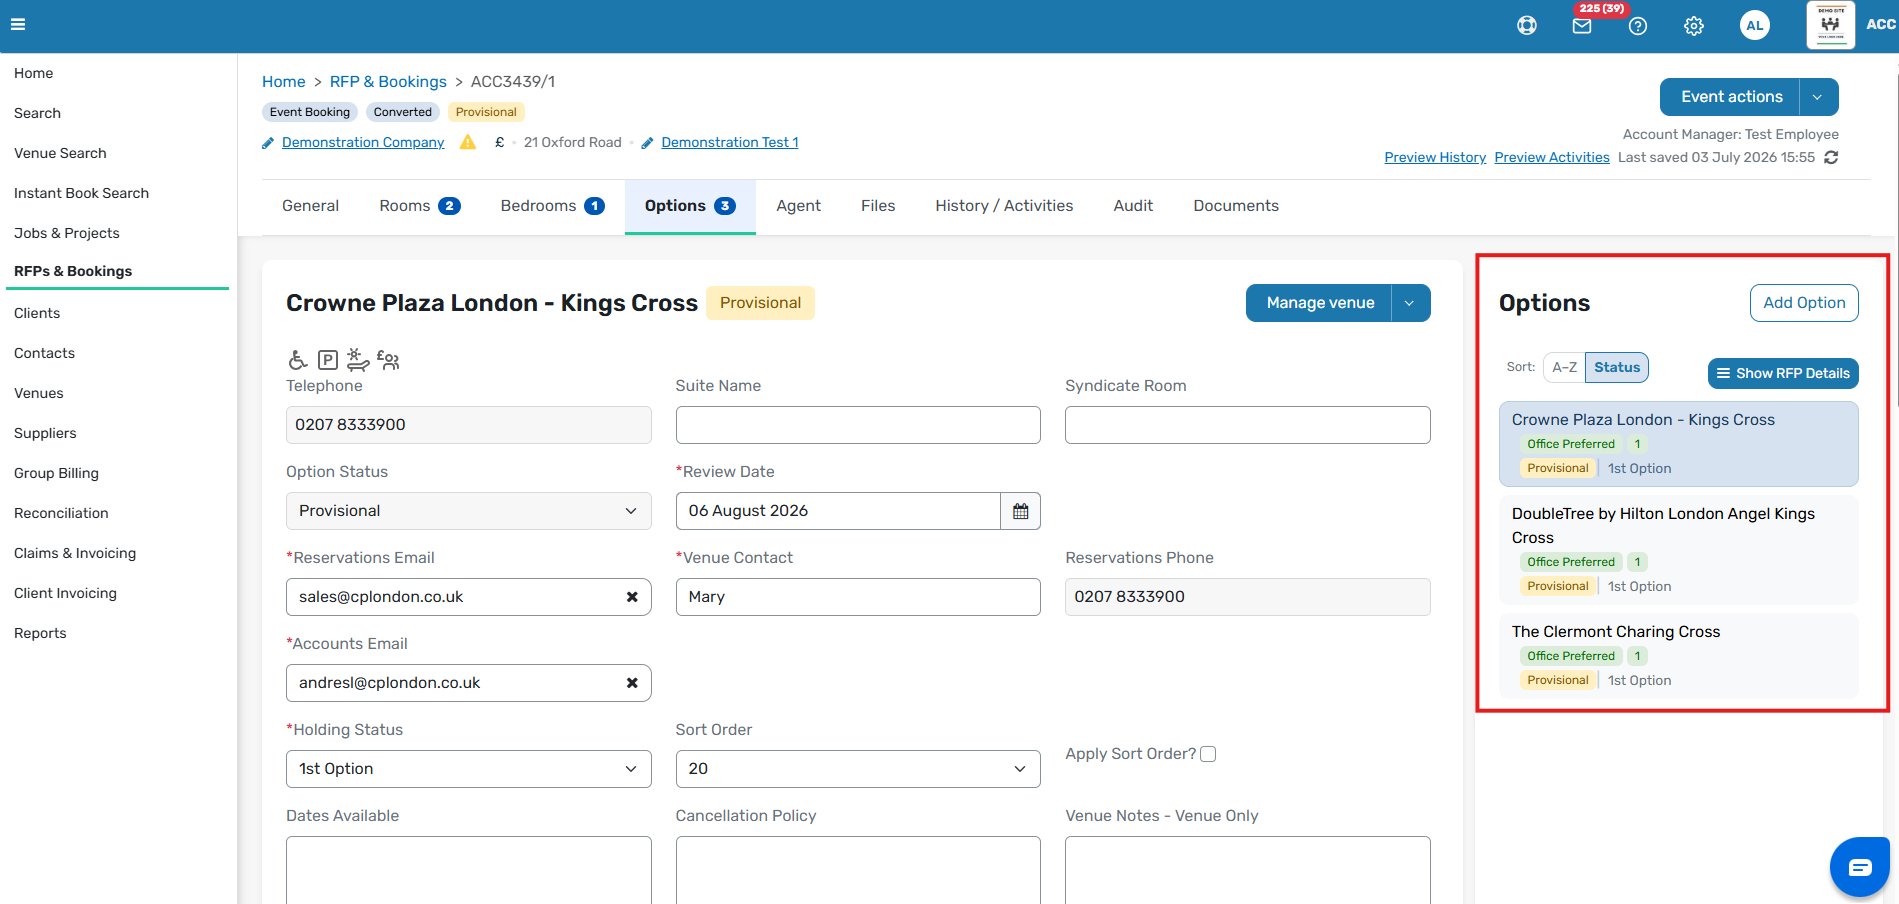
Use Add Option to add a new venue at the booking stage.
Please note that you cannot send an RFP to venues from the booking stage. If you add a venue at this point, you must contact it outside the system and enter its quote and details manually.
If you need to refer back to the RFP stage information, click Show RFP Details.
11. Confirm, amend, cancel, or lose the record
Confirm a booking
To confirm a booking, select the chosen option, click Manage Venue, and then click Confirm.
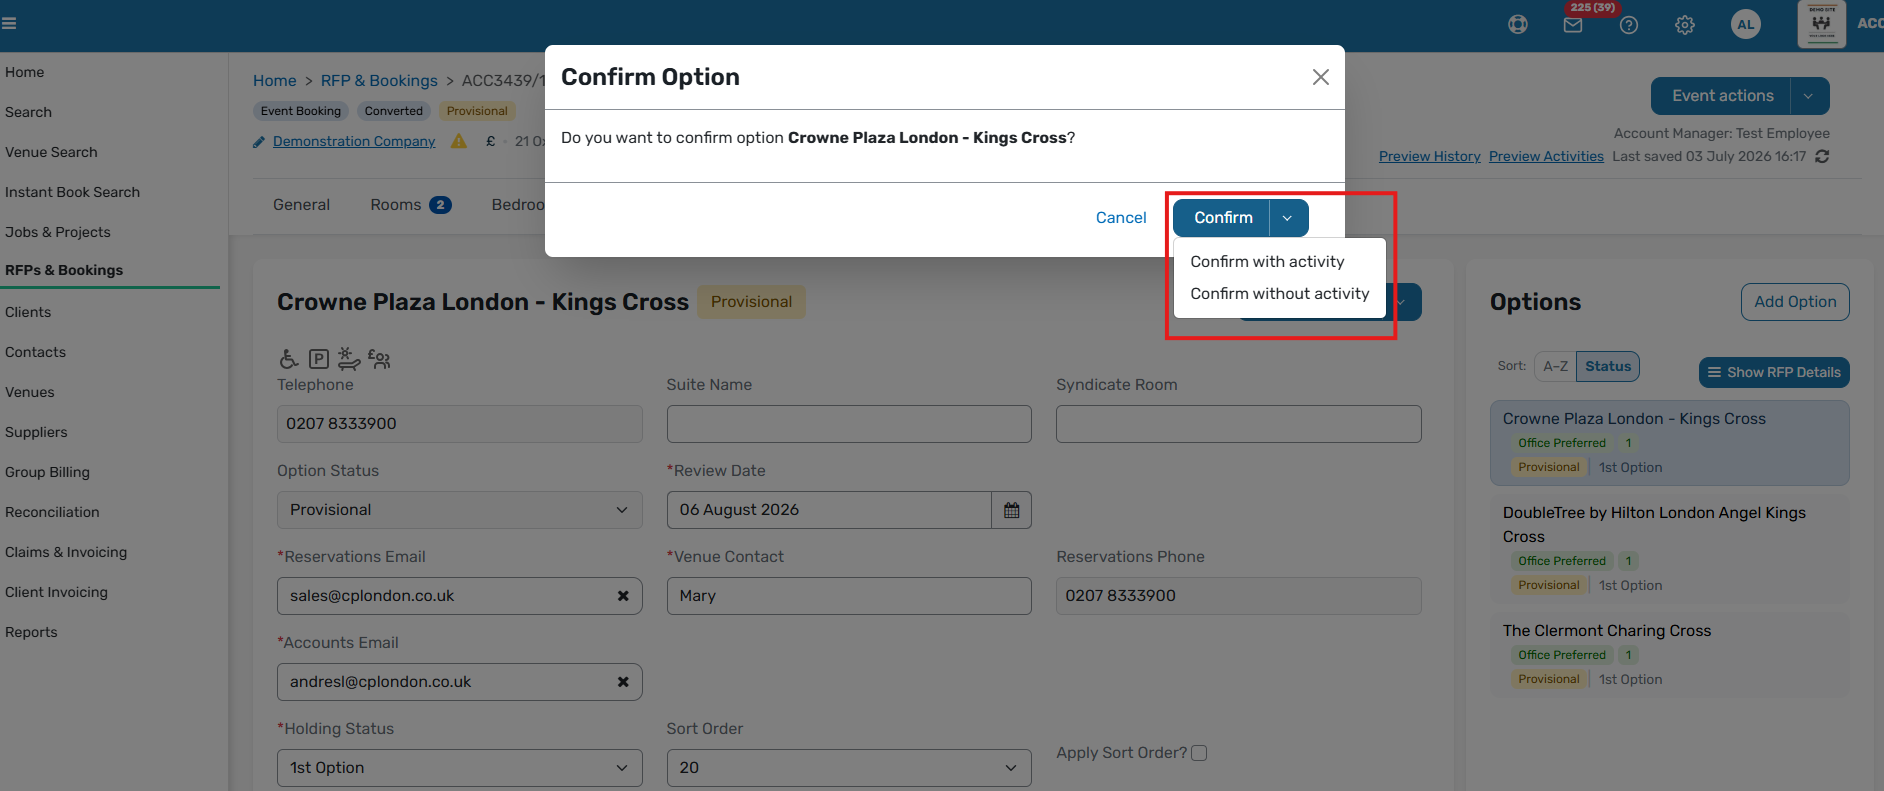
You can confirm with or without a follow-up activity.
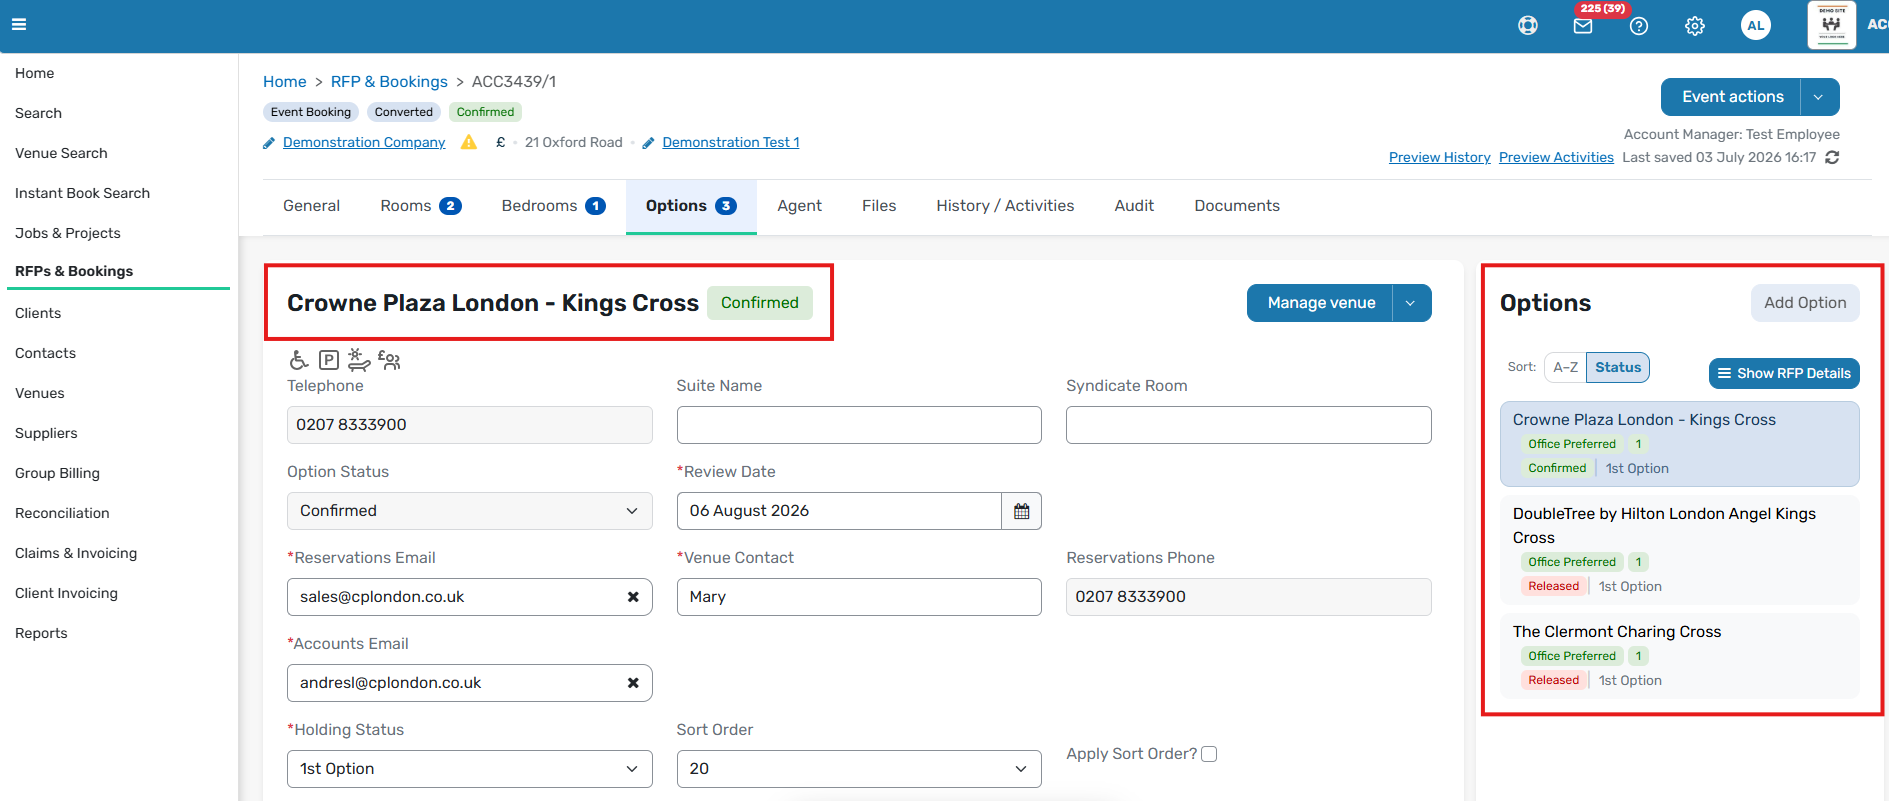
Confirmation creates the relevant client and venue or supplier documents, and release documents can also be created for unsuccessful options.
Amend a booking
Bookings can be amended after creation. Once your changes are saved, amendment documents can be generated for onward transmission.
Cancel a booking
To cancel a booking, click Actions, then Cancel Booking.
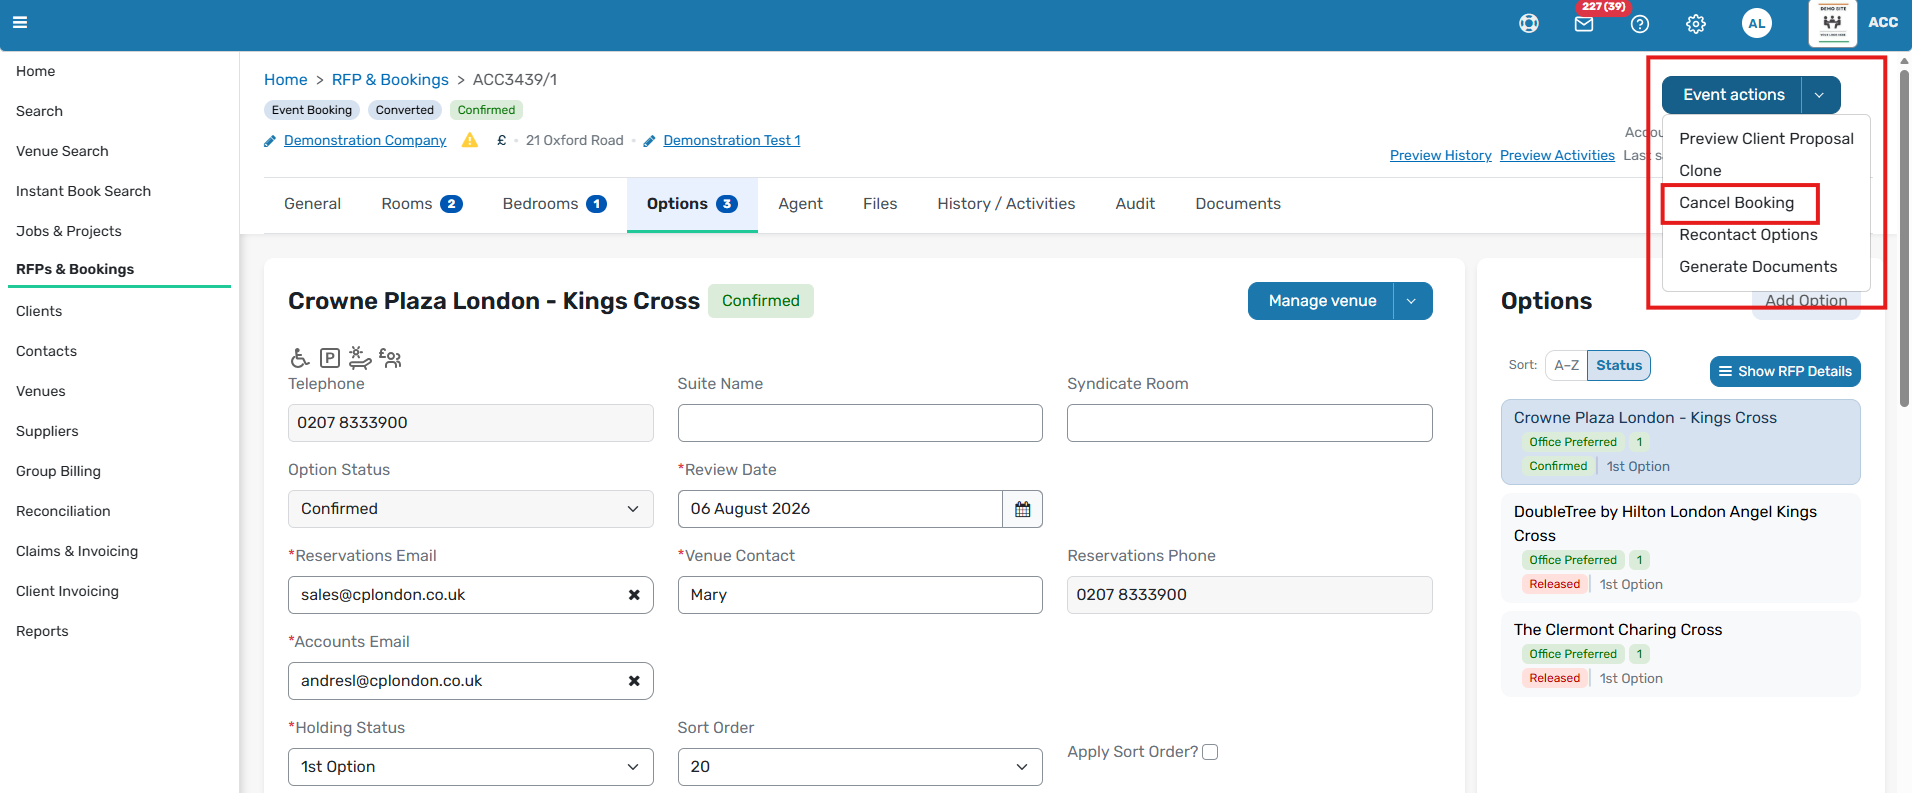
When you cancel a booking, you will be prompted for a reason, and cancellation documents will then be generated.
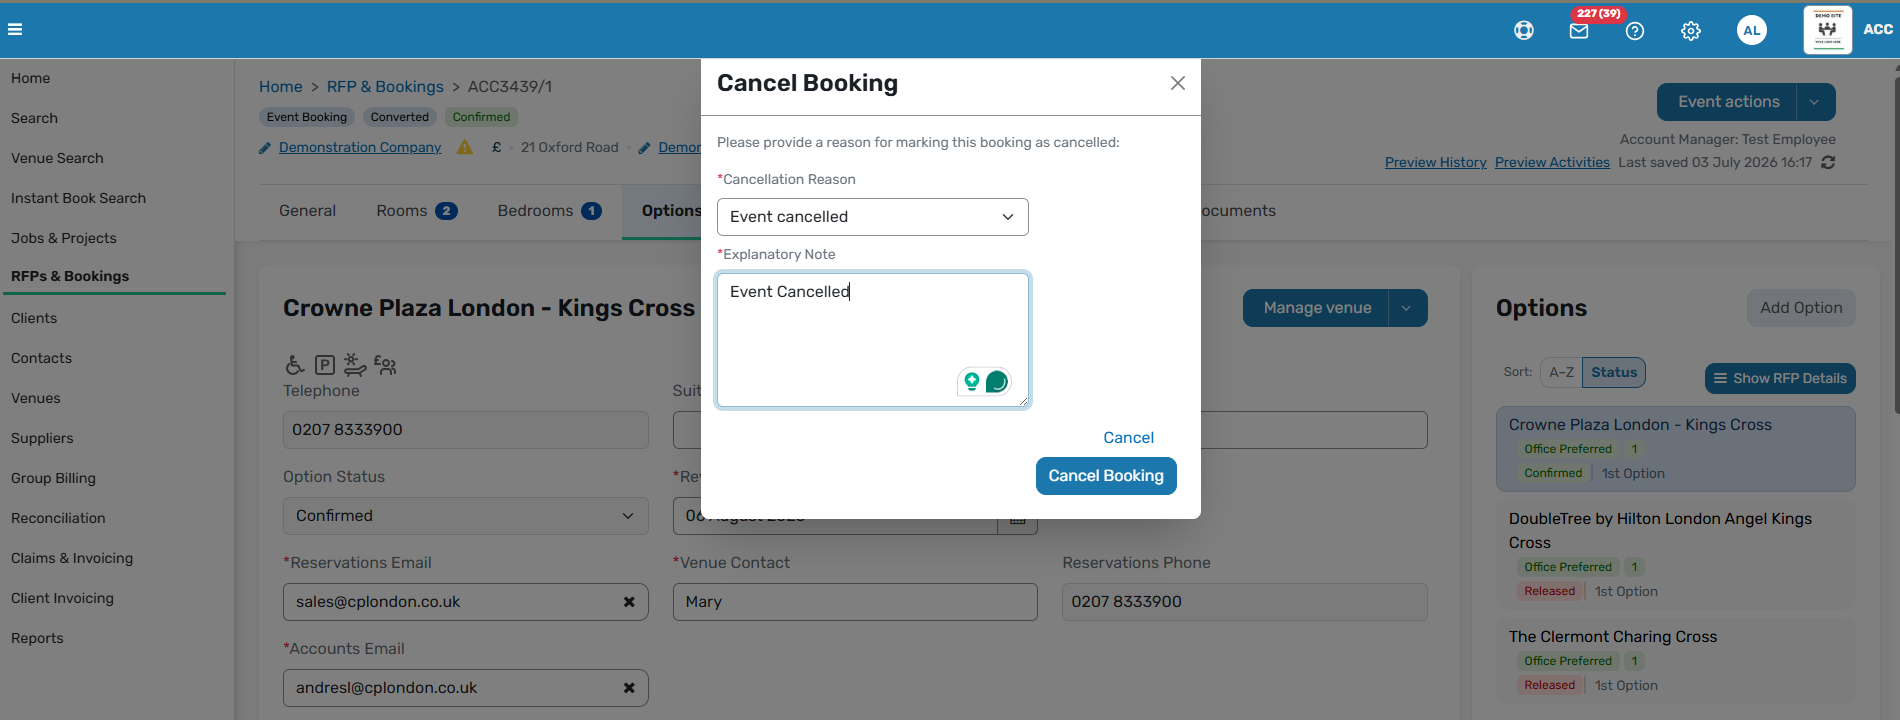
If cancellation charges apply, update the charges grid before completing the cancellation so the charges are reflected correctly.
Lose an RFP
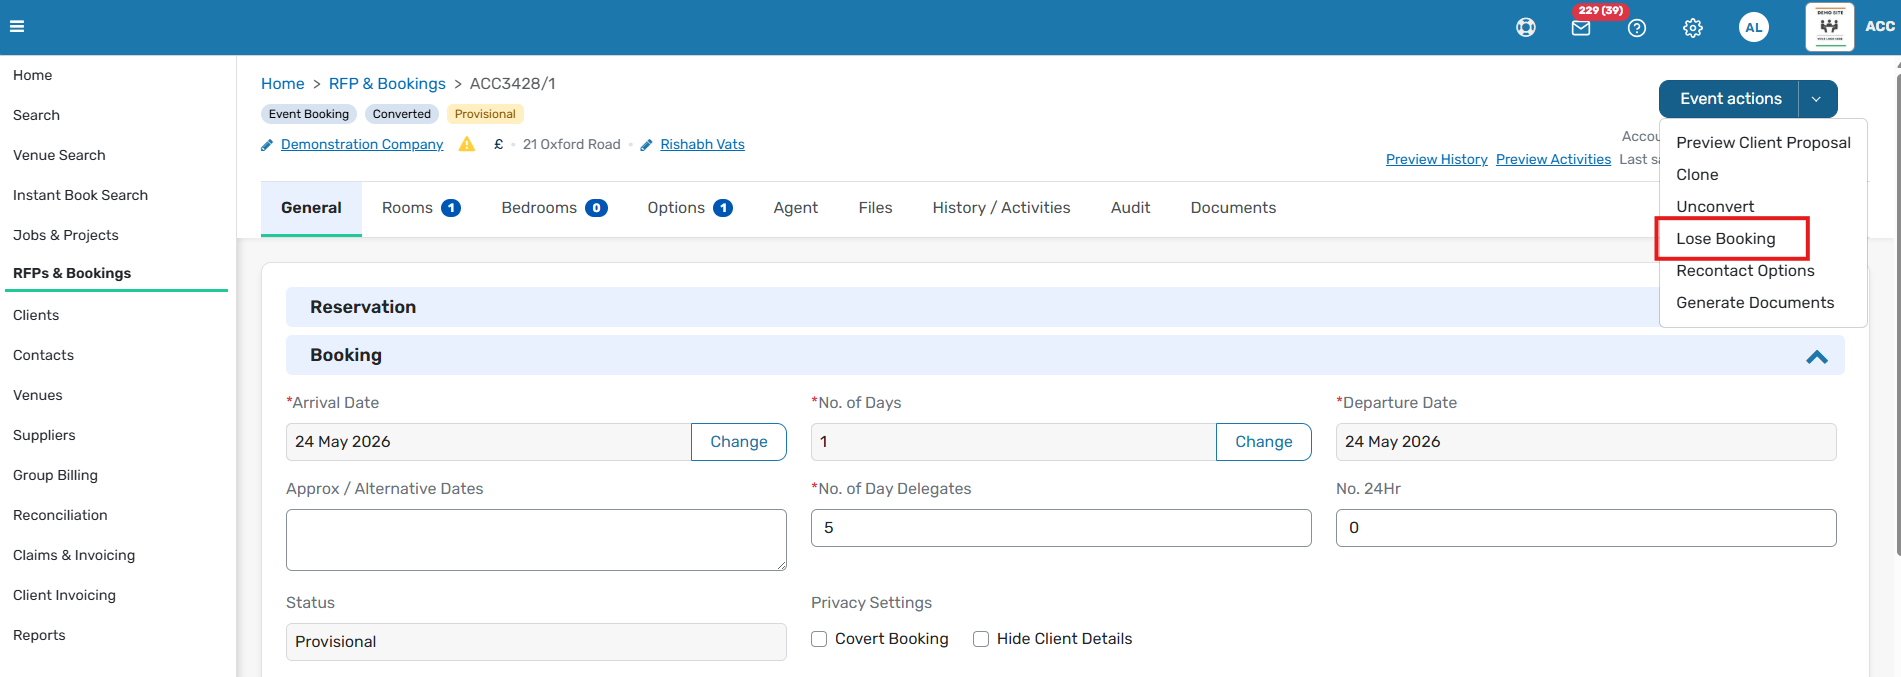
If the event does not proceed to the booking stage, use the Actions button and select Lose Booking or the equivalent loss option for the record.
Was this article helpful?
That’s Great!
Thank you for your feedback
Sorry! We couldn't be helpful
Thank you for your feedback
Feedback sent
We appreciate your effort and will try to fix the article