The Claims and Invoicing process in GRATIS covers everything from creating claims to sending reminders, allocating payments, and issuing invoices. It follows four stages:
- Create commission claims and send them by email.
- Send a first reminder to venues summarising all outstanding claims.
- Optionally schedule a second reminder (for example, 14 days later or 42 days after the original claim date).
- Allocate payments and create invoices to receive settled claims.
TABLE OF CONTENTS
- Key settings
- Exchange rates and currency
- Reprint Invoices/Claims tab
- Allocate Payments tab
- Scenario 1 – Venue pays the exact amount (single payment)
- Scenario 2 – Venue pays the credit charge
- Scenario 3 – Venue underpays, and you will continue to claim the shortfall
- Scenario 4 – Venue underpays, and you will write off the shortfall
- Scenario 5 – Multiple outstanding claims; allocate to specific reservations
- Scenario 6 – Multiple claims, including one overpayment (credit charge) and one underpayment (write off or claim)
- Invoice report for your accounts system
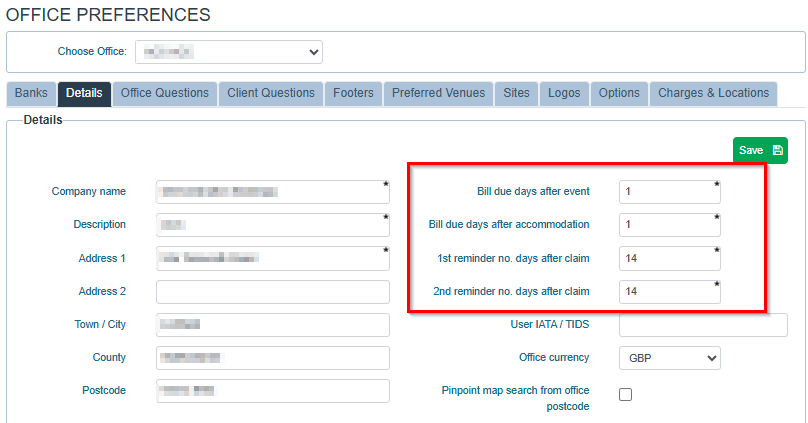
Key settings
- Bill Due Date (Accommodation and Conferencing) and Reminder Dates can be set in SETUP > OFFICE PREFERENCES > DETAILS.
Exchange rates and currency
- Exchange rates are locked at the time a claim is created to ensure clarity between booking and payment dates. Minor variances at payment time are handled during allocation.
- Claim currency is generated based on reservation settings: UK bookings in Sterling (GBP); European bookings (where a Euro flag is set in the countries table) in Euros (EUR); all other countries in US Dollars (USD).
- Rates source is taken when the venue is added to the enquiry/booking and is sourced from XE.com.
Please refer to this document to see how to create commission claims
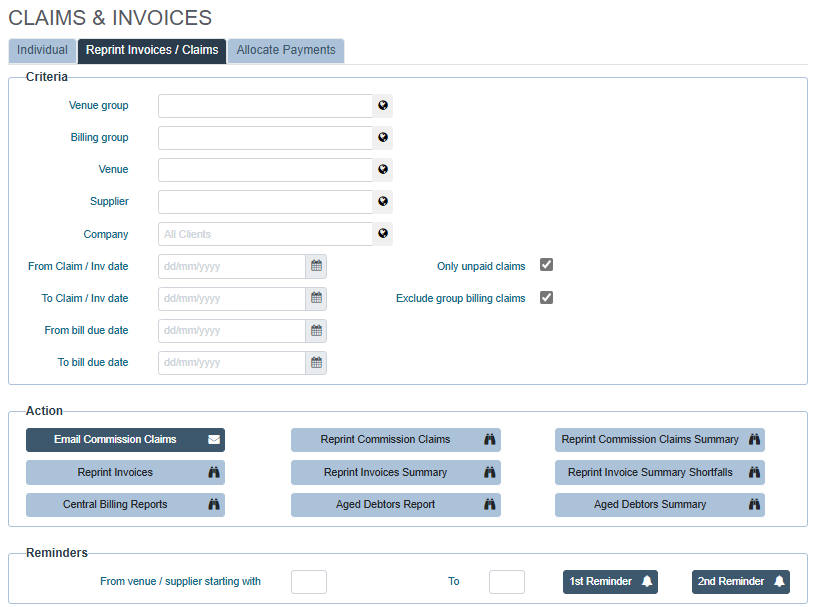
Reprint Invoices/Claims tab
Use the Reprint Invoices/Claims tab to view and resend documentation.
- Reprint Commission Claims Summary shows which claims were raised on which dates, and which remain outstanding.
- If a claim appears on this summary, it is still open.
- TIP: To check whether a supplier owes commission, choose their company from the dropdown and select Reprint Commission Claims Summary to see all commissions owed.
Sending claims in a batch
- Select the date range to claim and click Email Commission Claims.
- In the pop‑up, tick the venues to include and click Email Selected.
- Multiple claims for the same supplier are combined into a single email.
Re‑sending or reprinting a specific claim
- Go to the Individual tab and select the claim from the dropdown picklist to resend or reprint.
Sending reminders
- In the Reminders section (bottom of the screen), populate the range using “From Venue/Supplier name starting with” and “To Venue/Supplier Starting with” (for example, A to Z).
- Click 1st Reminder or 2nd Reminder.
- In the pop‑up, select the venues to remind and click Email Selected.
Allocate Payments tab
Payment Allocation & Invoicing
You can enter banking for the day as a batch or process payments individually. Until you’re fully comfortable, entering payments one by one is recommended (a single payment may cover multiple claims).

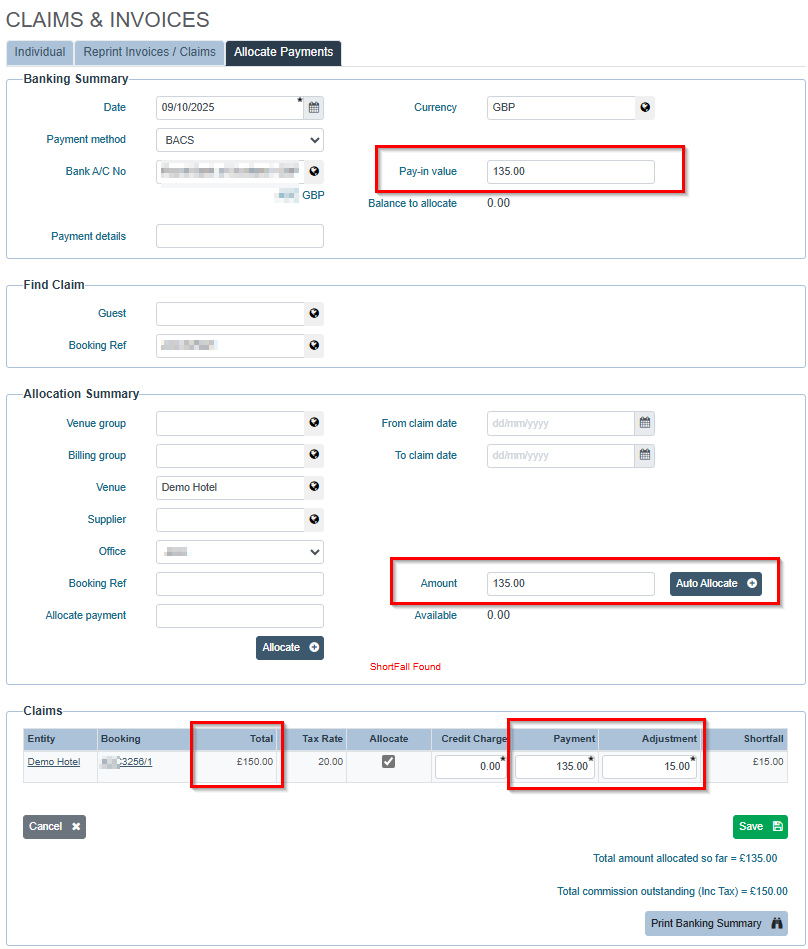
Scenario 1 – Venue pays the exact amount (single payment)
- Select the paying‑in date, currency, payment method, and bank account.
- Enter pay‑in value and pay‑in slip number.
- Select the paying venue, then click Edit.
- In the lower section, enter the amount; the Available Amount will auto‑calculate.
- Click Auto Allocate to apply funds to the outstanding claim(s); the available balance should be zero.
- Click Save to create the invoice. A print option will be available if required.

Scenario 2 – Venue pays the credit charge
- Enter the venue’s payment in the Banking Summary as usual.
- If this is the only claim, click Auto Allocate. The remaining amount in the Available box represents the credit charge.
- Enter the over‑amount in the Credit Charge field, then Save to create the invoice. The credit charge appears as a separate line.

Scenario 3 – Venue underpays, and you will continue to claim the shortfall
- Enter the payment in the Banking Summary.
- If it’s the only claim, click Auto Allocate. GRATIS flags the shortfall and populates the Shortfall column.
- Click Update. The paid amount is invoiced; the shortfall remains as an outstanding balance.
- Send the resulting invoice and a covering note to request settlement of the shortfall. The remaining balance will appear on the next reminder.

Scenario 4 – Venue underpays, and you will write off the shortfall
- Enter the payment in the Banking Summary.
- If it’s the only claim, click Auto Allocate. The shortfall appears in the Shortfall column.
- Enter the shortfall amount in Adjustment to write it off, balancing the claim.
- Click Save. The invoice shows the adjustment/discount. Commission is reduced, but venue and client spend remain intact for accurate MI.
Scenario 5 – Multiple outstanding claims - allocate to specific reservations
- Enter the payment in the Banking Summary, then click Edit.
- Set the Amount you wish to allocate (typically the amount paid in).
- Select the booking in the list, and tick Allocate next to the booking.
- The Available balance reduces accordingly. Repeat for additional allocations, then click Save to create the invoice(s).

Scenario 6 – Multiple claims, including one overpayment (credit charge) and one underpayment (write off or claim)
- Enter the payment in the Banking Summary and click Edit.
- Set the Amount to allocate (typically equal to the amount paid in).
- Overpayment: in Charges, complete Payment with the claim’s amount and enter the Credit Charge. Available balance adjusts.
- Underpayment: in Charges, complete Payment with the underpaid amount and enter the Adjustment to write off the shortfall, or leave the shortfall to continue claiming.

Invoice report for your accounts system
- In the Reports module, select Invoice Report and choose the invoice date range.
- Click Preview or export to Excel (.xlsx).

- The report includes standard invoice fields generated by GRATIS and can be imported into your accounts system.
- The Accounts Agency Reference must be entered on each venue’s record in the Venue Details module to align with your accounts system.
- You can run the Invoice Report as often as needed to identify missing Accounts Agency References, add them in GRATIS, and re‑run the report.
- GRATIS also provides a Supplier Code for users who prefer to use it as their accounts reference.
- After exporting to Excel, you may add columns required by your accounting package. For example, in Sage:
- An initial column with “si” to denote Sales Invoice.
- A nominal code column (for example, 4000) populated for each line.
- Remove any columns not required by your import template before loading to your accounts system.
Was this article helpful?
That’s Great!
Thank you for your feedback
Sorry! We couldn't be helpful
Thank you for your feedback
Feedback sent
We appreciate your effort and will try to fix the article